Dashboard
 Dashboard

Talk-to-Tasks Quick Guides

Short, simple walkthroughs showing exactly how each part of Talk-to-Tasks works, so you can learn it fast, test it instantly, and decide what fits your workflow.

These guides give you the essentials only:
(1) No long videos, no deep dives, and no overwhelm.
(2) Each flow comes with a short explainer and a step-by-step video so you can see how it works in under a minute.

Here are the Guides you should include:

Before you get started, please open your Slack settings using the link: Click Here
This will ensure everything connects smoothly. Once you’re in, follow the steps to complete your setup.

Registration

Welcome to the Talk-to-Tasks Registration Setup Guide. This guide walks you through the steps to enter your information, select your preferred payment plan, and complete the registration process.

1 Registration Form

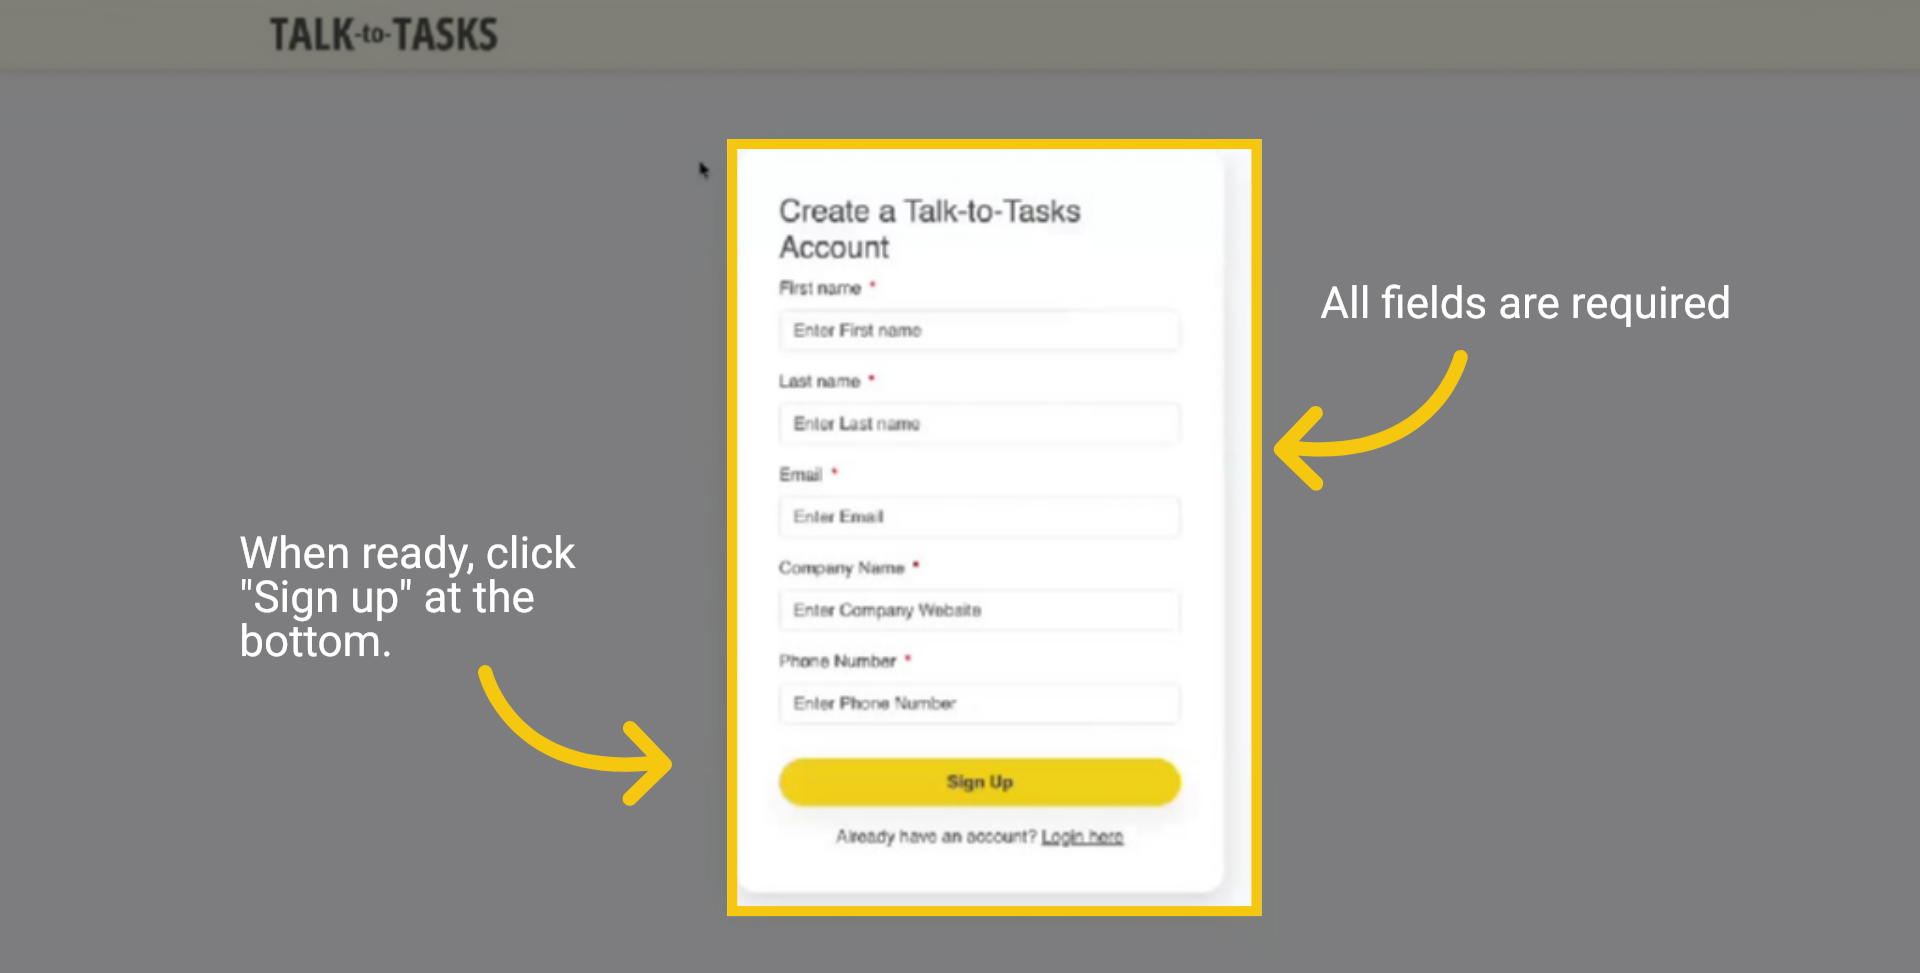
To complete the Talk-to-Tasks Registration Form, please ensure all fields are filled in. This step is crucial, as the fields contain important information for your registration. When you're ready, click "Sign up" at the bottom.
Registration Form

2 One-time Password Sent

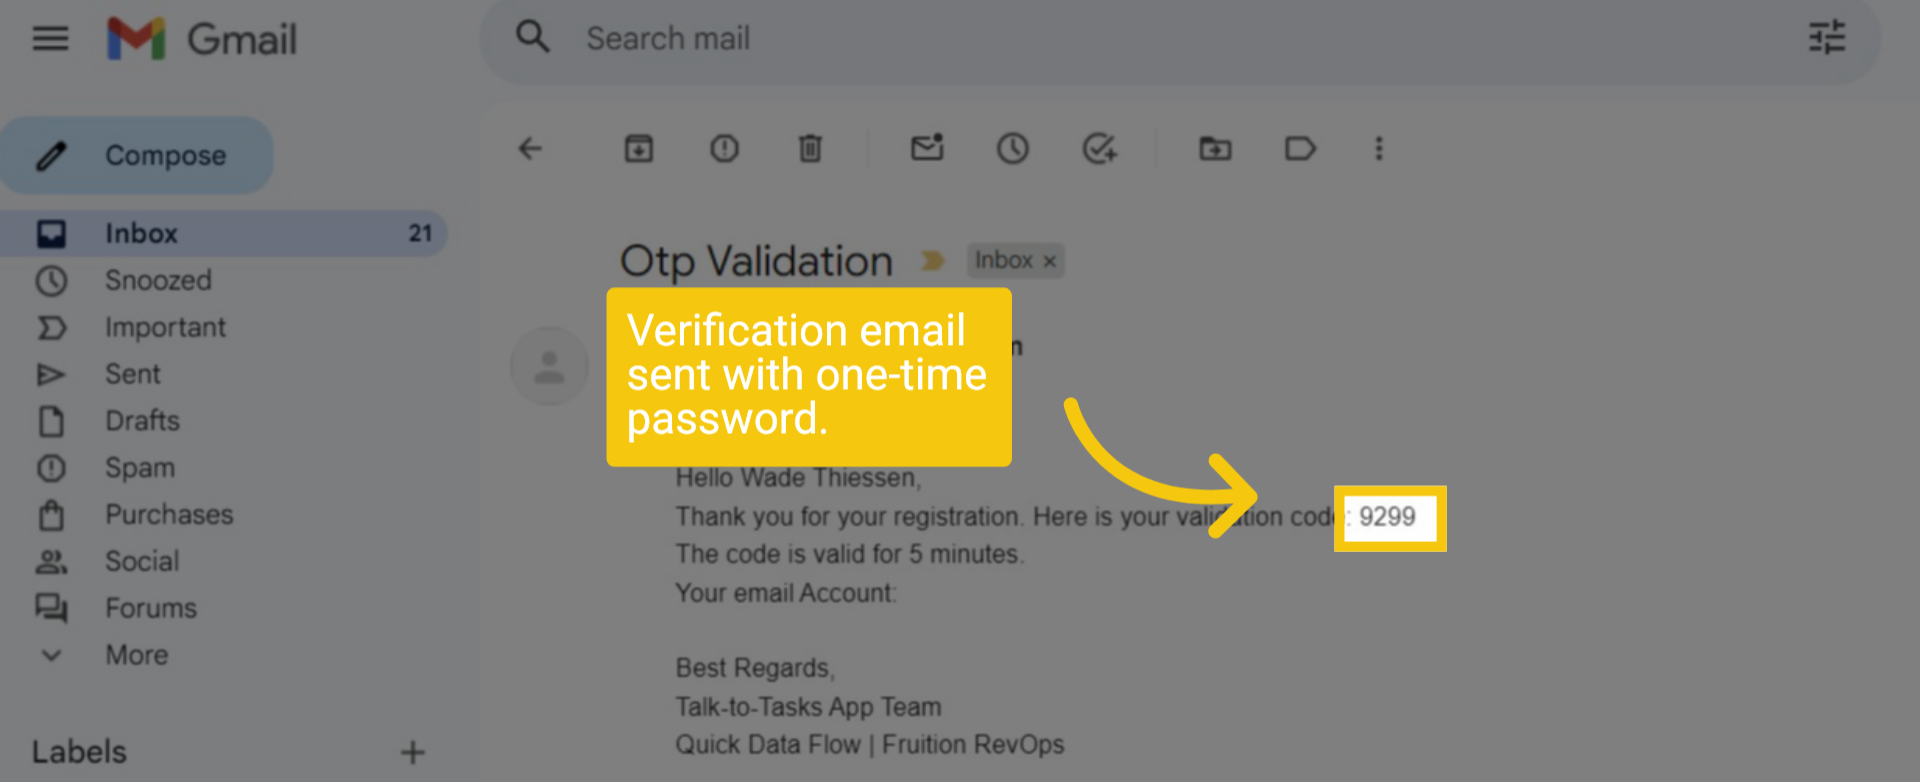
A verification email has been successfully sent to your registered email address, containing a secure one-time password. This password is required to complete your authentication and ensure your account remains protected.
One-time Password Sent

3 Enter One-time Password

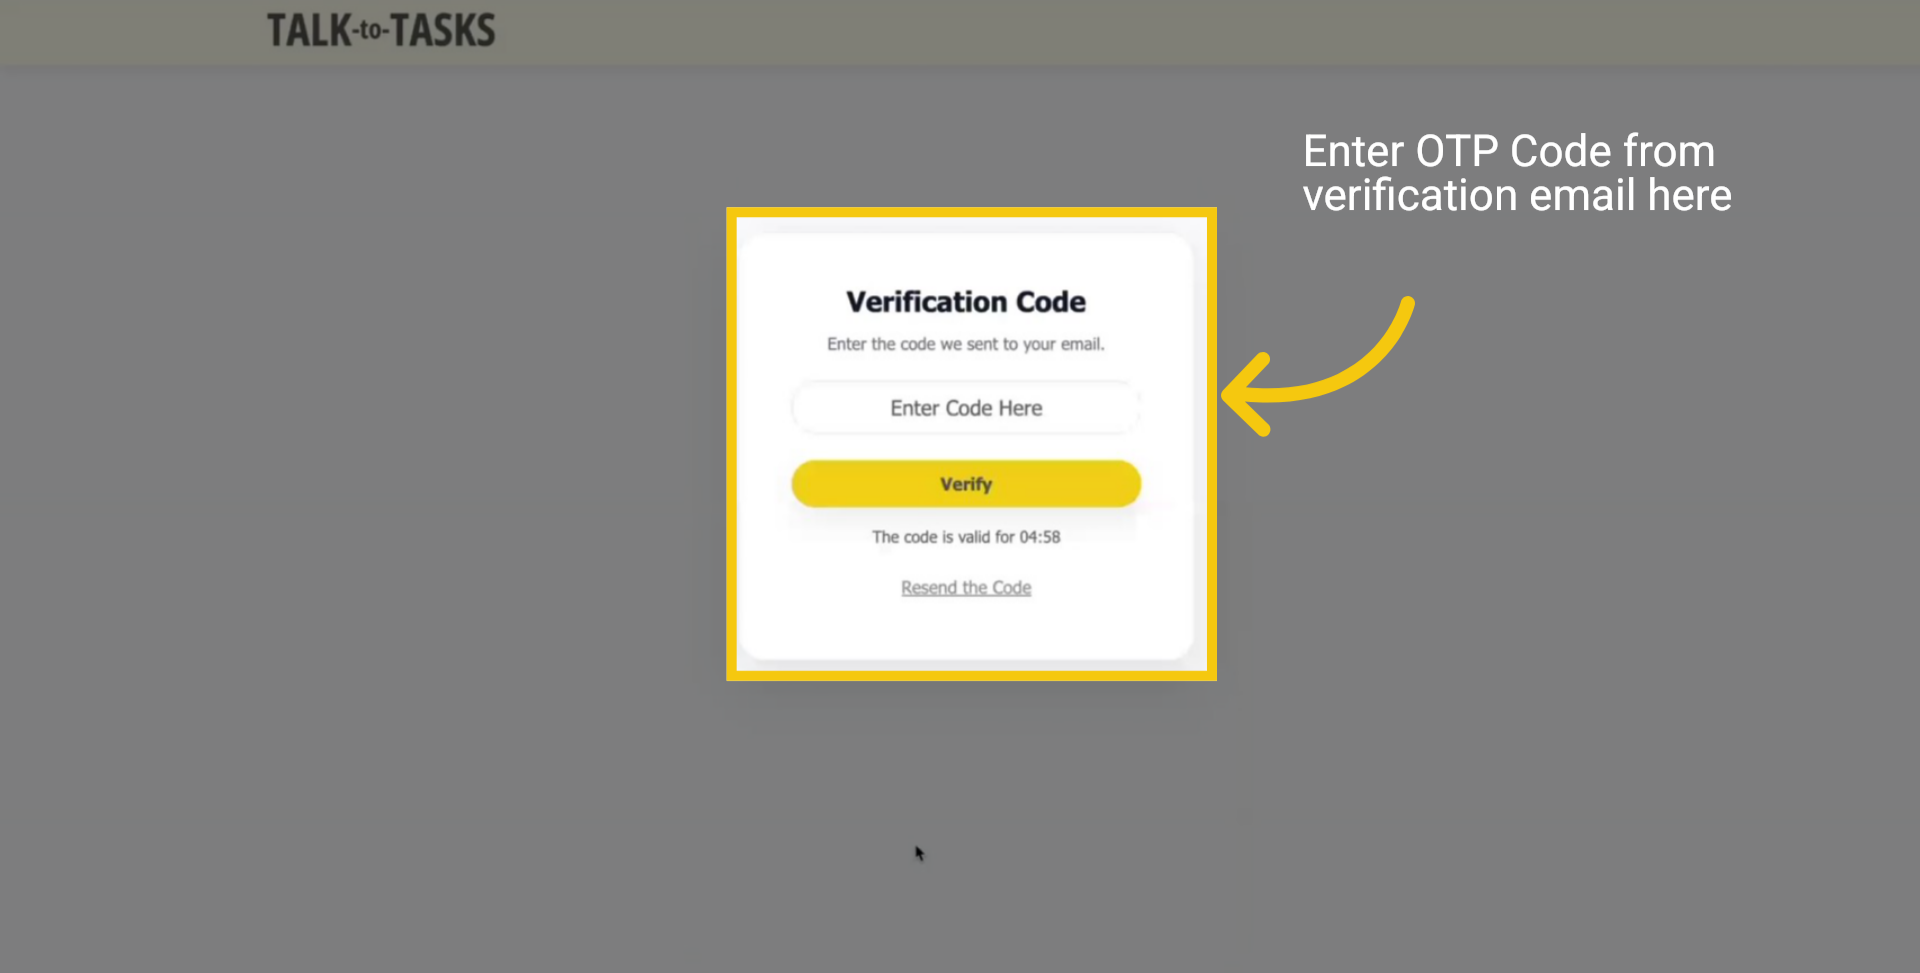
Return to the Talk-to-Tasks Verification Page and enter your one-time password (OTP) to continue to the next step of the setup process.
Enter One-time Password

4 Account Details

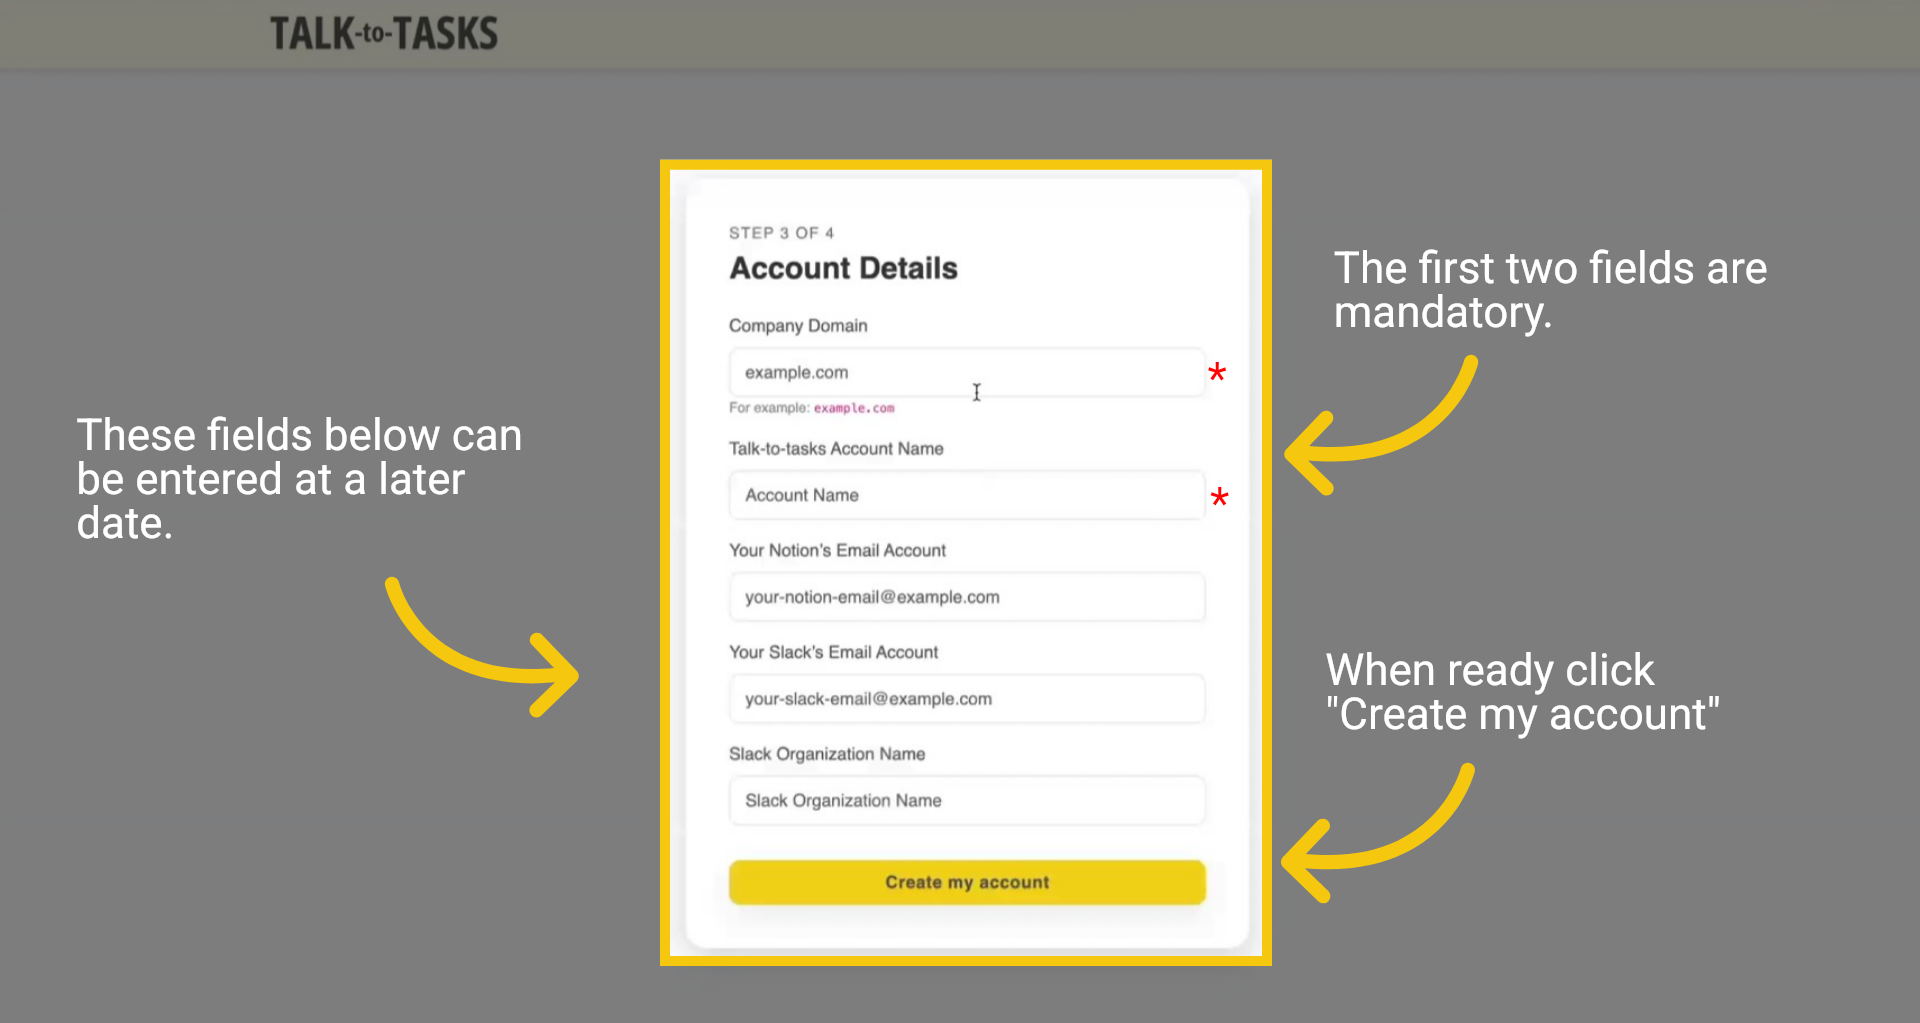
To proceed with the registration process, please fill in your account details in the fields provided. Note that the first two fields are mandatory. If you do not intend to use the Slack or Notion integrations at this time, you may skip those fields and complete them later at your convenience. Once you've finished, simply click the "Create my account" button to finalize your Account Details.
Account Details

5 Complete your subscription

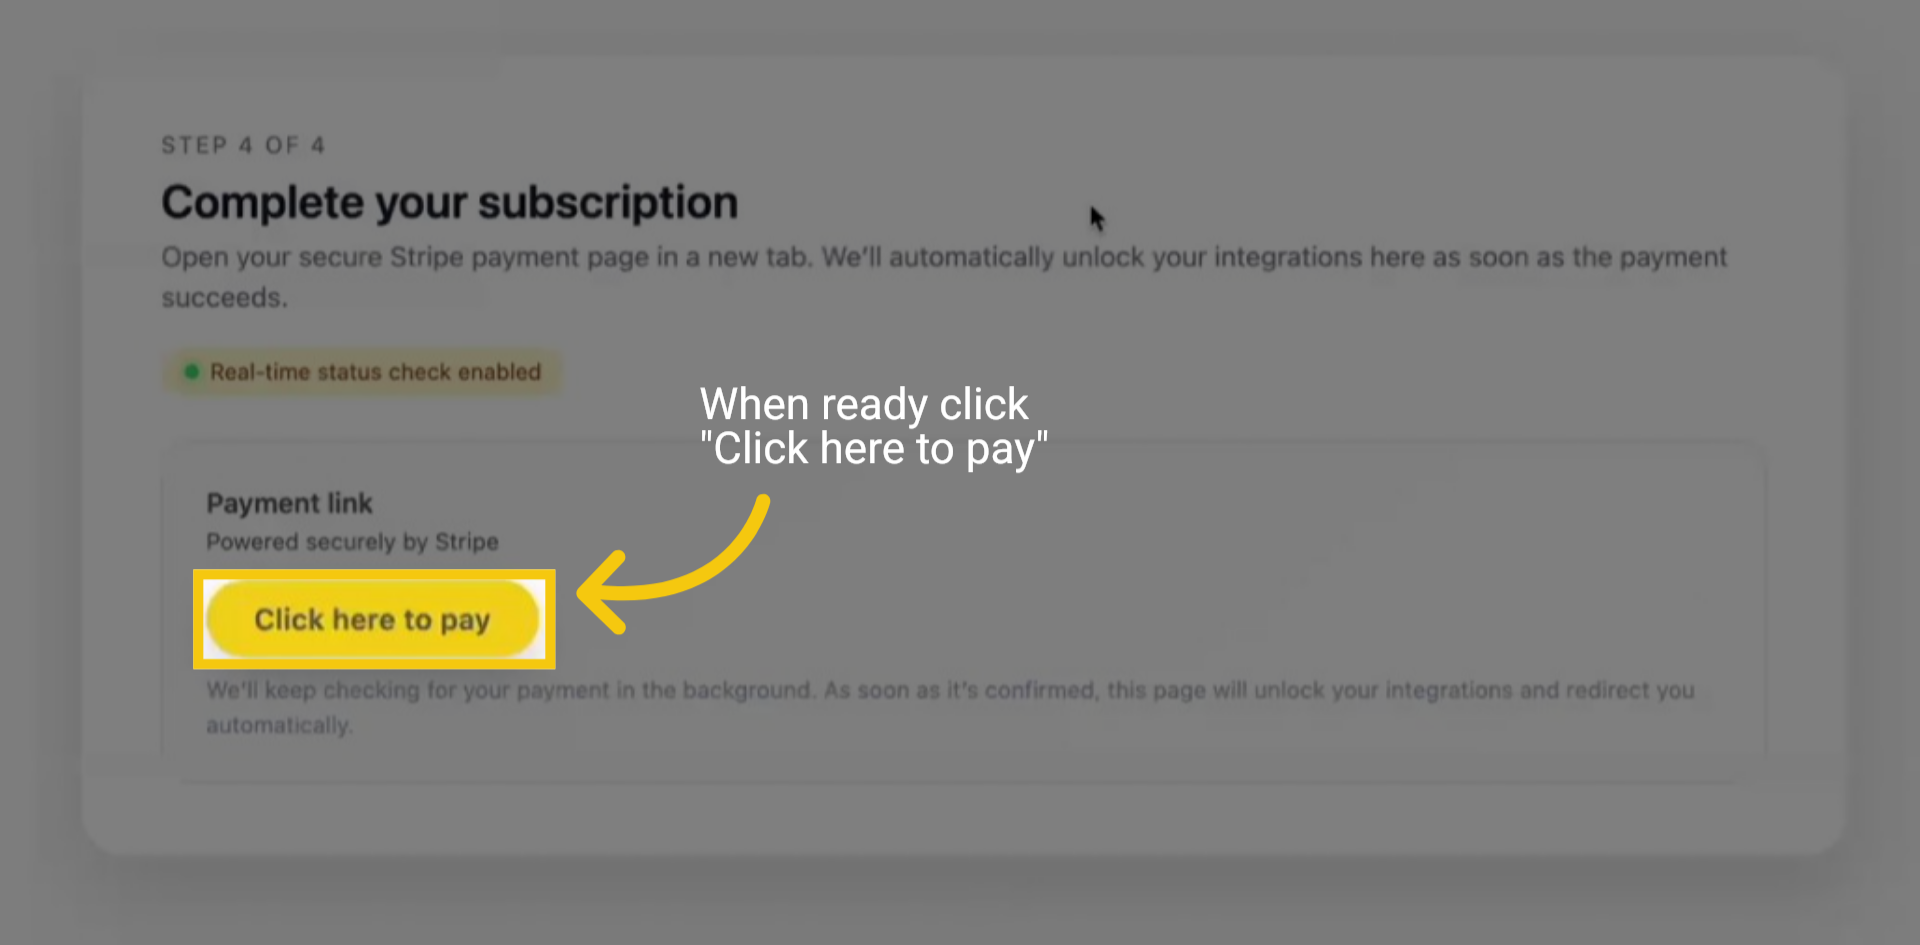
Your account has been successfully created. Click here to proceed to the payment page. This will guide you through entering your billing information to activate your free trial. Once you've provided your payment details, your account setup will be complete, granting you full access to Talk-to-Tasks.
Complete your subscription

6 Start 7 day free Trial

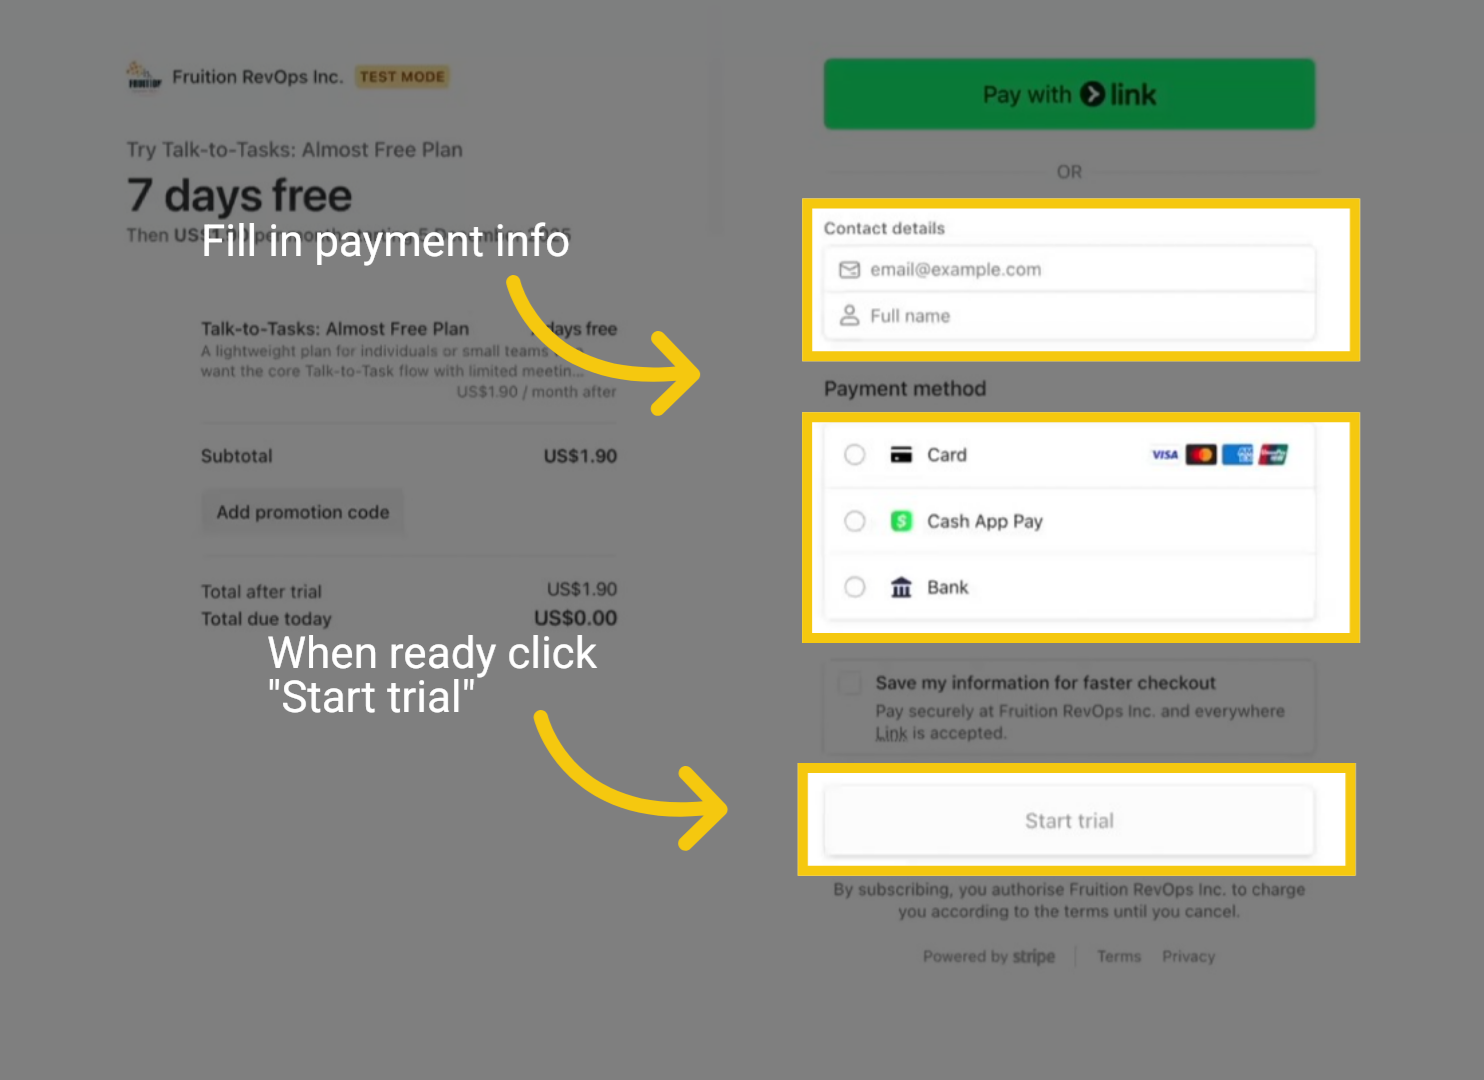
Enter your payment details and click "Start Trial" at the bottom of the page. This will start your seven-day free trial, giving you full access to explore and use the platform before thefirst payment is processed.
Start 7 day free Trial

7 Integration Page

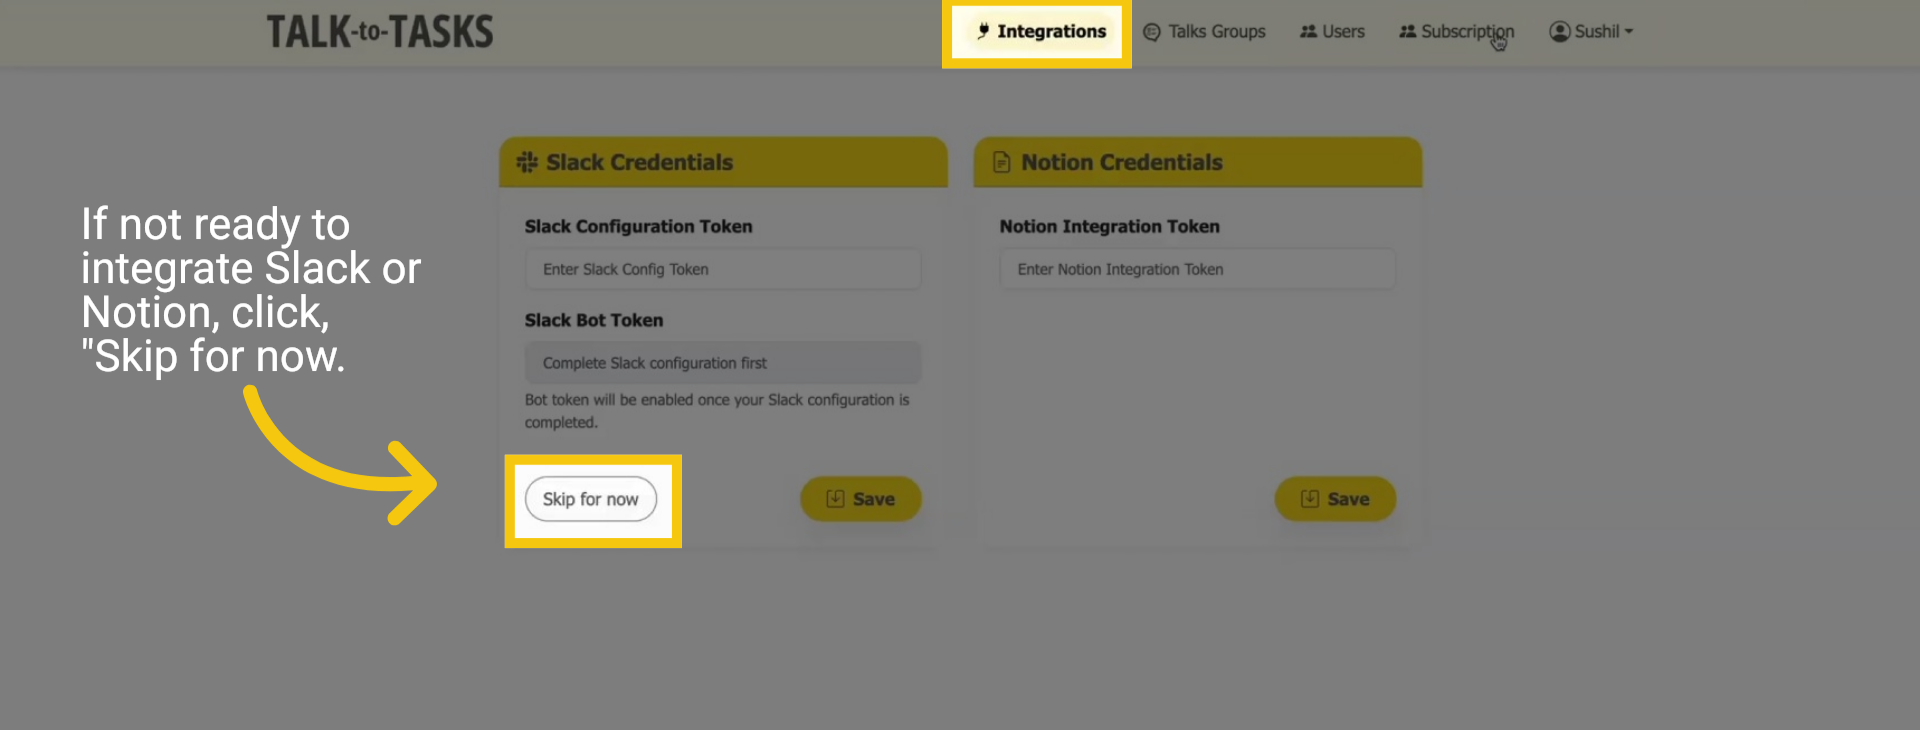
You will now be taken to the integration page. If you're not prepared to connect with Notion or Slack, click "Skip for Now" to proceed and revisit this step at your convenience later.
Integration Page
Thank you for taking the time to register with Talk-to-Tasks! We sincerely hope you enjoy exploring and making the most of all the features our platform has to offer. Should you require any assistance or have any questions, please do not hesitate to contact our dedicated support team at support@staging-fruition-revops.webdevsunita.com. We are here to help ensure you have a smooth and enjoyable experience while using our services.

Before you get started, please open your Slack settings using the link: Click Here
This will ensure everything connects smoothly. Once you’re in, follow the steps to complete your setup.

How to Create a Talk Group

Welcome to Talk-to-Tasks. In this guide, you will learn how to create a Talk Group to get ready to add Talks and start generating tasks directly from your meeting files. Let's get started.

1 Add Talk Group

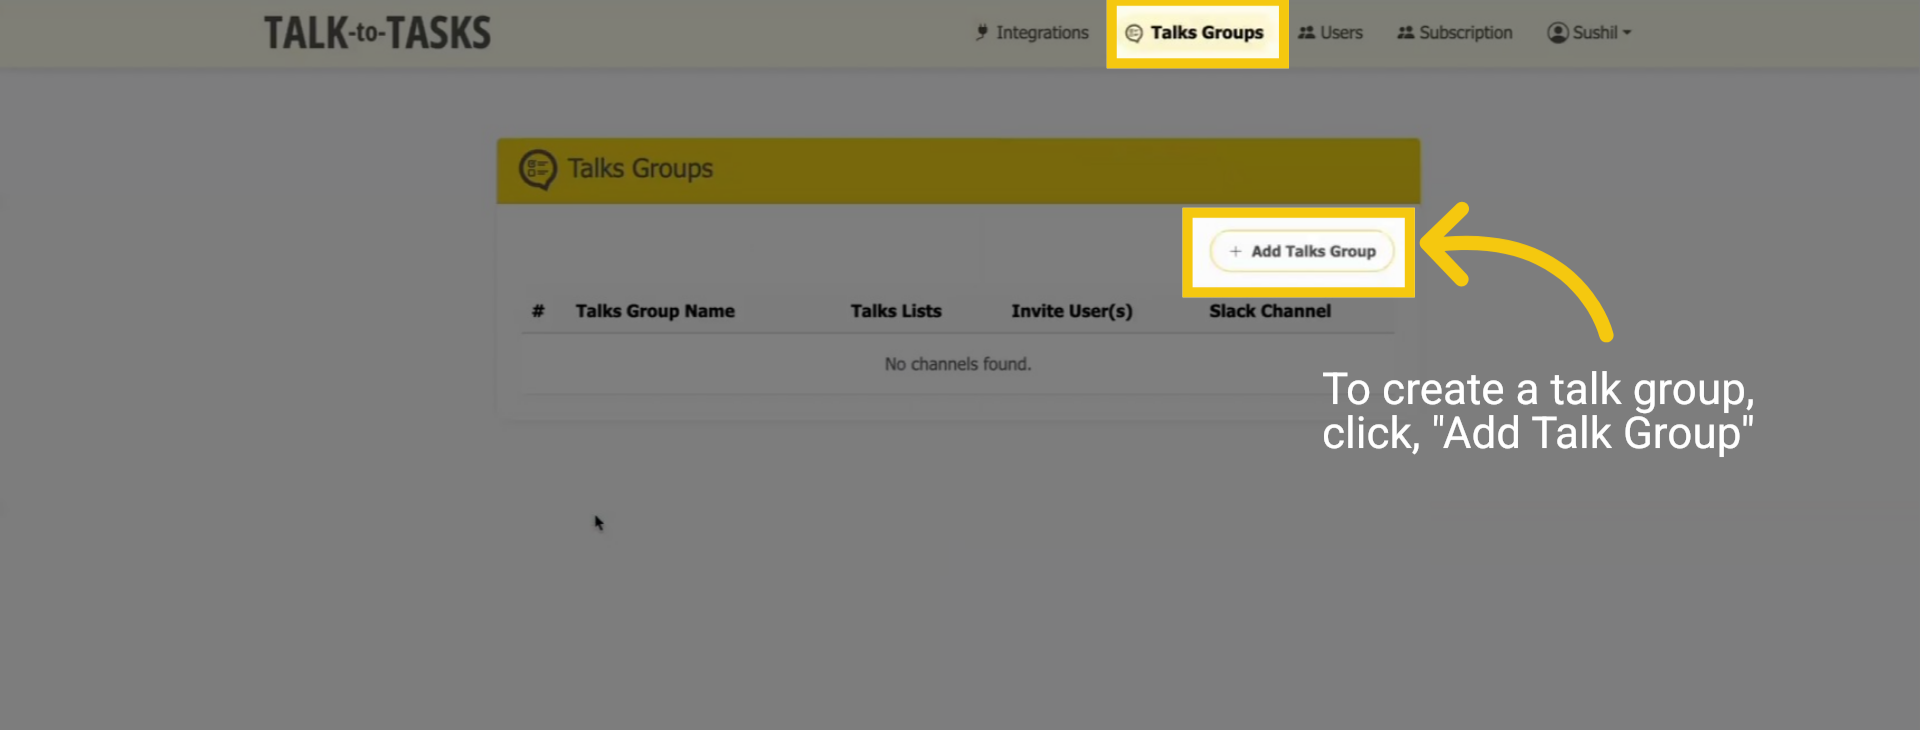
Click the "Talk Groups" menu item located at the top of the Talk Group page. Then, select "Add Talk Group."
Add Talk Group

2 Add Talk Group

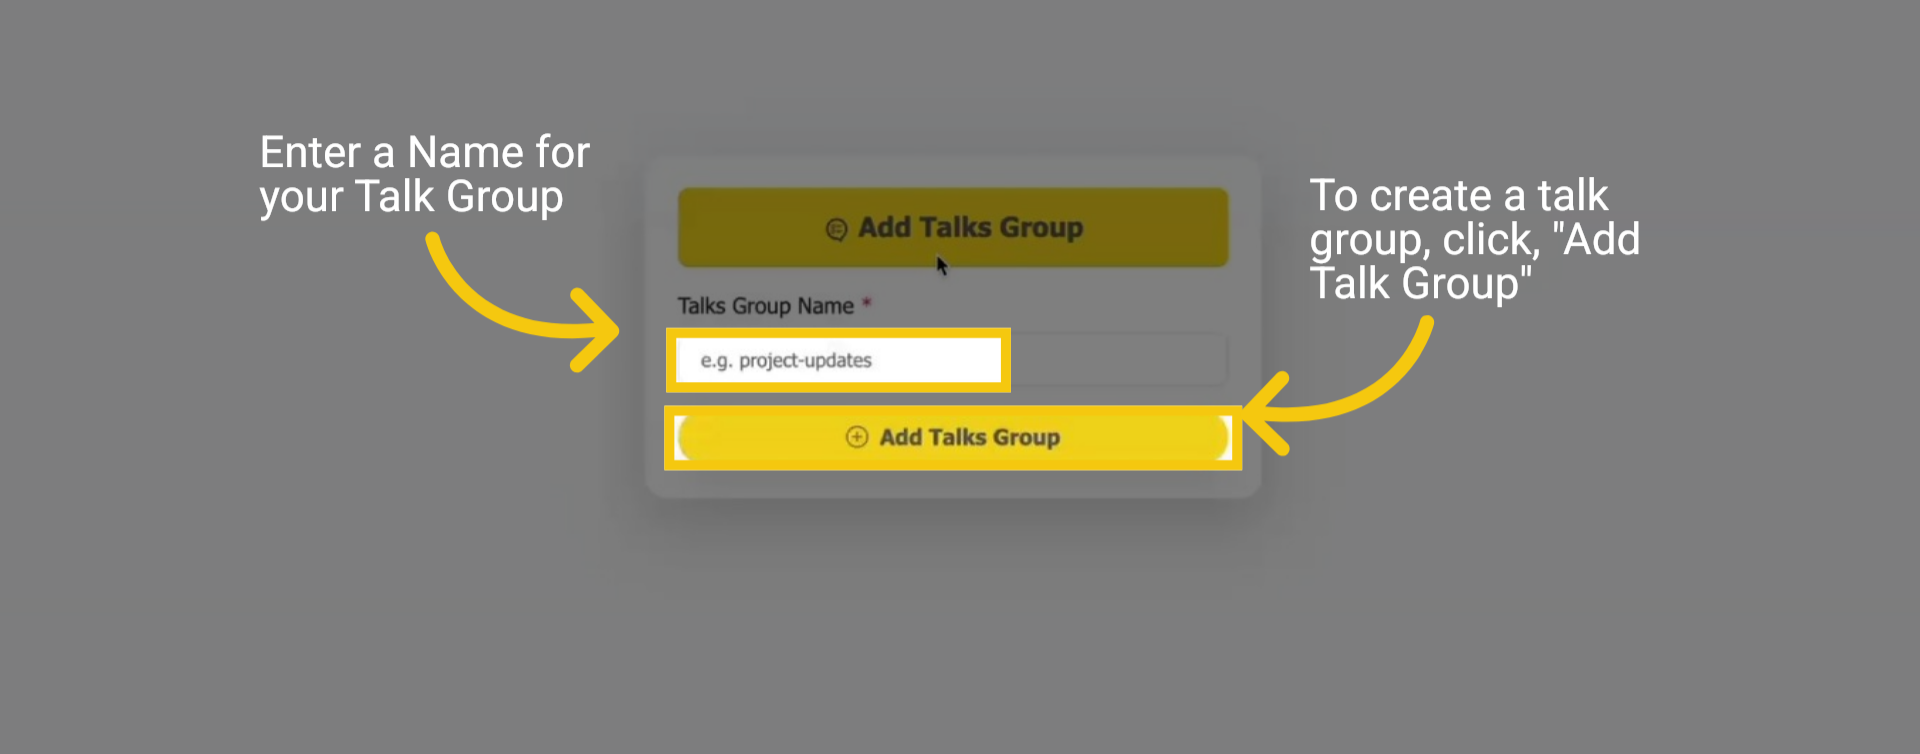
Enter a name for your new Talk Group. Click "Add Talk Group."
Add Talk Group

3 View Talks

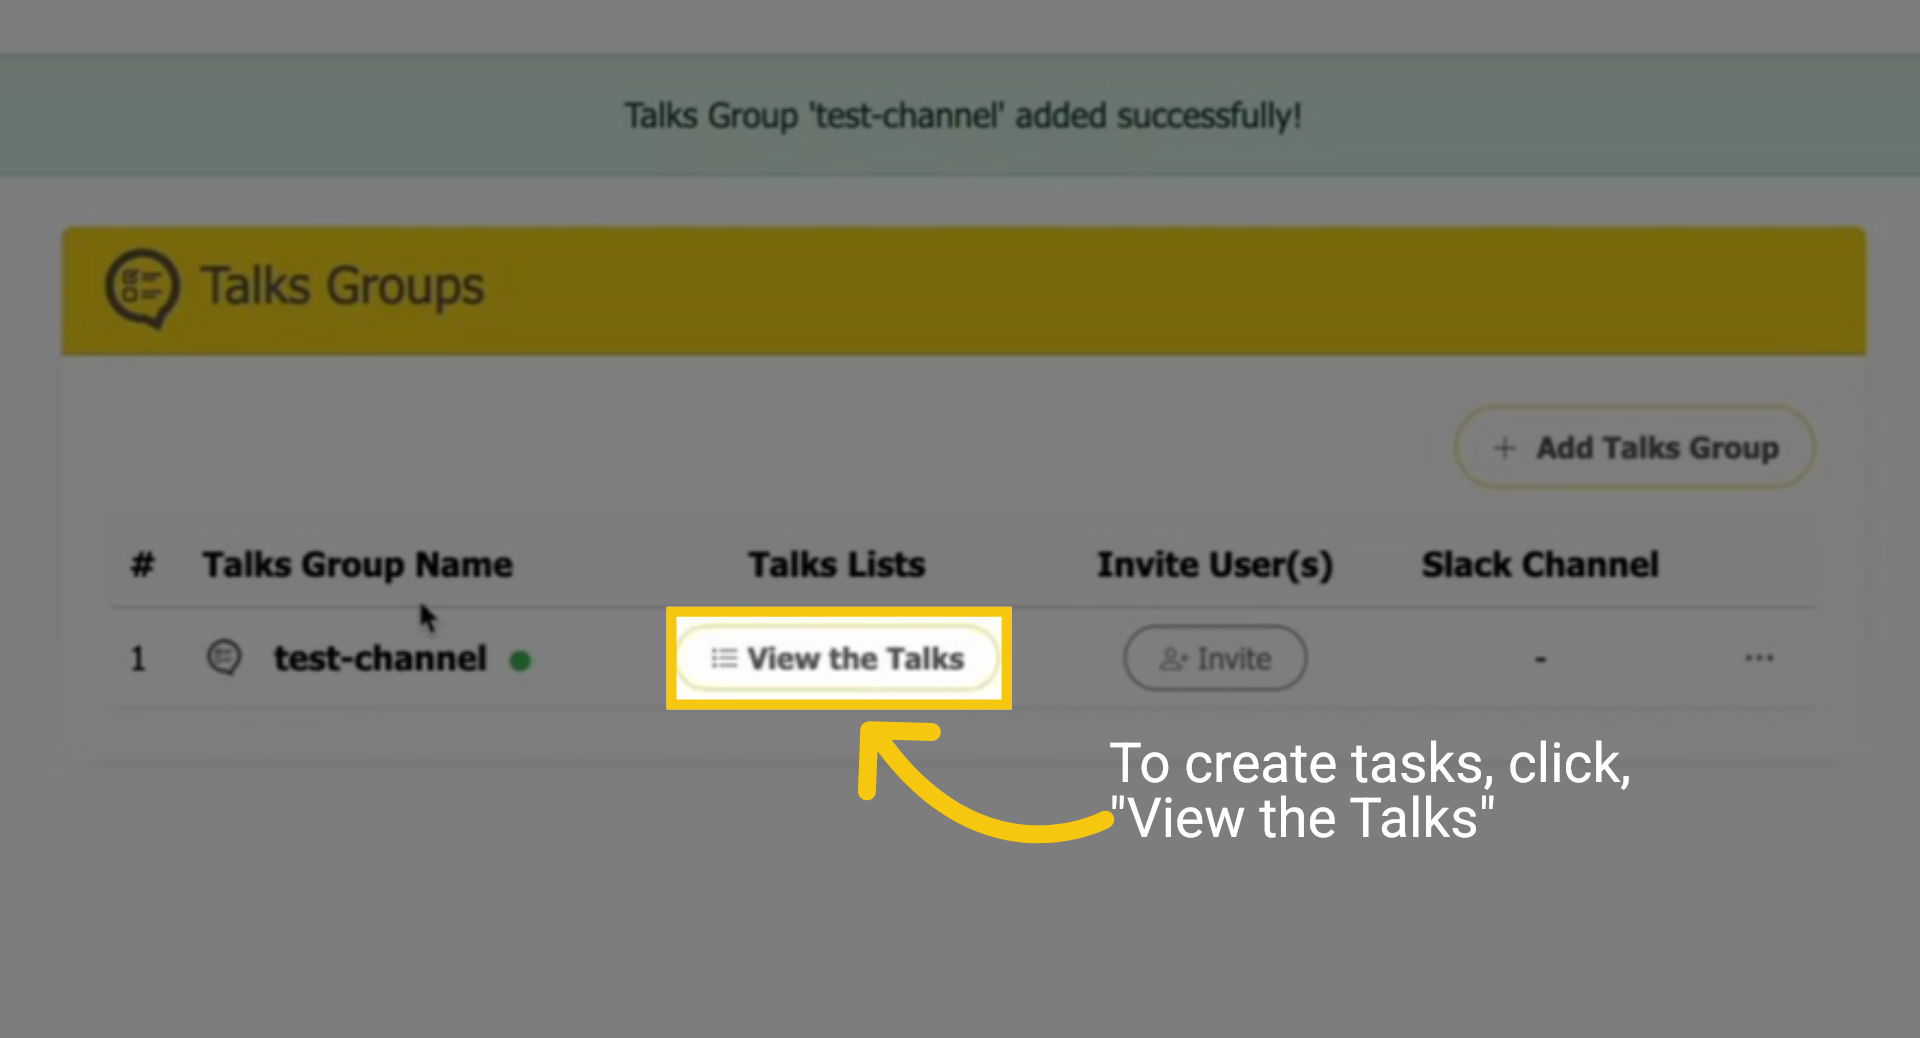
Your Talk Group has been successfully created. Click "View the Talks" to start adding your files or links, which will be used to generate tasks within the group.
View Talks

4 Thank you

This guide outlines the process for creating and naming a Talk Group, a collaboration space. Thanks for watching.
Thank you

Before you get started, please open your Slack settings using the link: Click Here
This will ensure everything connects smoothly. Once you’re in, follow the steps to complete your setup.

How-to Invite and Manage Users

In this guide, you will learn how to invite users to Groups or Channels and manage user permissions.

1 Invite Users to Group or Channel

To invite users, click the invite button next to the channel or group you wish to add them to.
Invite Users to Group or Channel

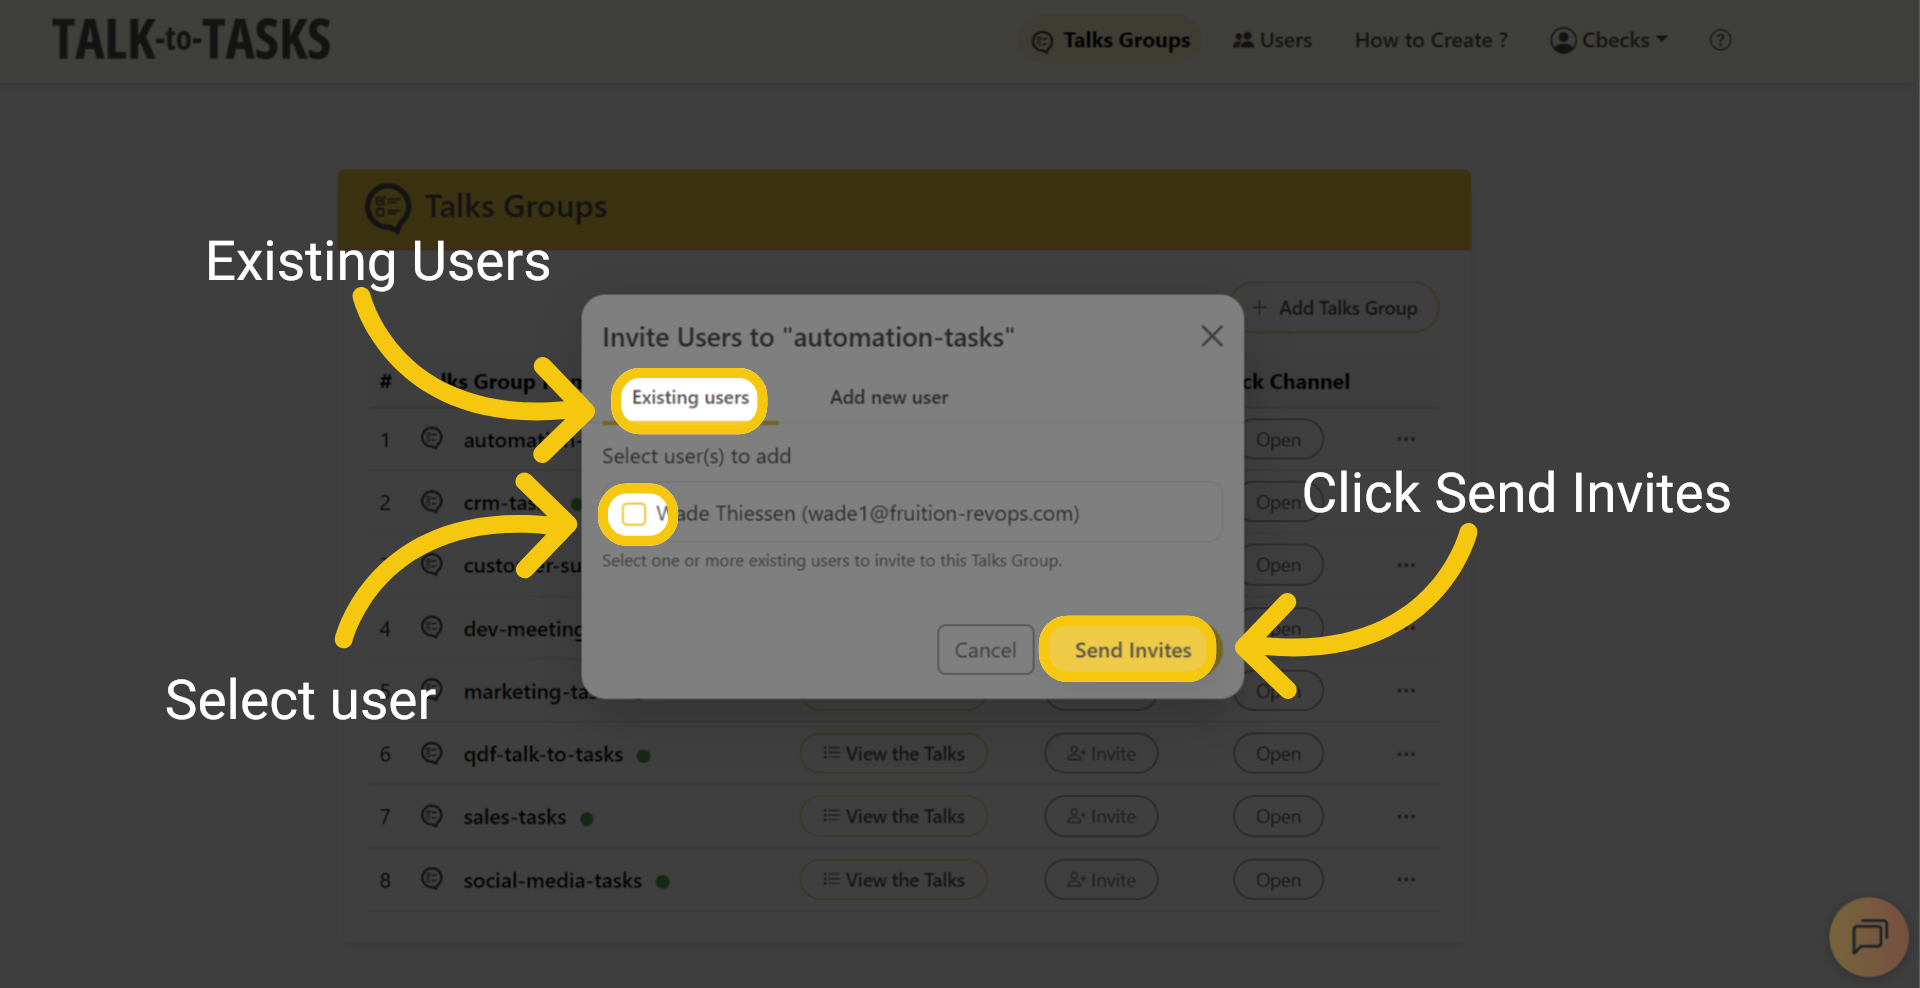
2 Existing Users

You can choose the user you would like to grant group access to, then click Send Invite.
Existing Users

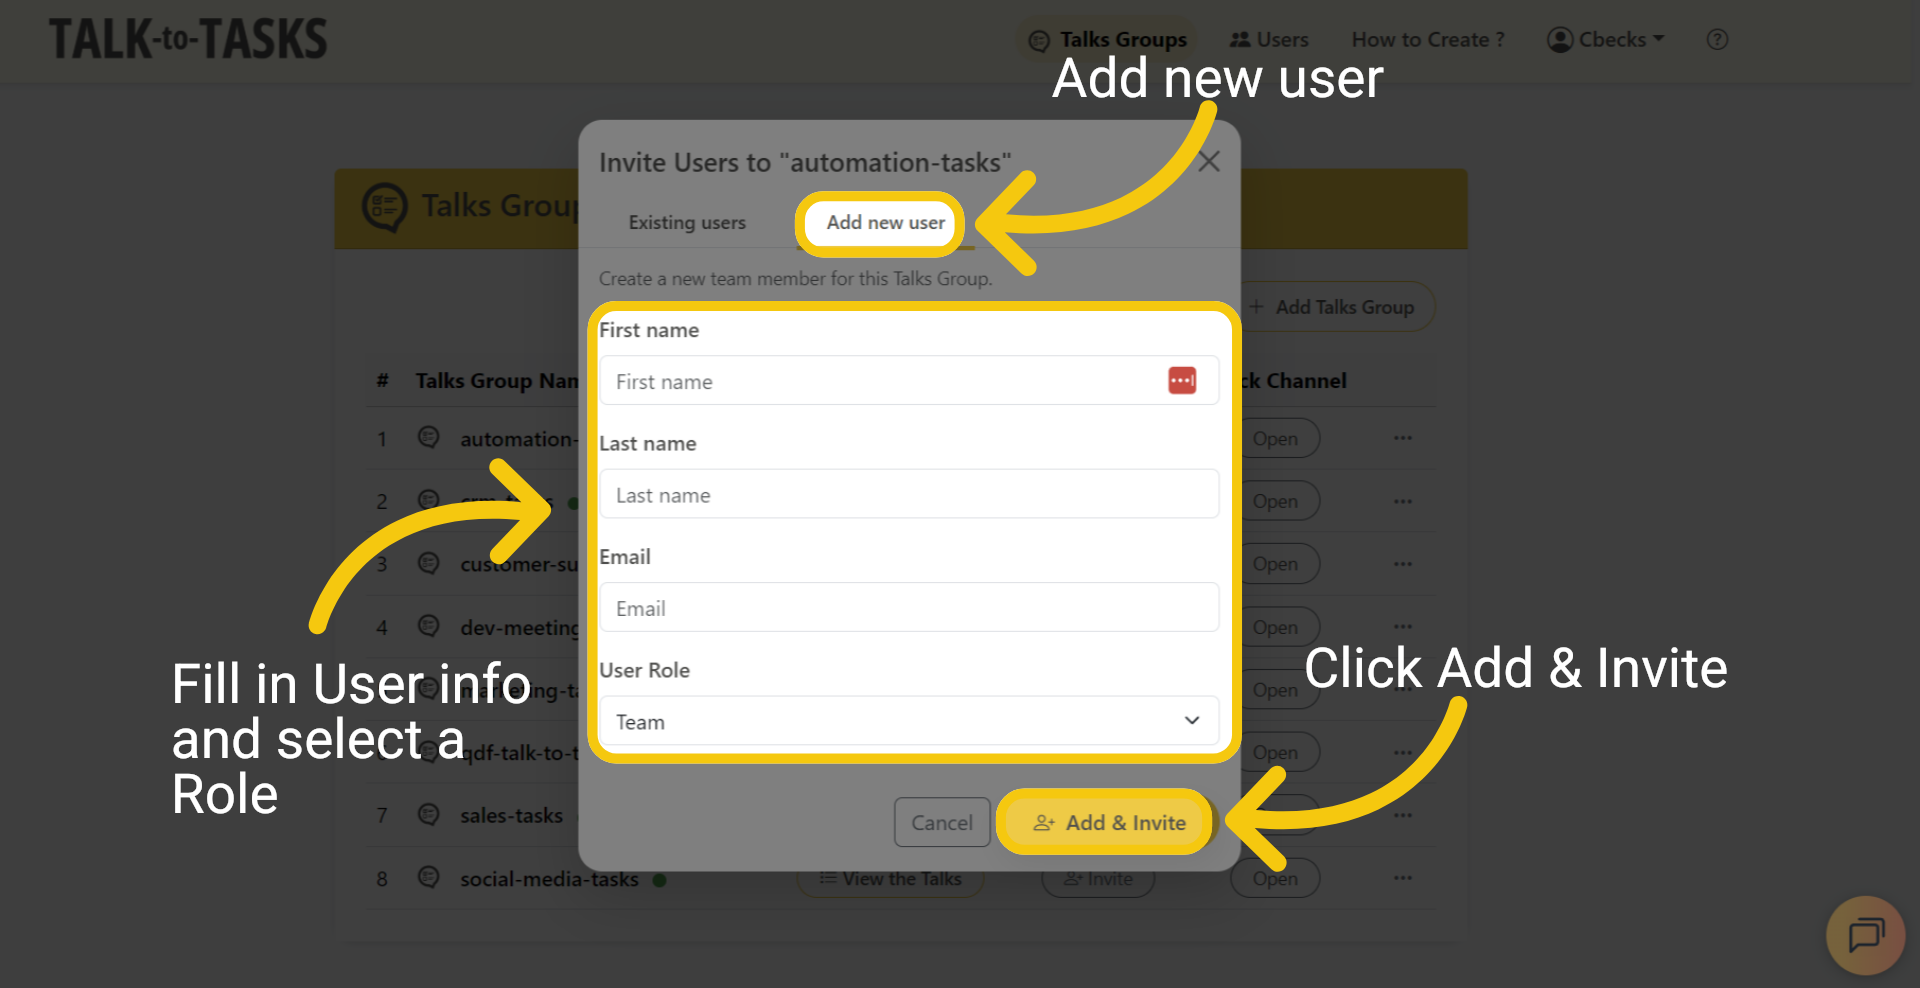
3 Existing Users

Enter the user information, select a role, and then click Add and Invite.
Existing Users

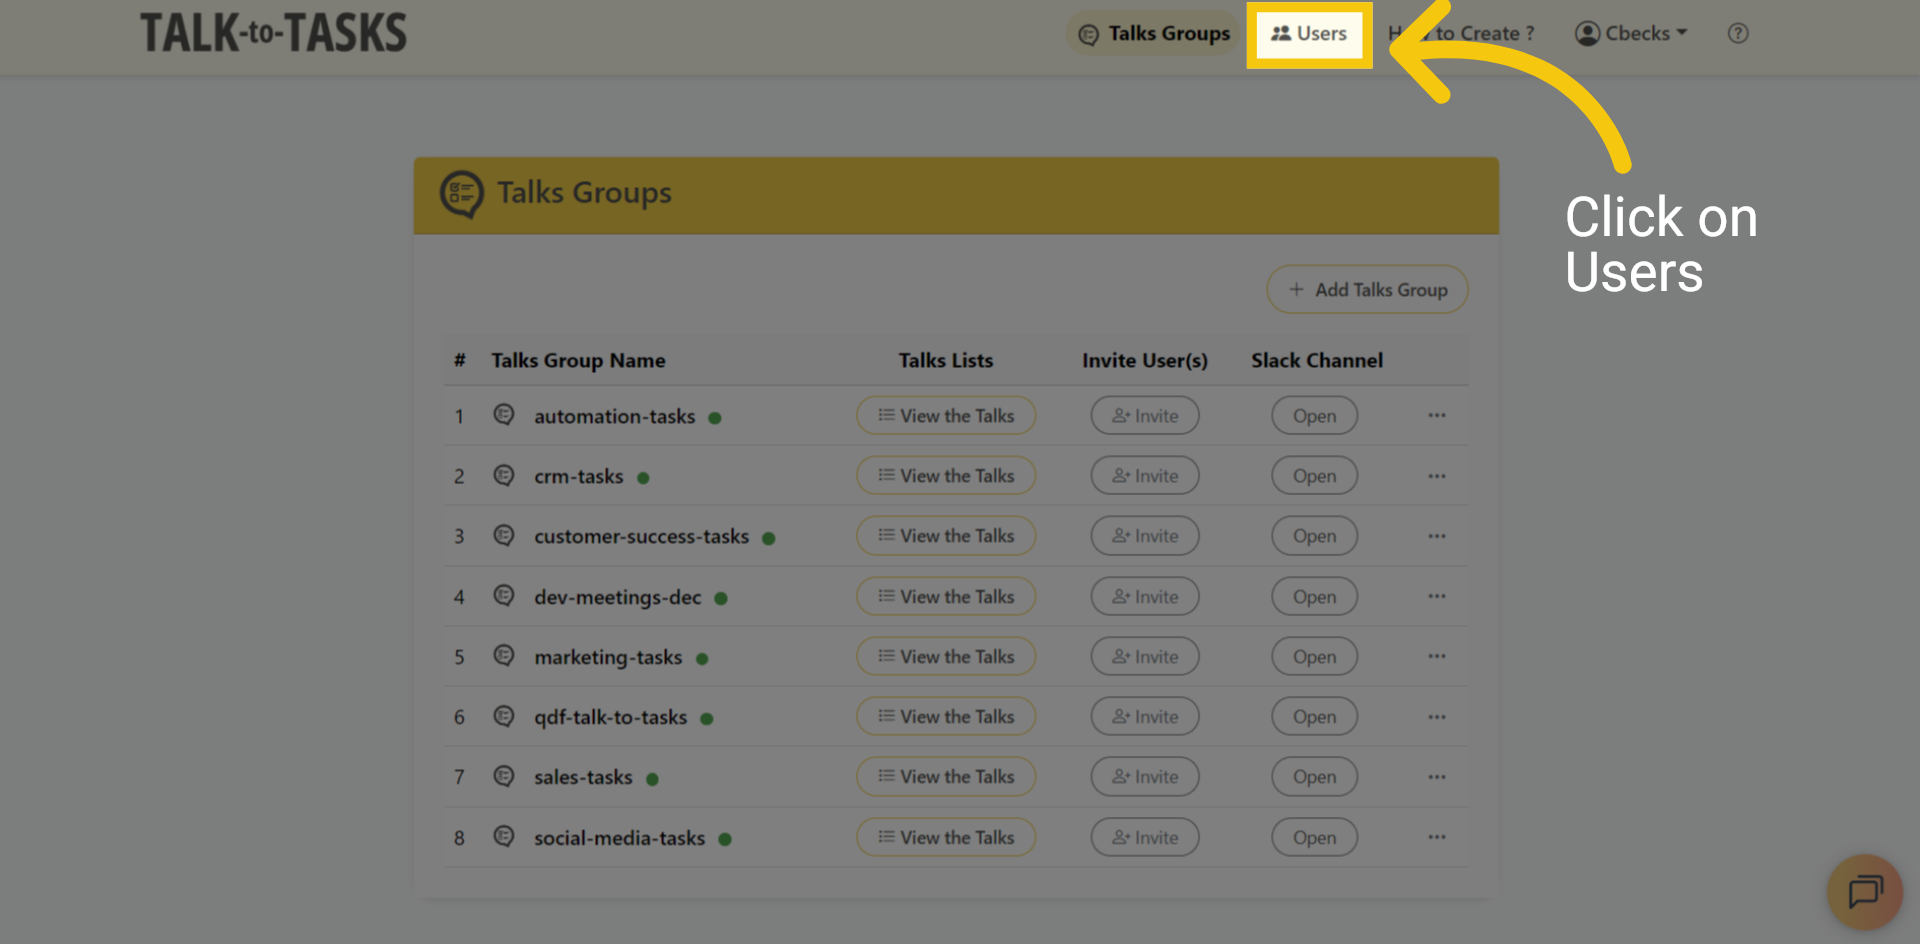
4 Manage Users

To manage your users, go to the Users menu at the top of the page.
Manage Users

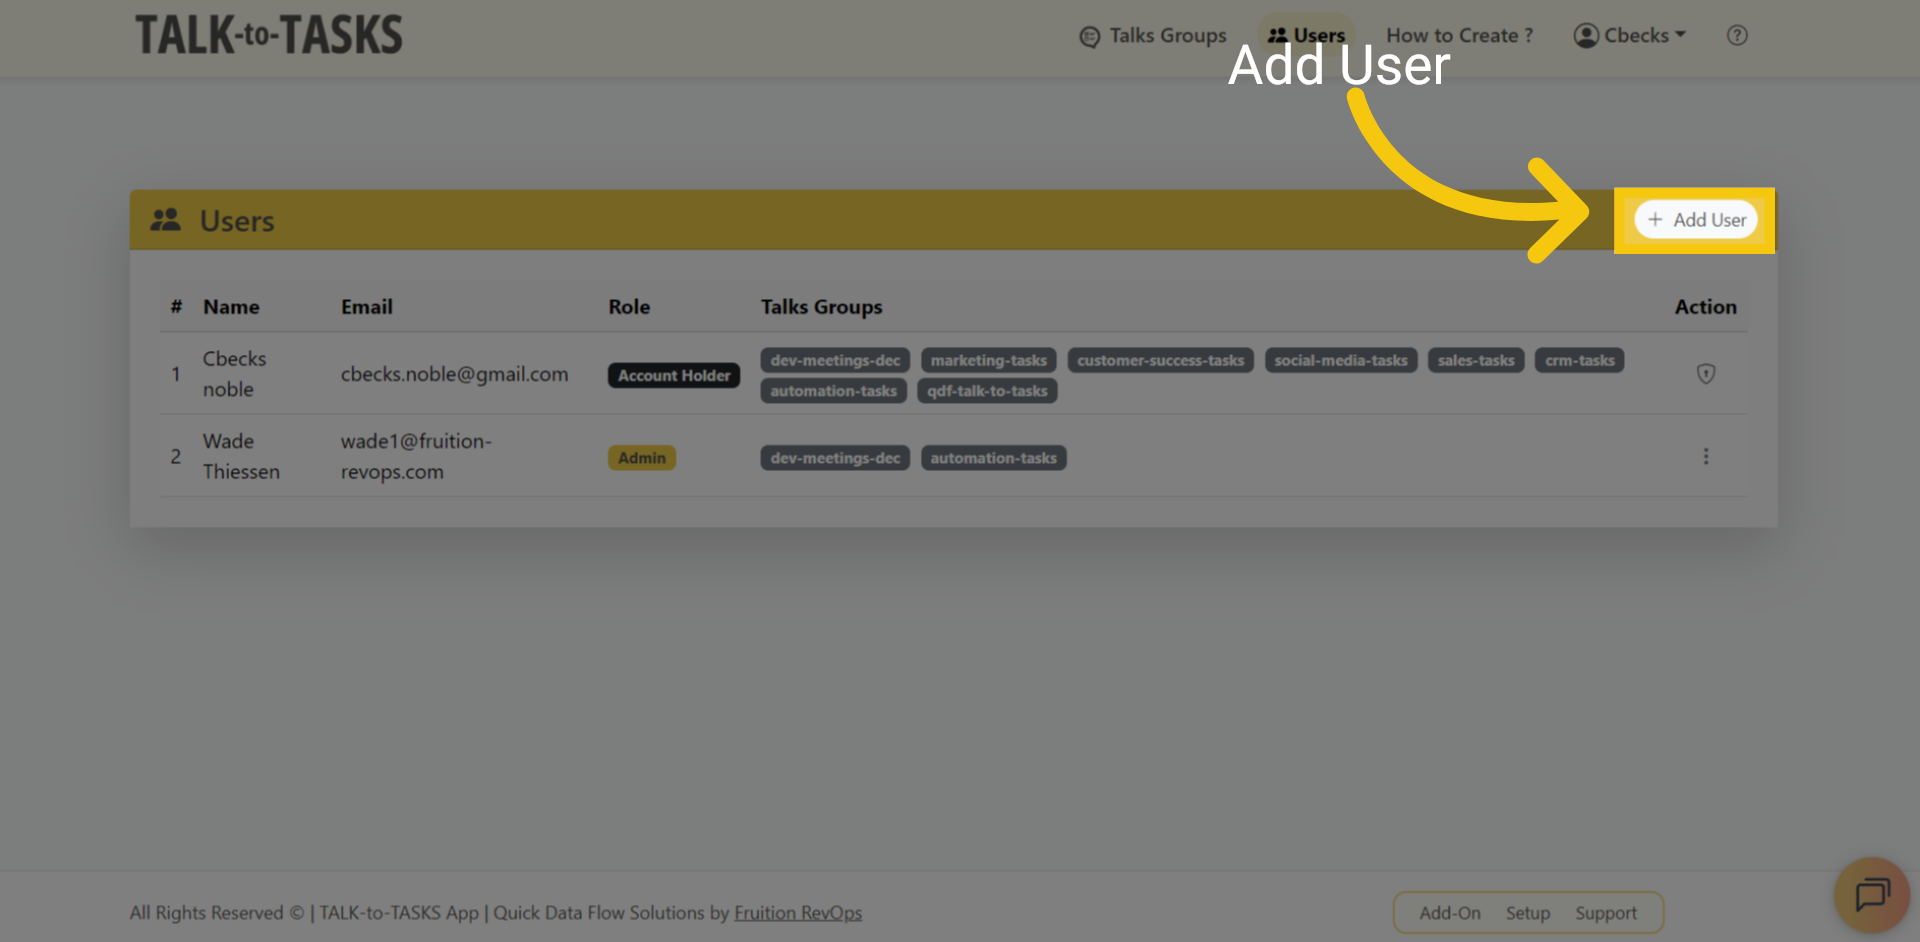
5 Add Users

Click "Add User" to create a new user.
Add Users

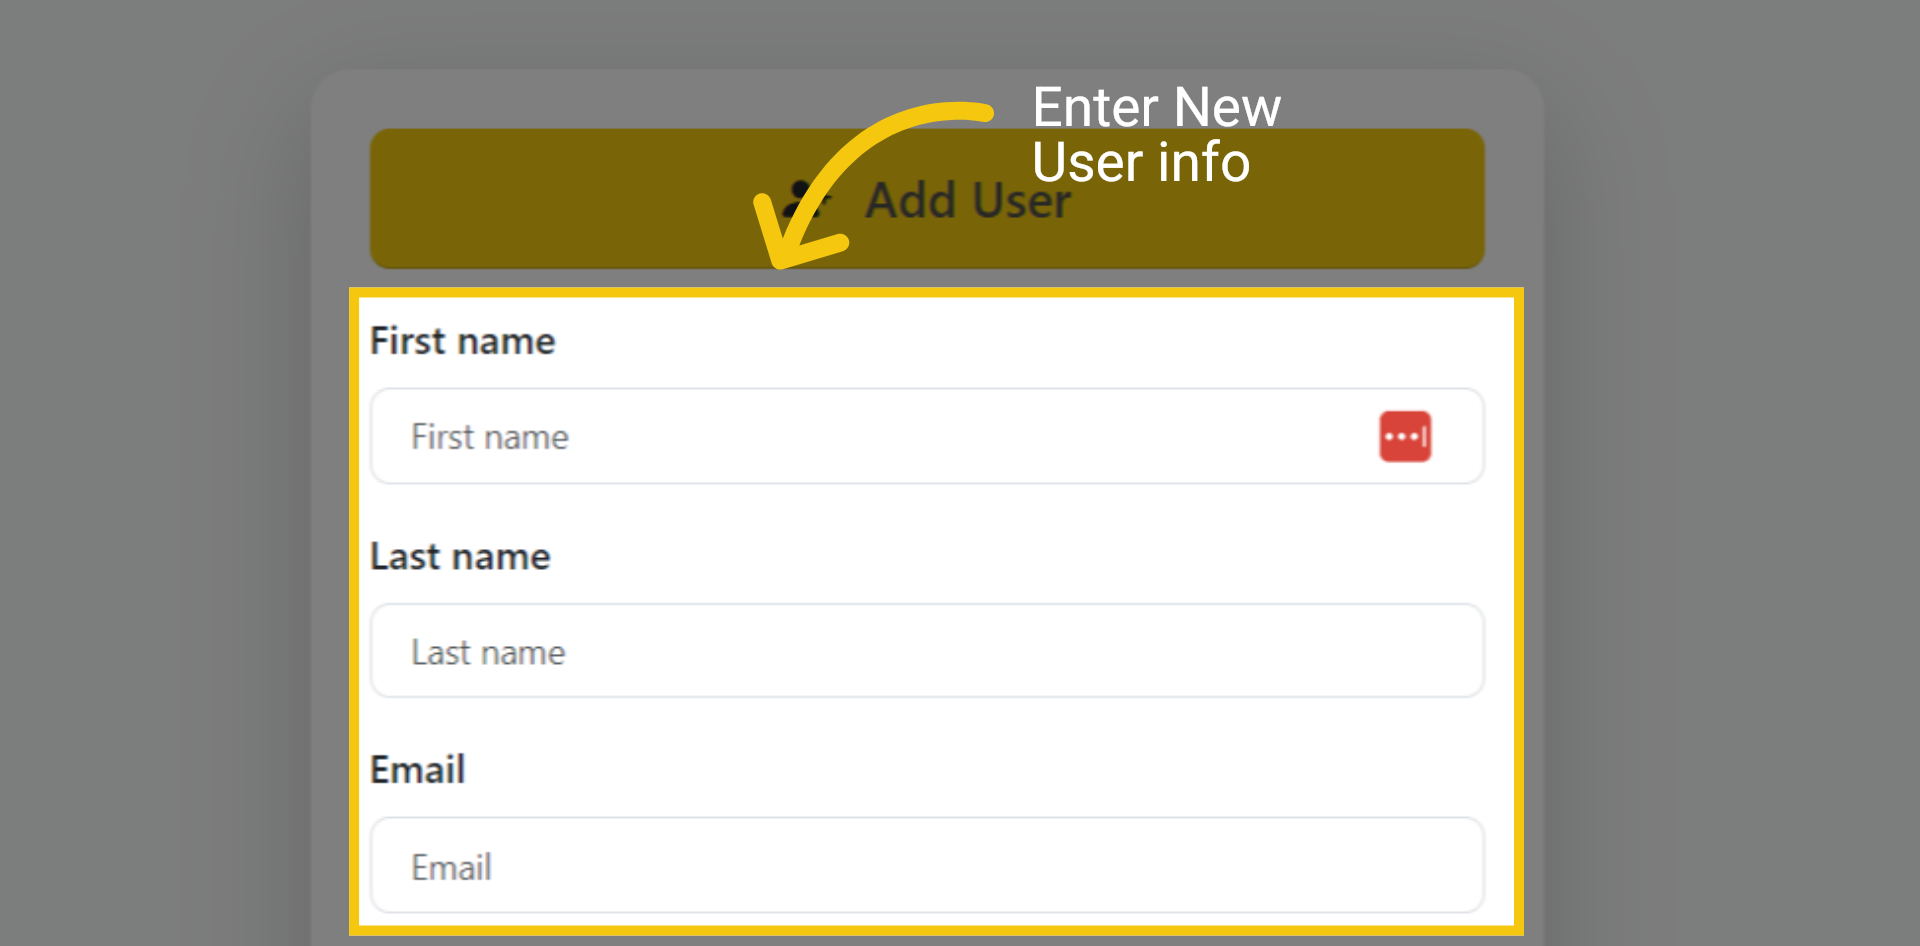
6 User Info

Please enter the new user's information, including their first name, last name, and email address.
User Info

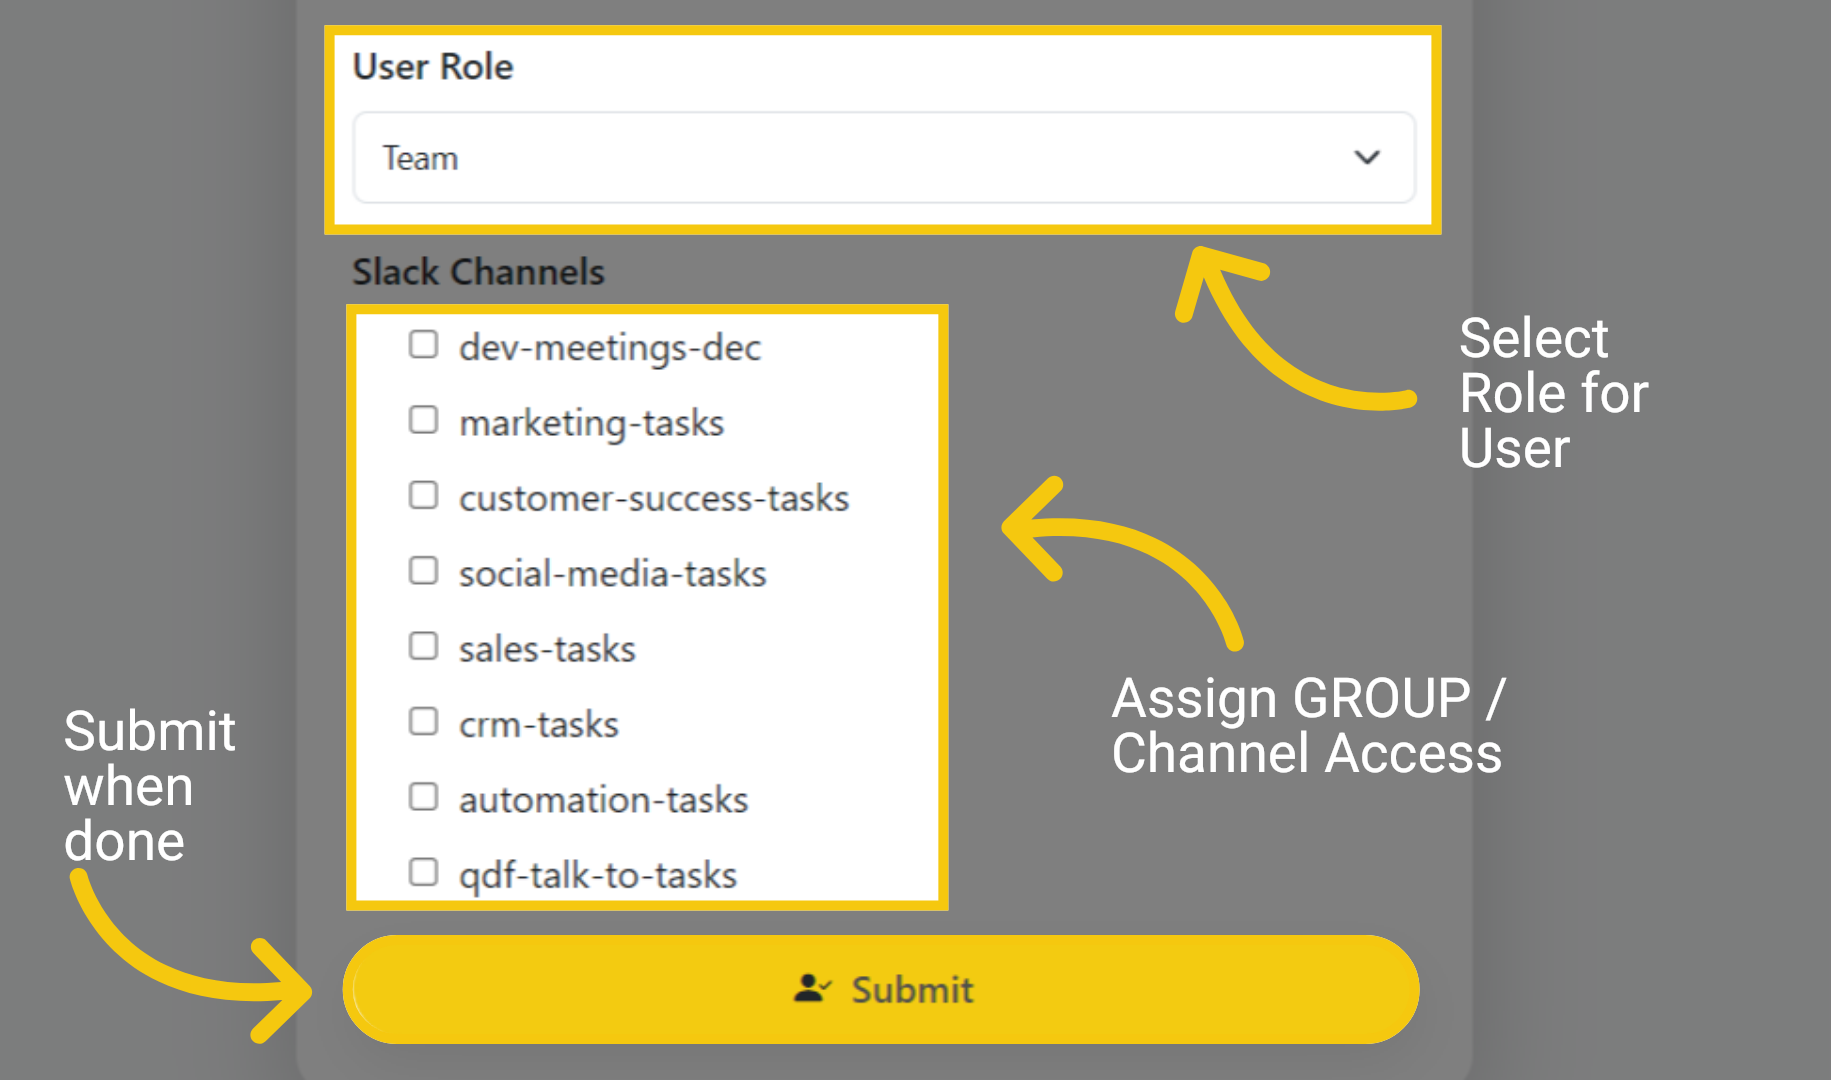
7 Group and Role Access

Select a user role and assign the Slack channels or talk groups they will have access to. Click Submit when done.
Group and Role Access

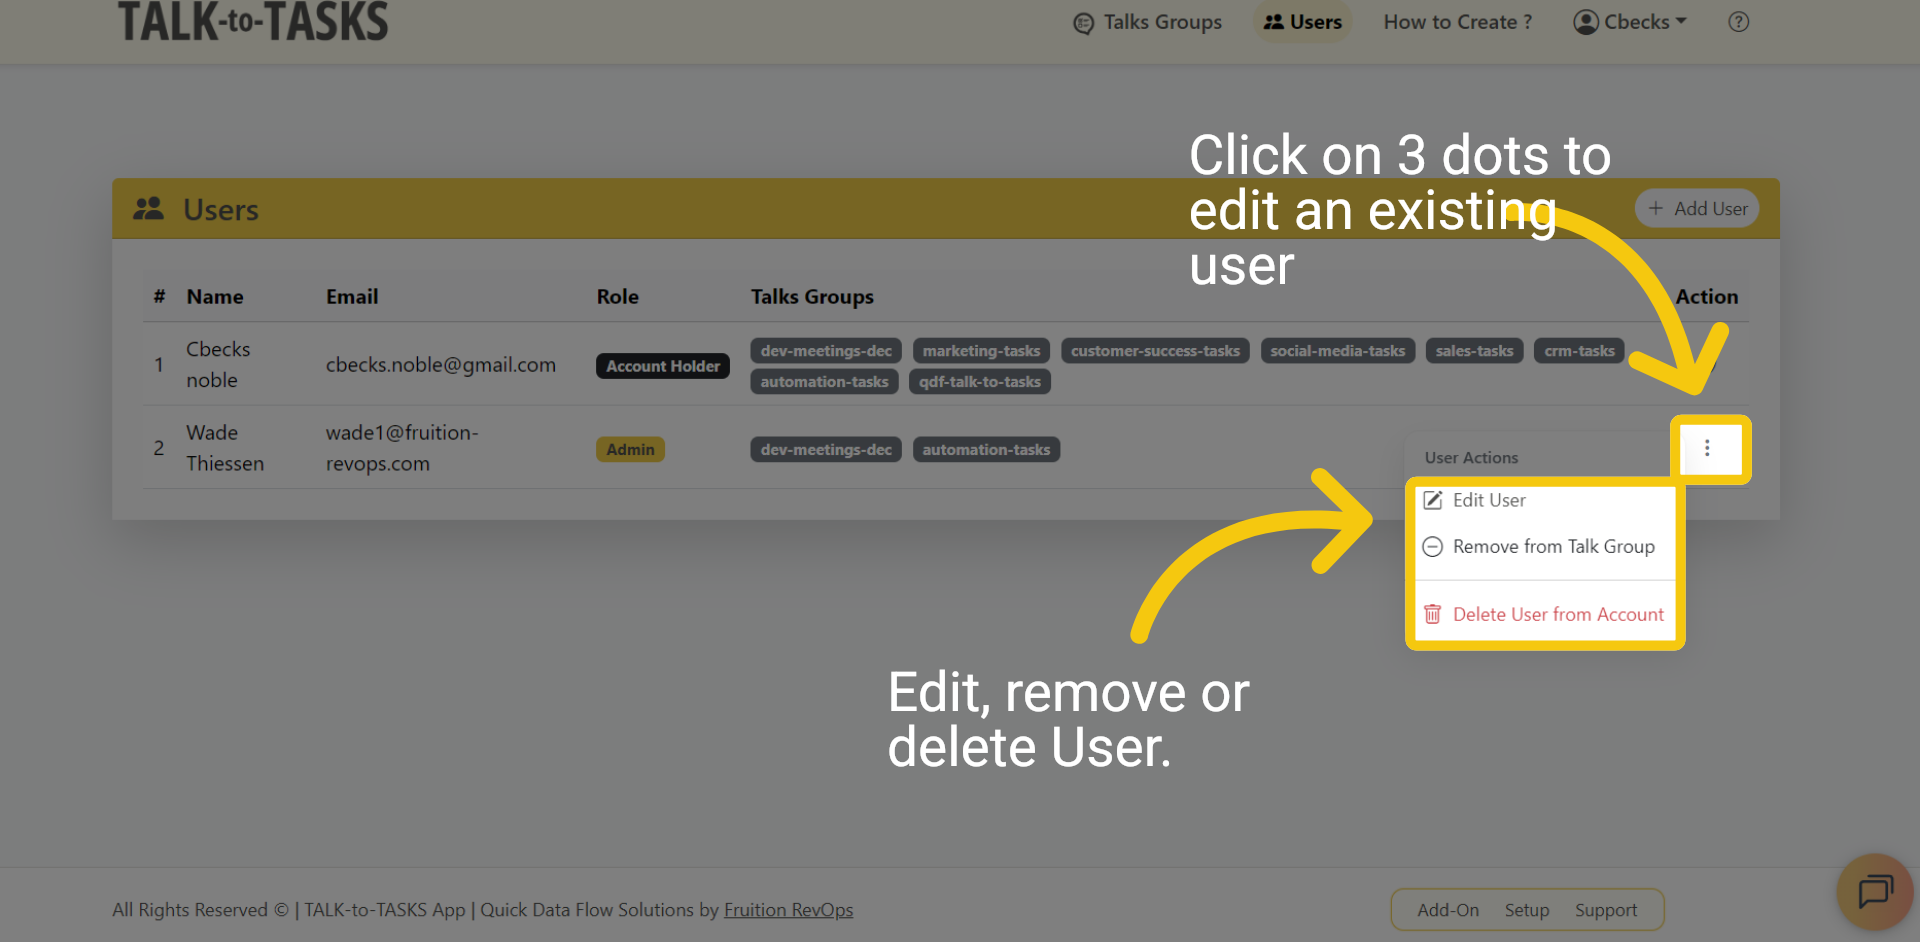
8 Add or Edit Users

Click the three dots to access options for deleting, editing, or removing an existing user from a group/channel.
Add or Edit Users

9 Thank you

In this guide, you learned how to manage users. Thank you for watching.
Thank you

How to Upload a Talk

Welcome to Talk-to-Tasks. In this guide, you'll learn how to create a Talk, upload a local meeting, and add a URL from Dropbox, Google Drive, or Zoom to begin generating tasks directly from your meeting files. Let’s get started.

1 Talk Group Created

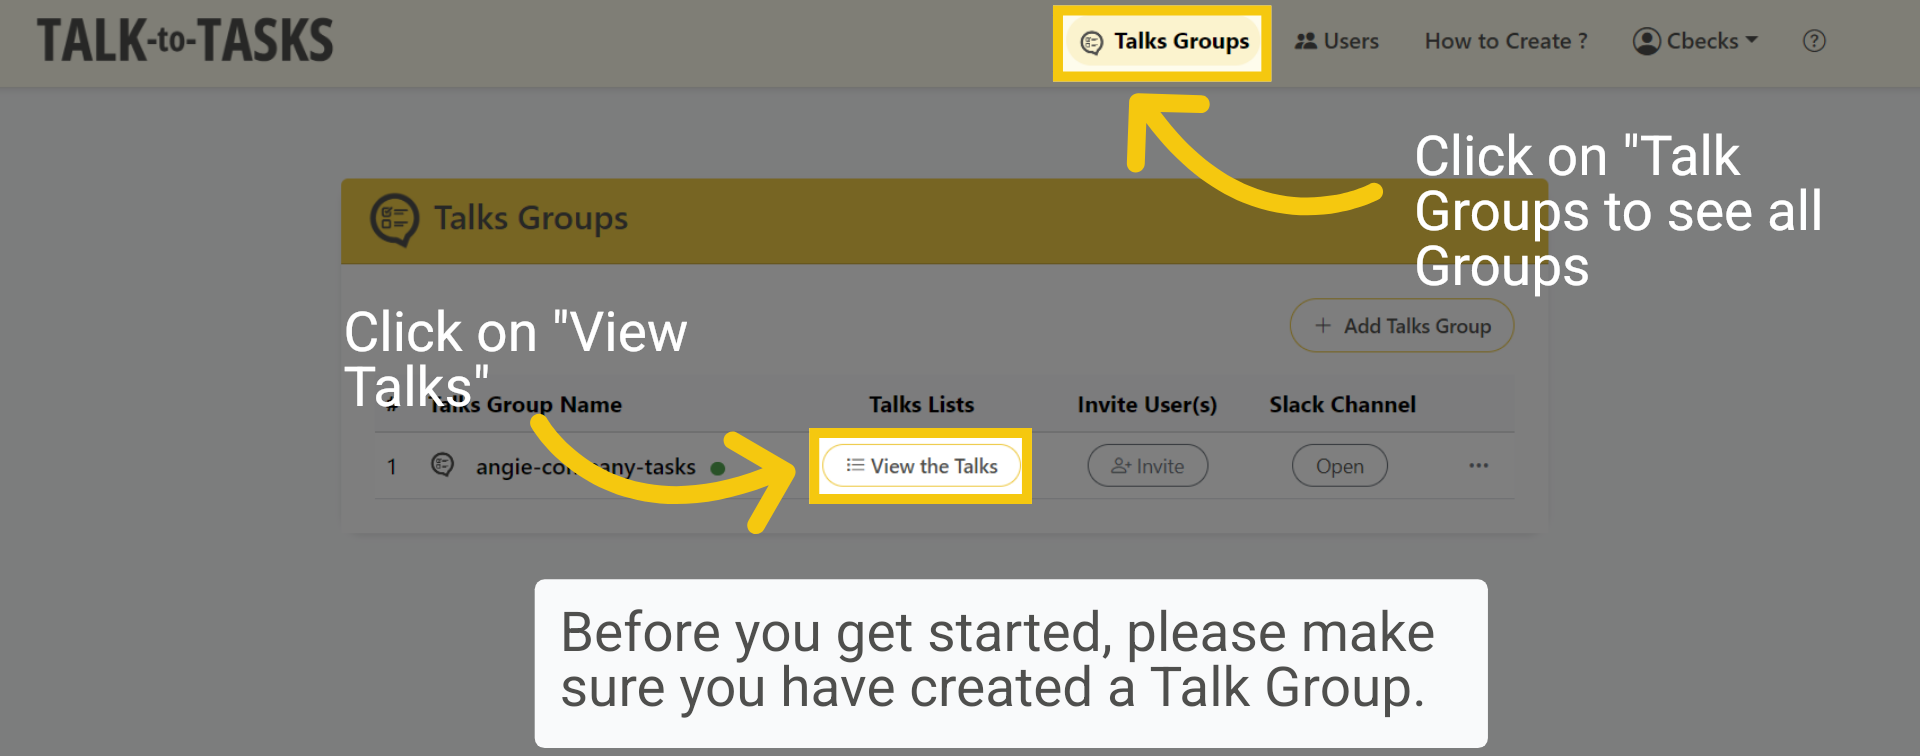
Before you get started, please make sure you have created a Talk Group. Click "View the Talks" to start adding your Talks via files or links, which will be used to generate tasks within the group.
Talk Group Created

2 Paste Link

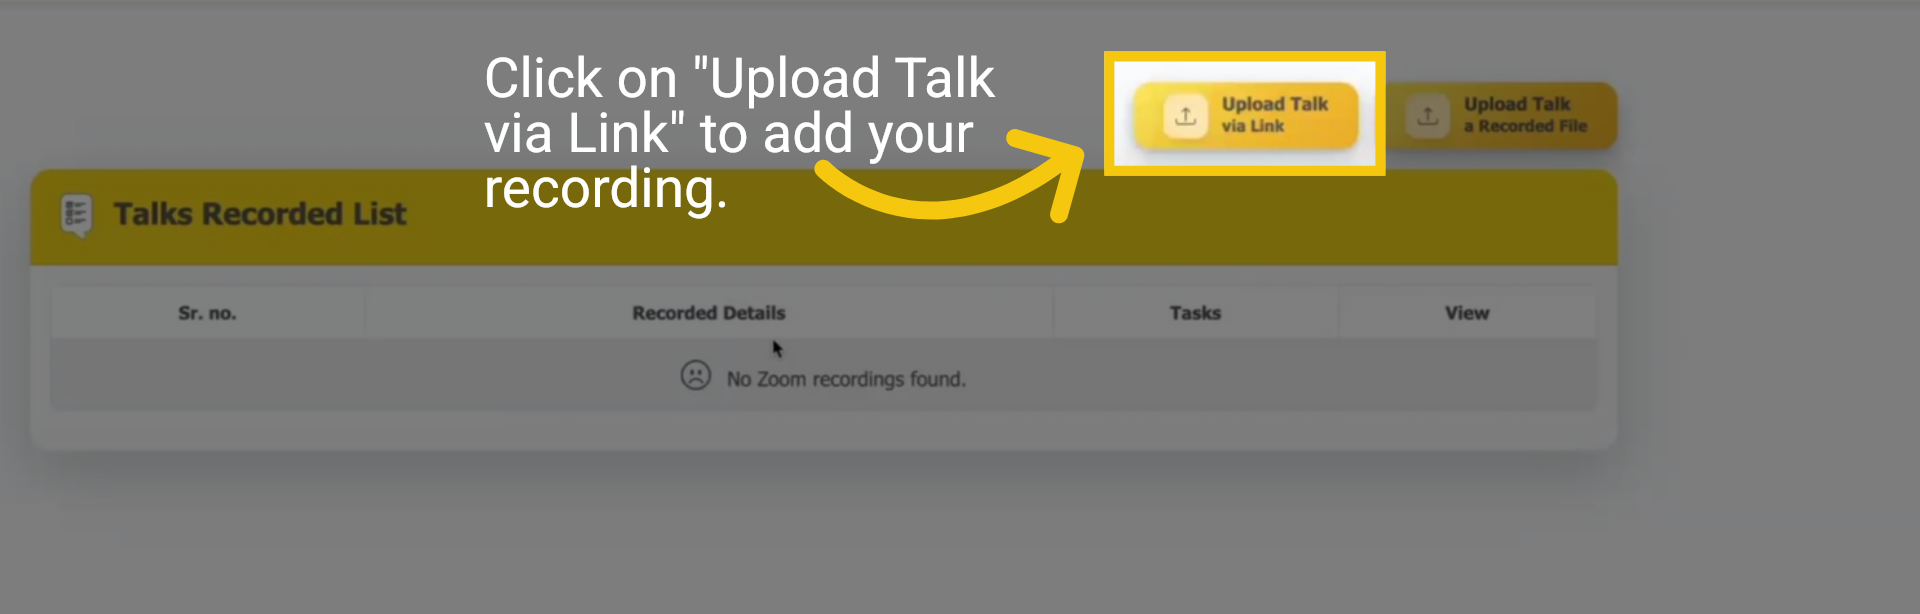
To begin, click on "Upload Talk via Link" to add your recording.
Paste Link

3 Dropbox, Google or Zoom Link

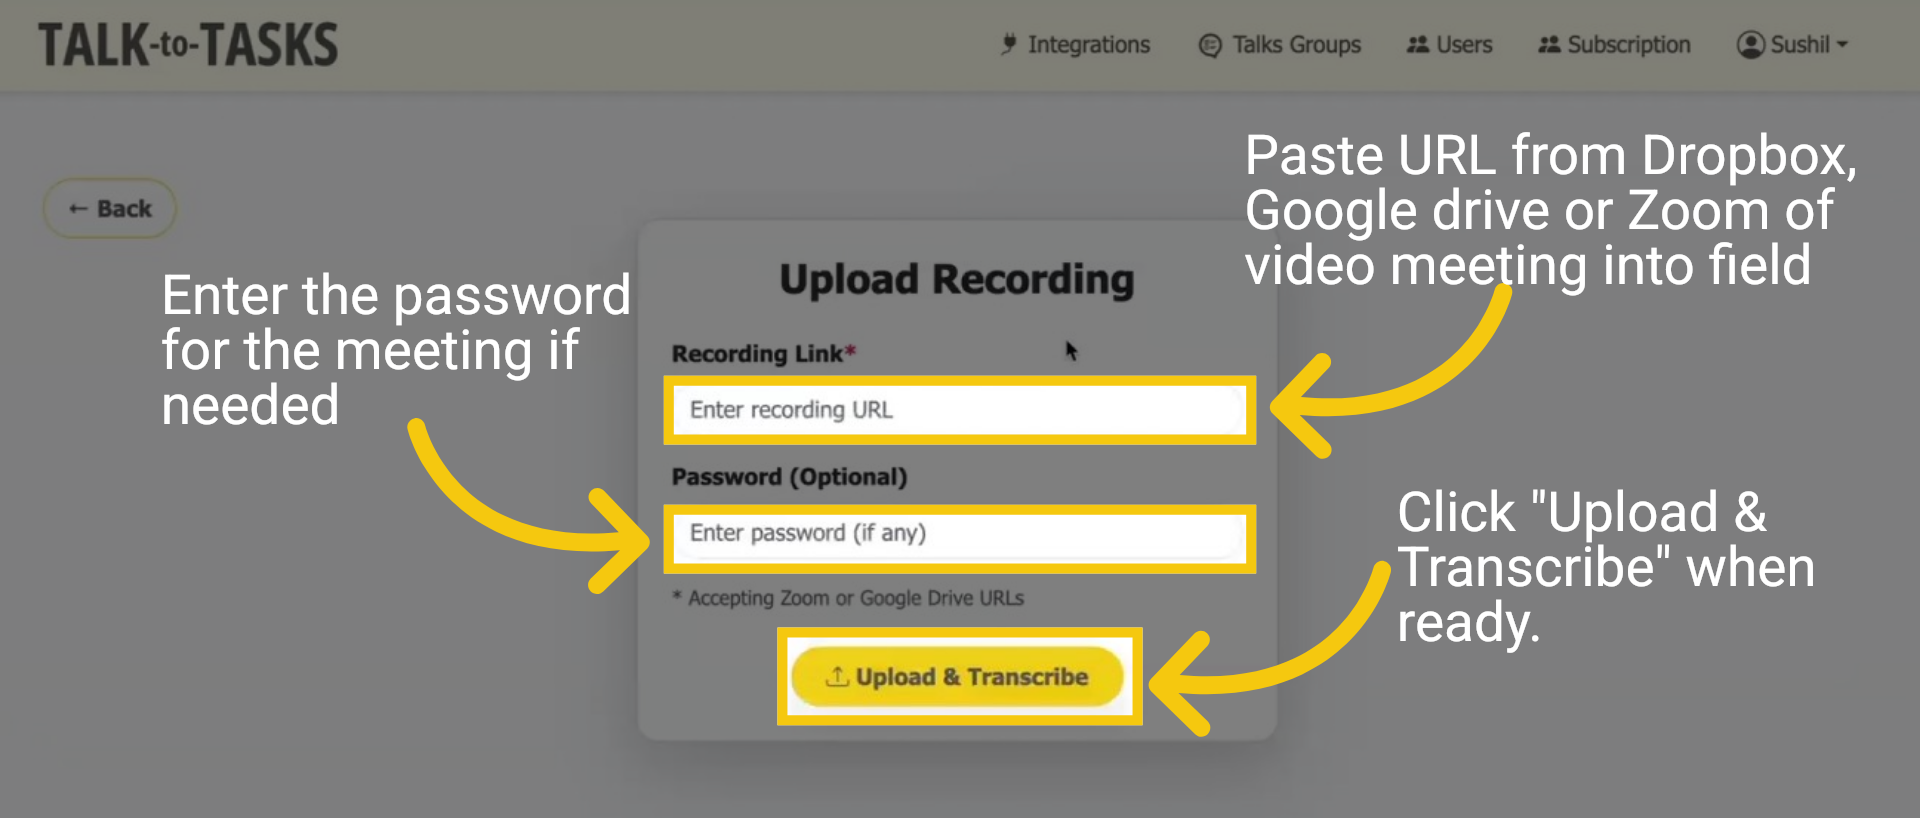
To create tasks using a Dropbox, Google Drive or Zoom link, paste the link into the designated field. If you're using a Zoom link, be sure to include the meeting password if required. For Dropbox and Google Drive links, please verify that they are public so the system can access them. Click "Upload and Transcribe".
Dropbox, Google or Zoom Link

4 A Recorded File upload

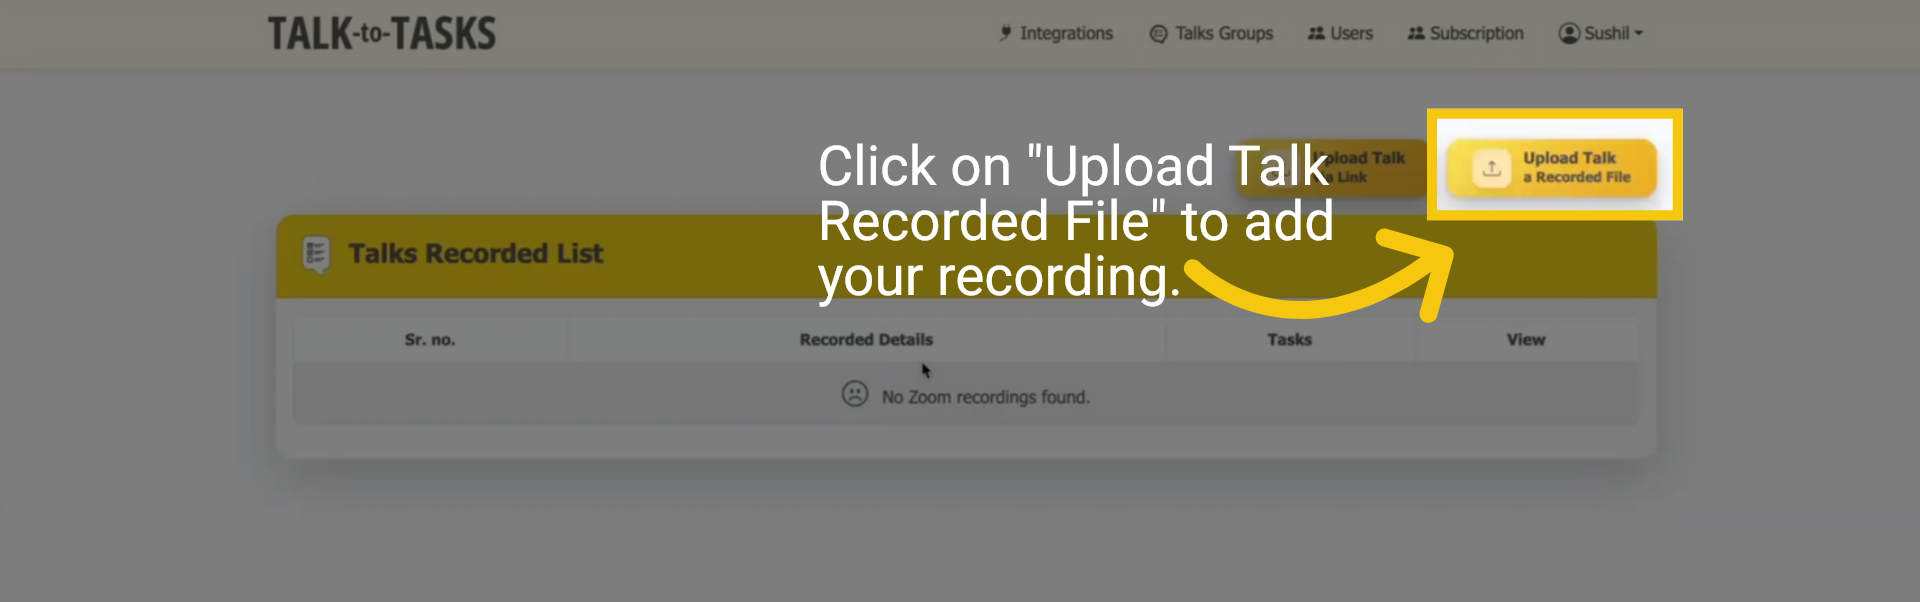
Now, let's try "Upload Talk Recorded File" to add your recording. Click on "Upload Talk Recorded File" to start the process.
A Recorded File upload

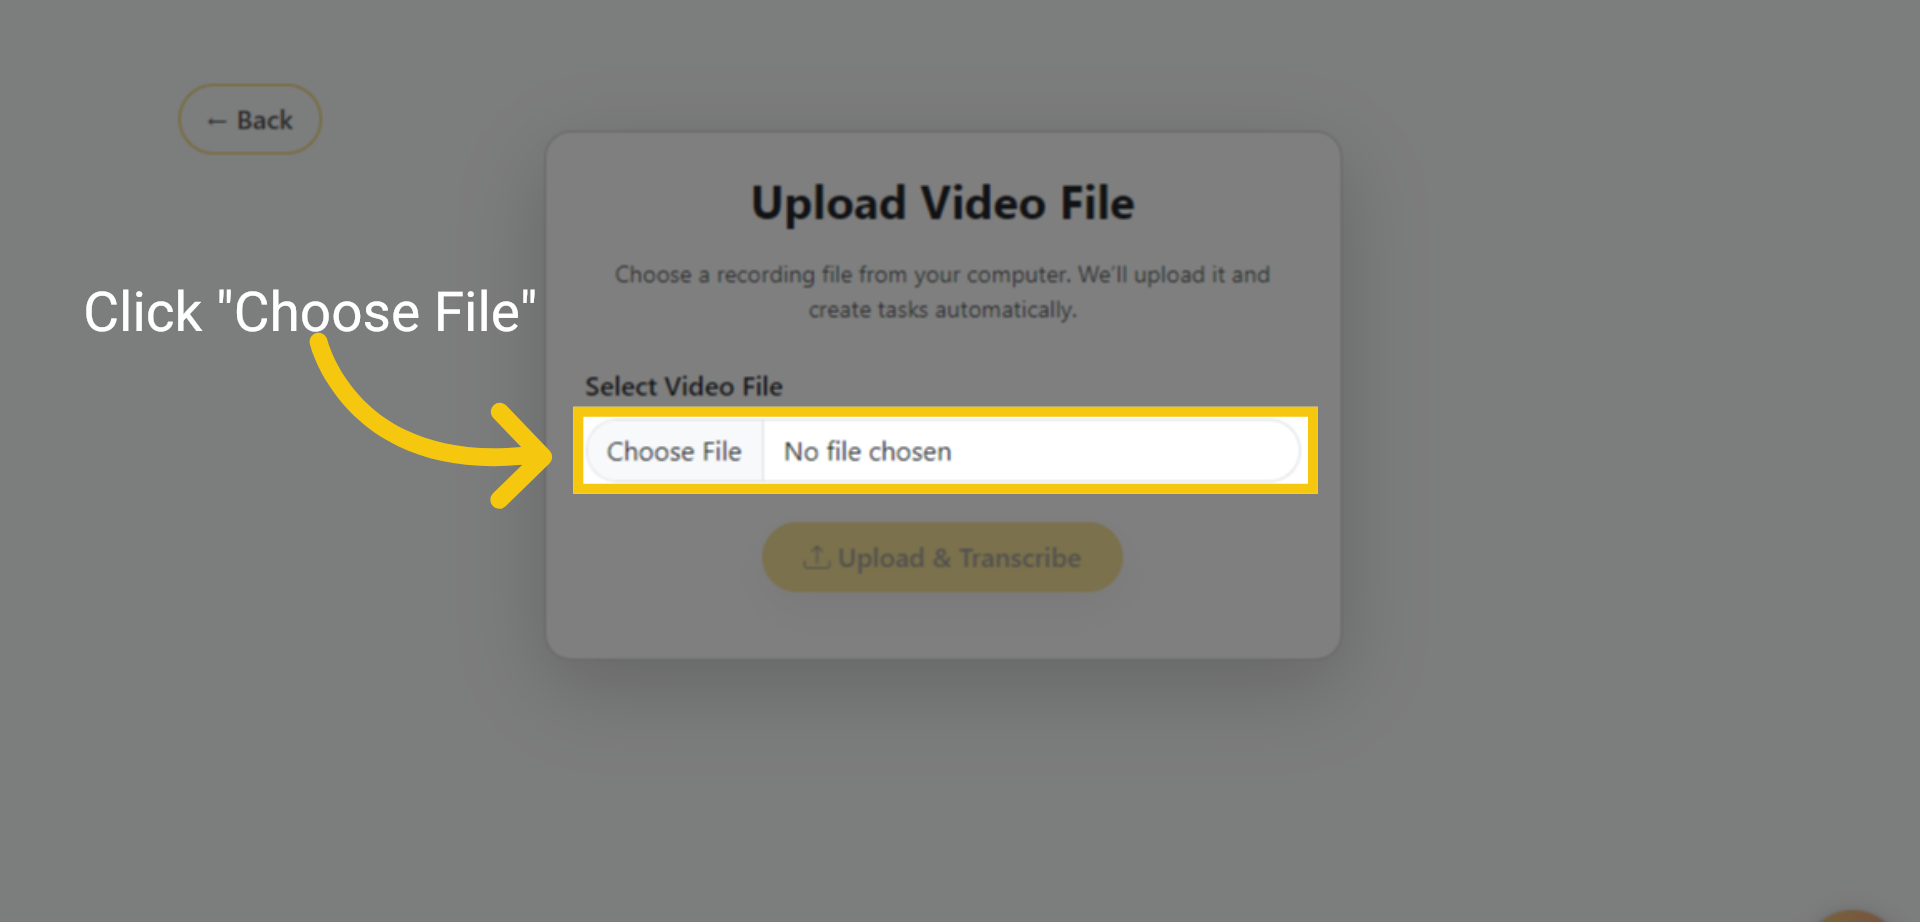
5 Choose Local Video

Click the button labelled "Choose File" to begin the process of selecting a file from your computer.
Choose Local Video

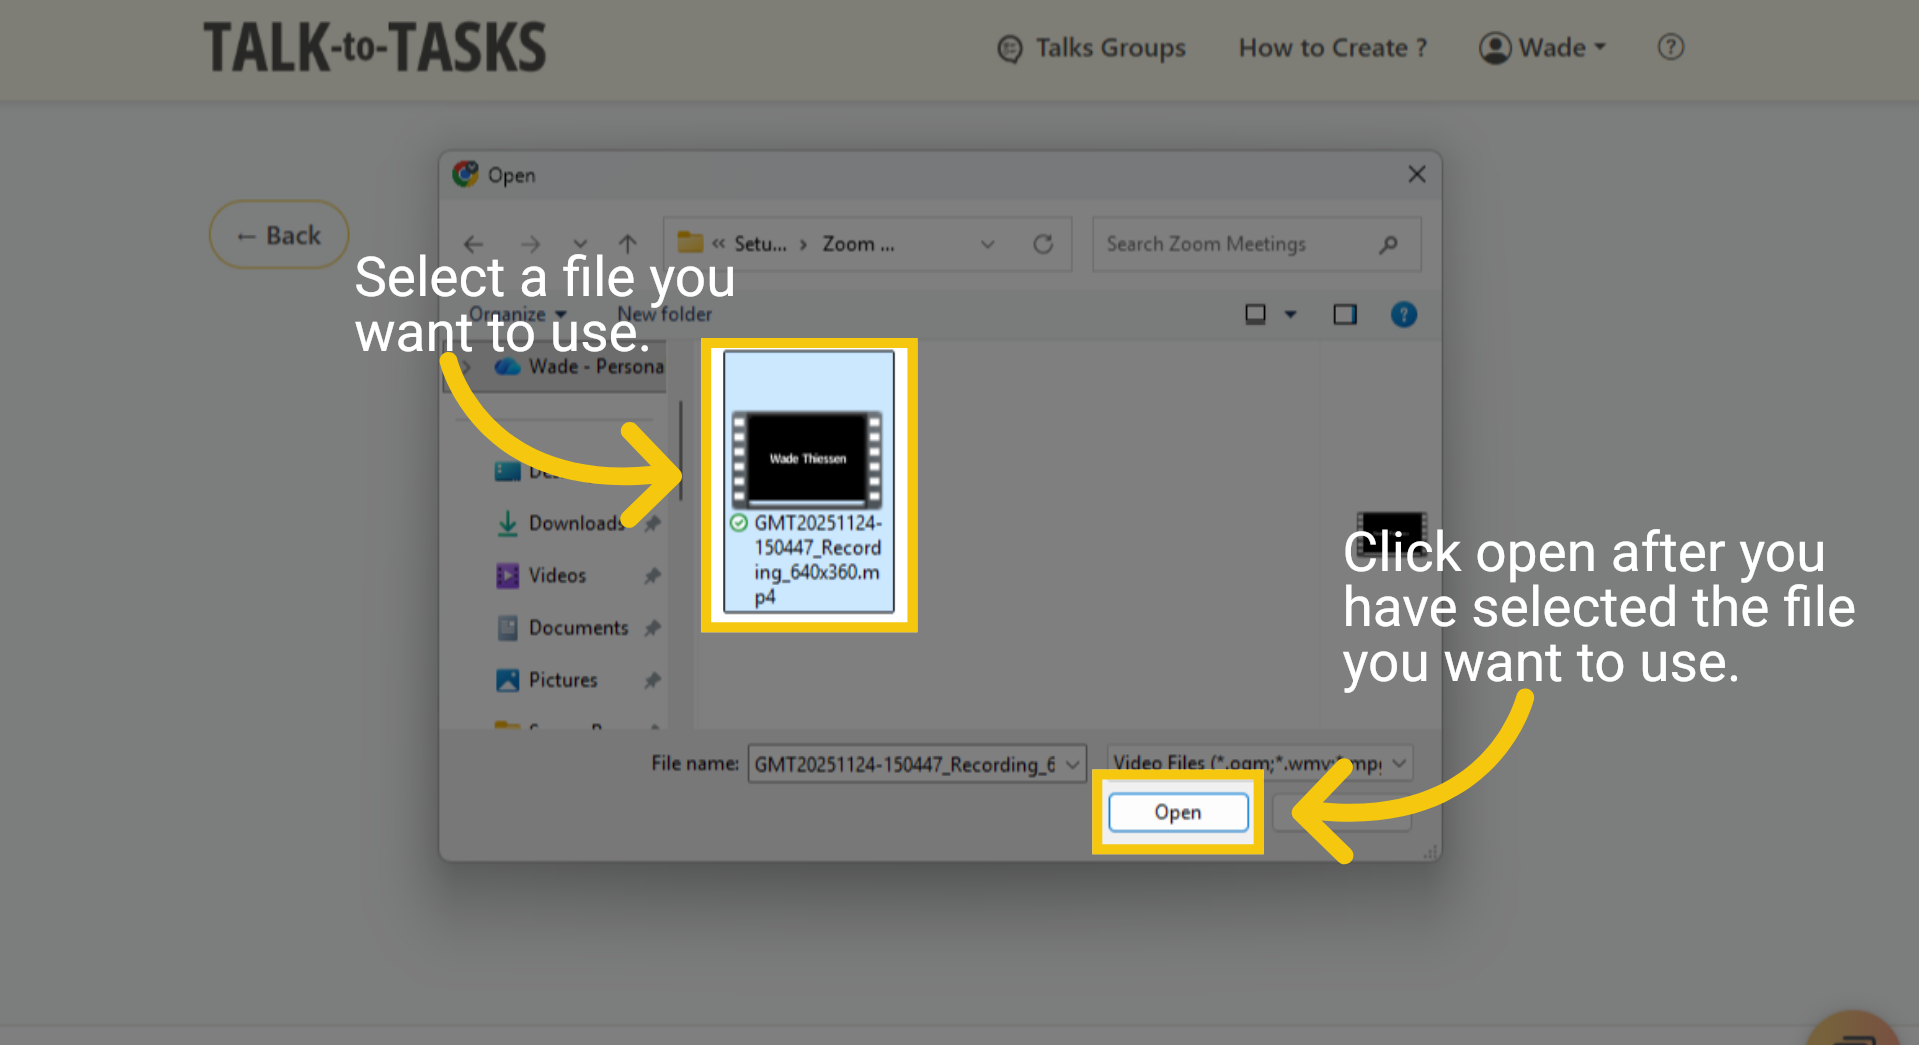
6 Upload Local Video

Choose the meeting video file you wish to process, then click Open.
Upload Local Video

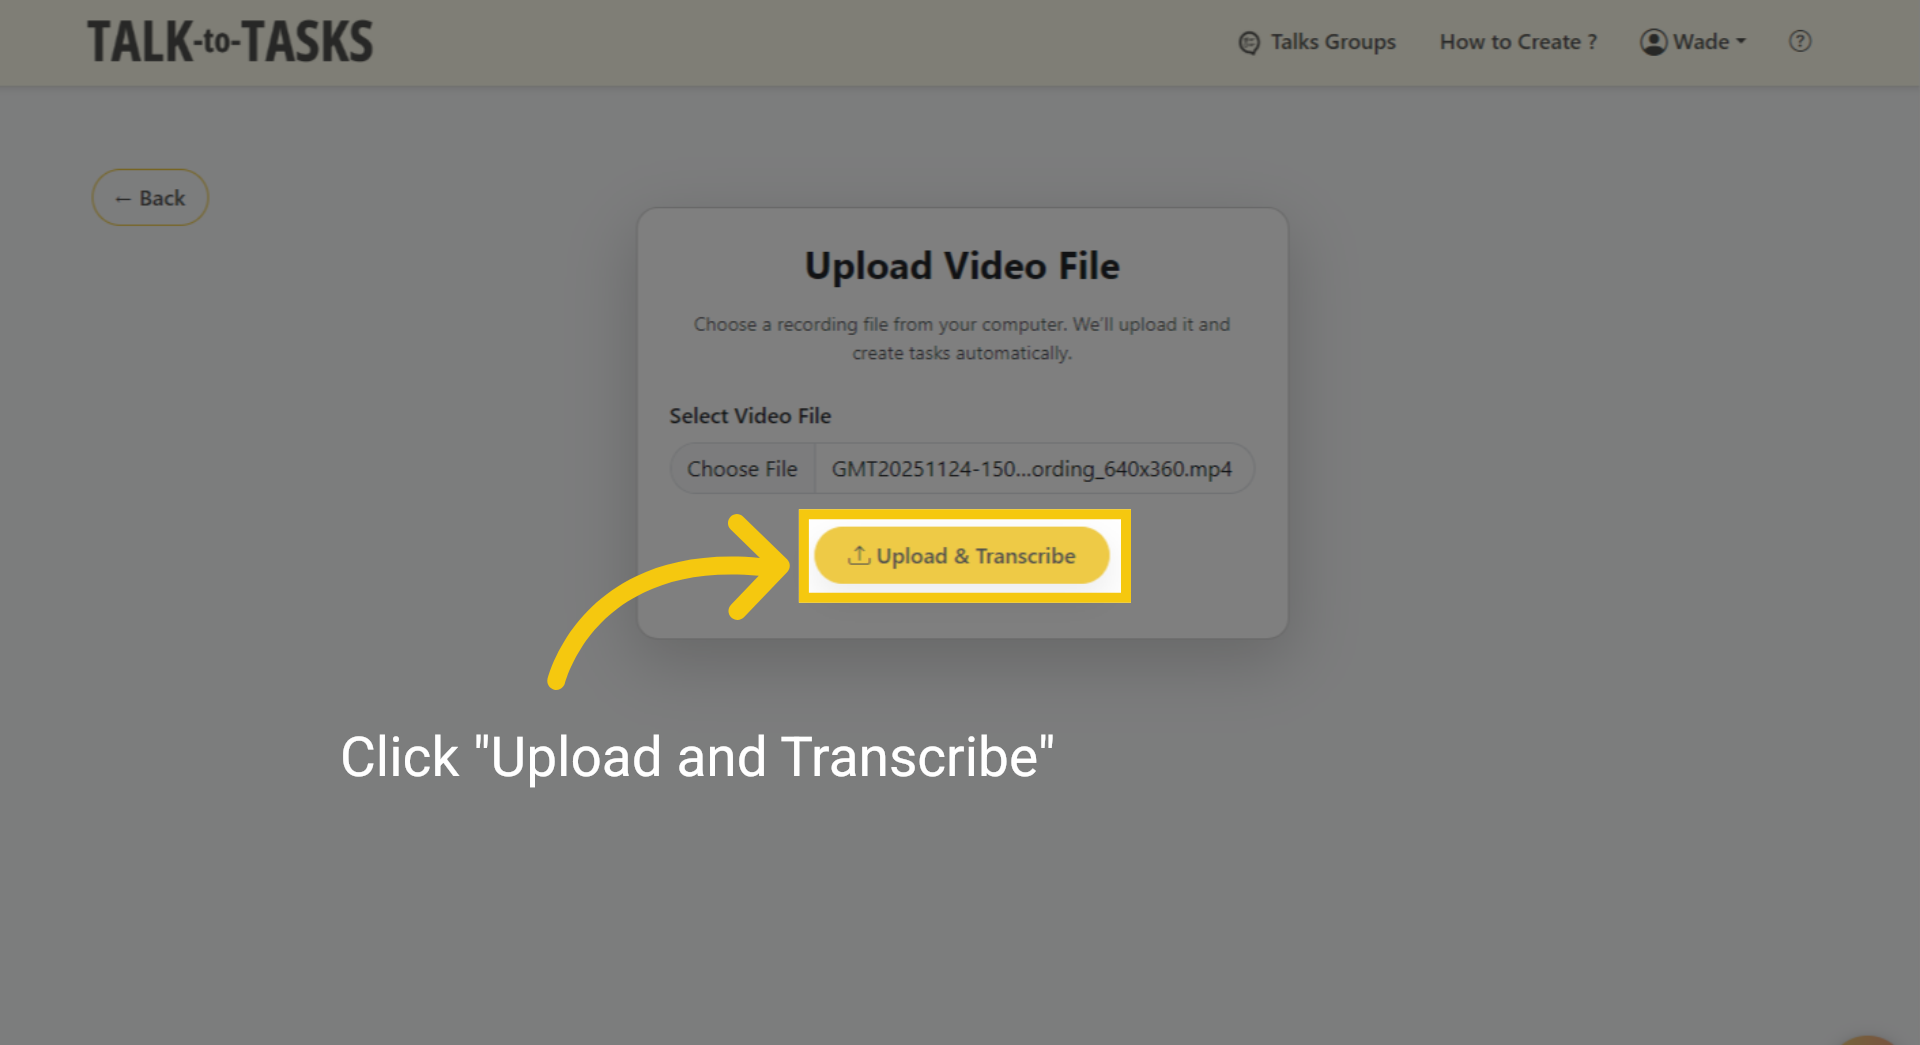
7 Upload and Transcribe Local File

Click "Upload and Transcribe," and the system will start processing your meeting into tasks.
Upload and Transcribe Local File

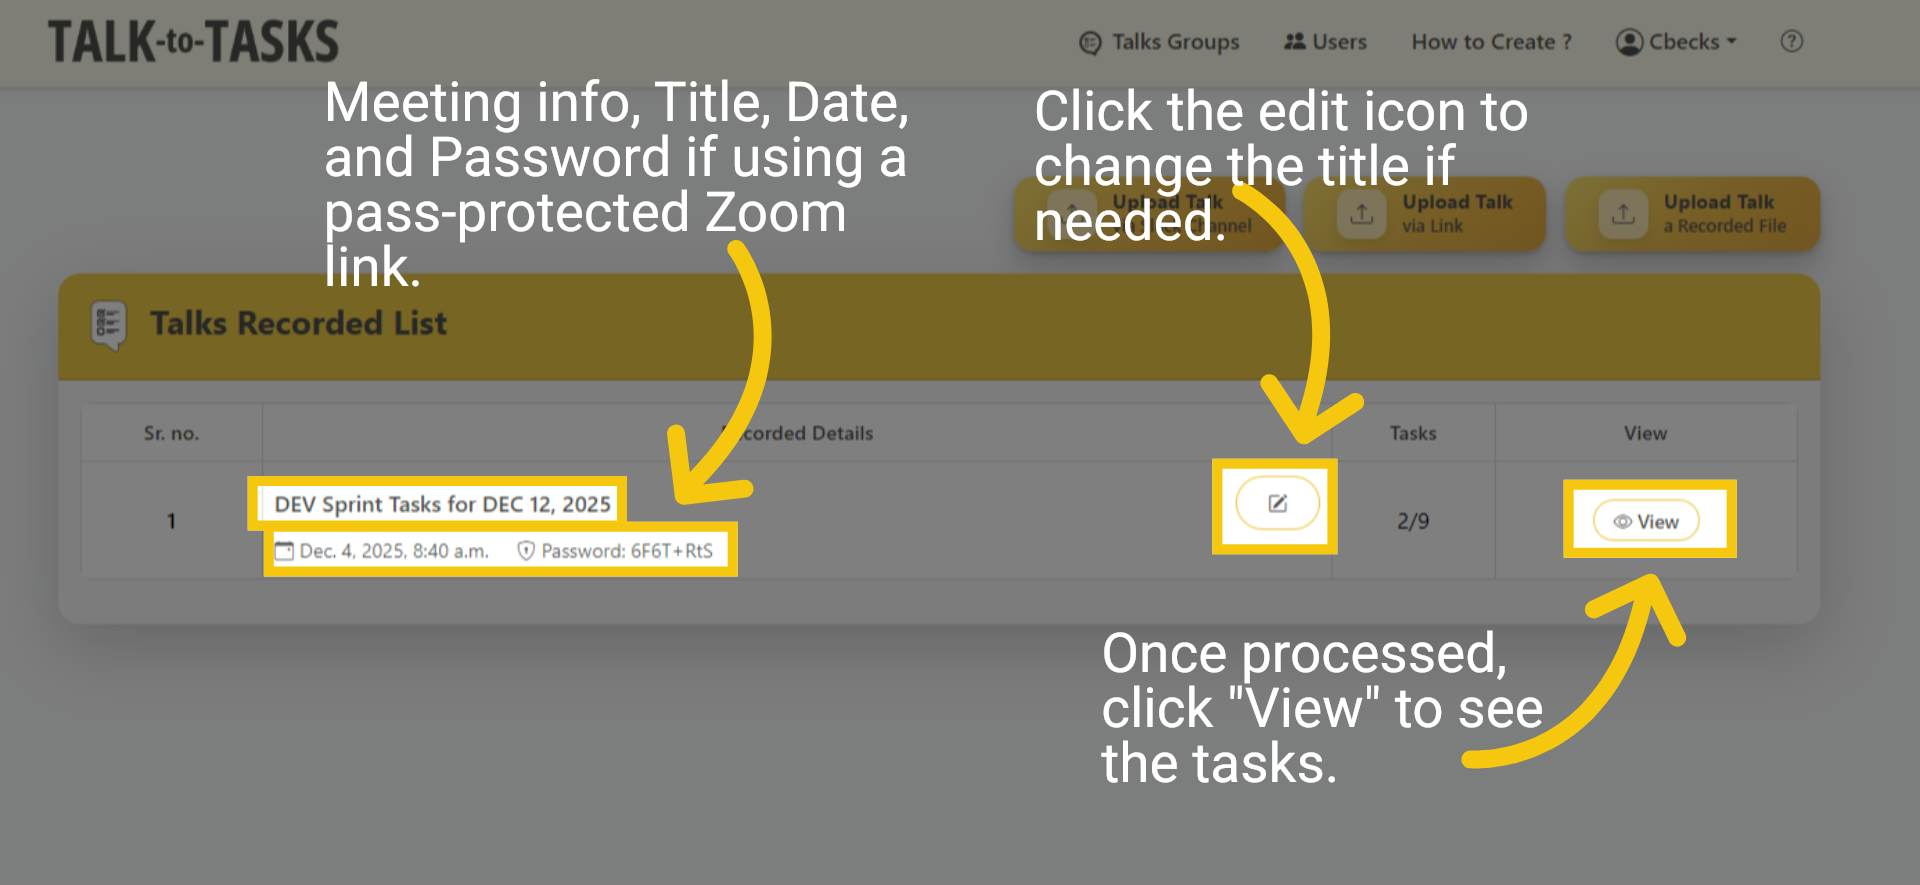
8 Meeting Info and edit Title

Meeting information includes the title, date, and password for a password-protected Zoom link. To modify the title, click the edit icon. After processing, click "View" to access the tasks.
Meeting Info and edit Title

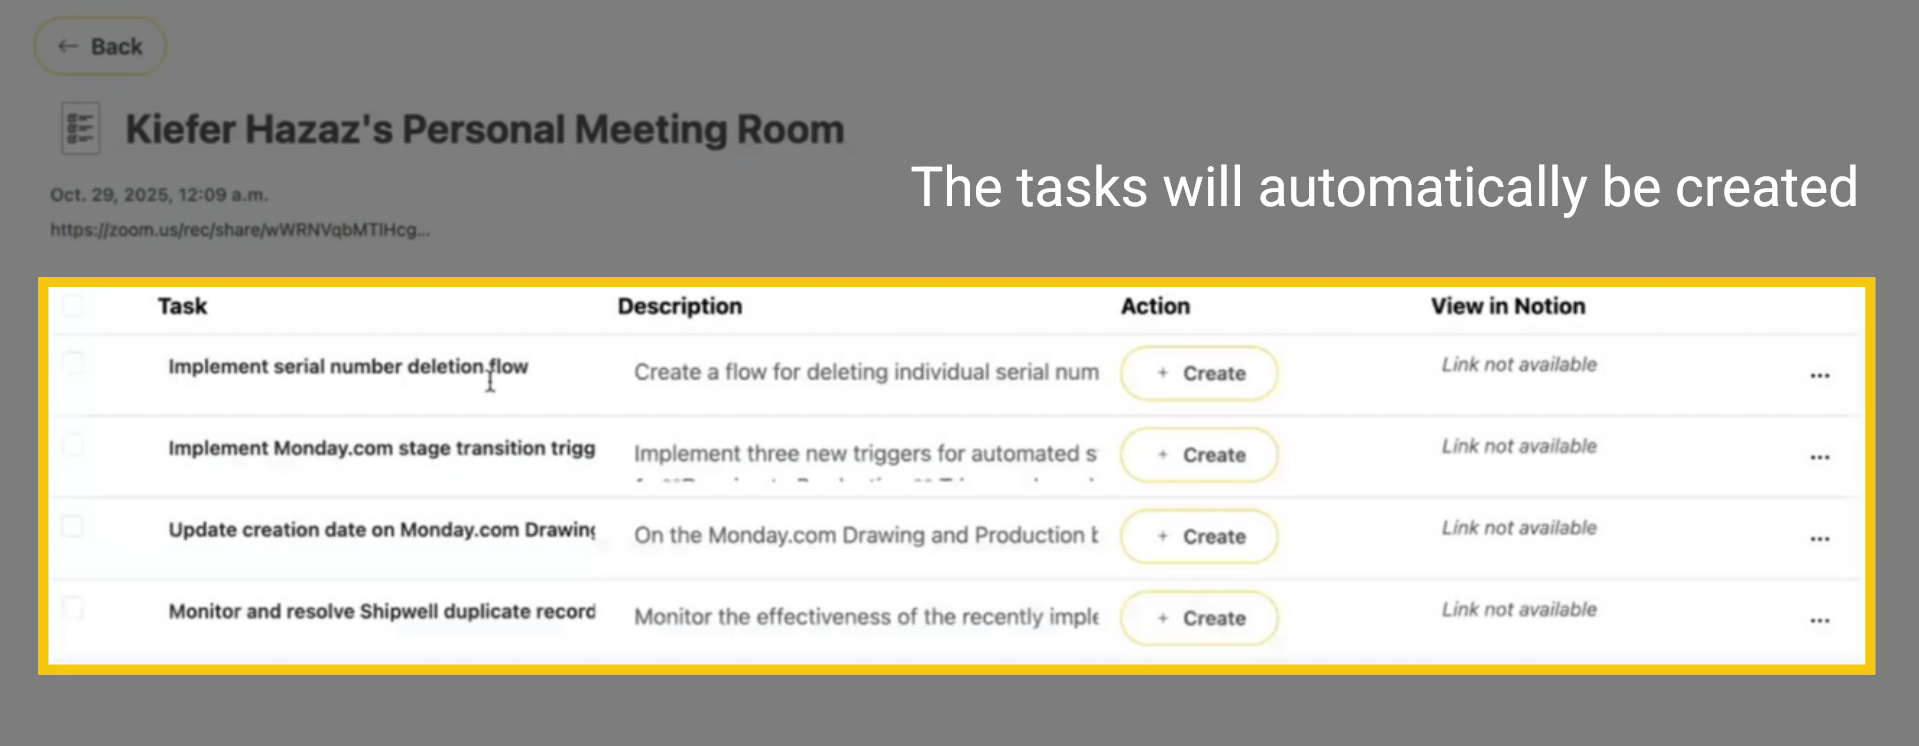
9 Generated Tasks

Tasks will be automatically generated for your review.
Generated Tasks

10 Thank you

This guide outlines how to upload recordings via Dropbox, Google Drive, or Zoom links for easy access, and how to upload a local file, as well as how to edit task titles and descriptions. Thanks for watching.
Thank you

Before you get started, please open your Slack settings using the link: Click Here
This will ensure everything connects smoothly. Once you’re in, follow the steps to complete your setup.

How-to Edit Talks and Tasks

In this guide, you will learn how to edit talks and tasks.

1 Talks List

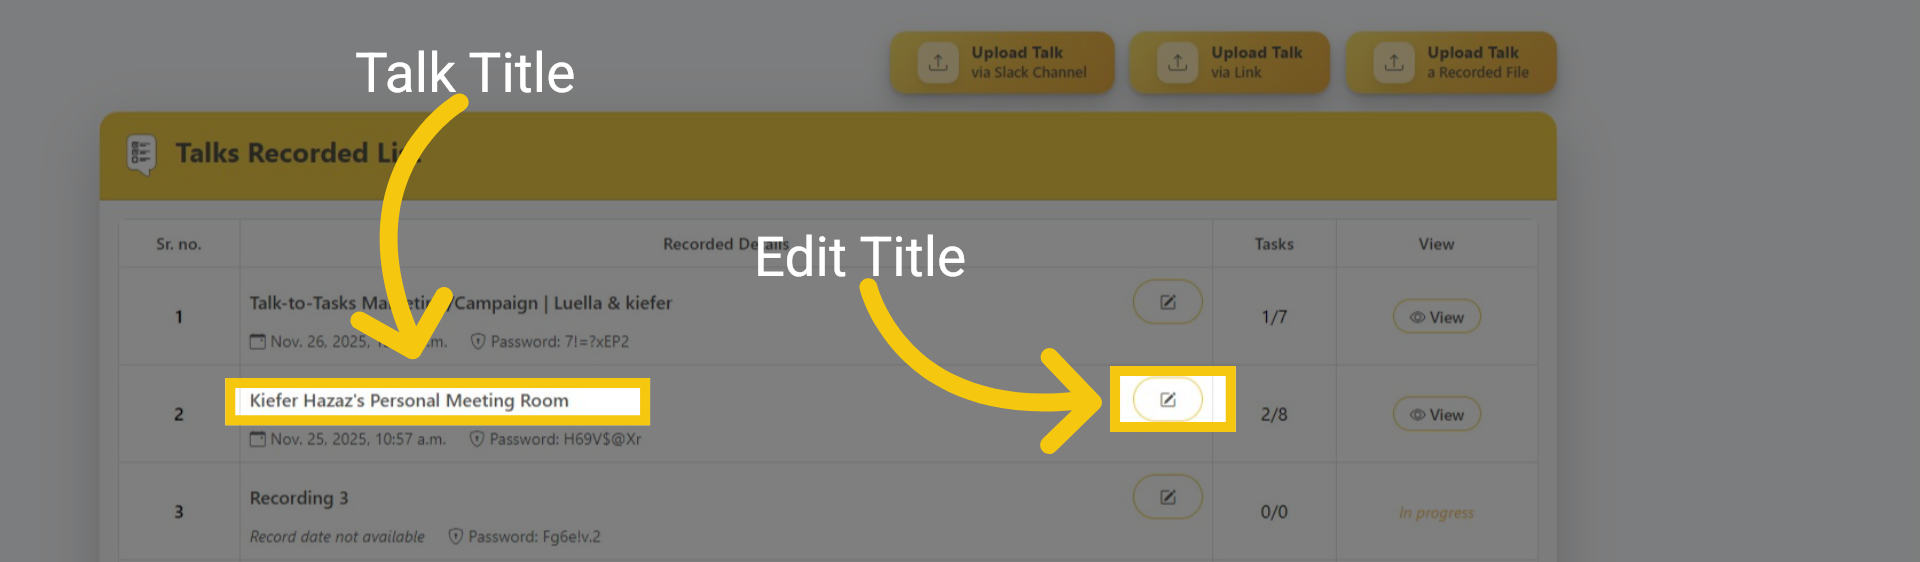
To modify your Talk titles, you can go to your Talk Group. Click the edit icon, as shown in the screenshot.
Talks List

2 Enter New Title

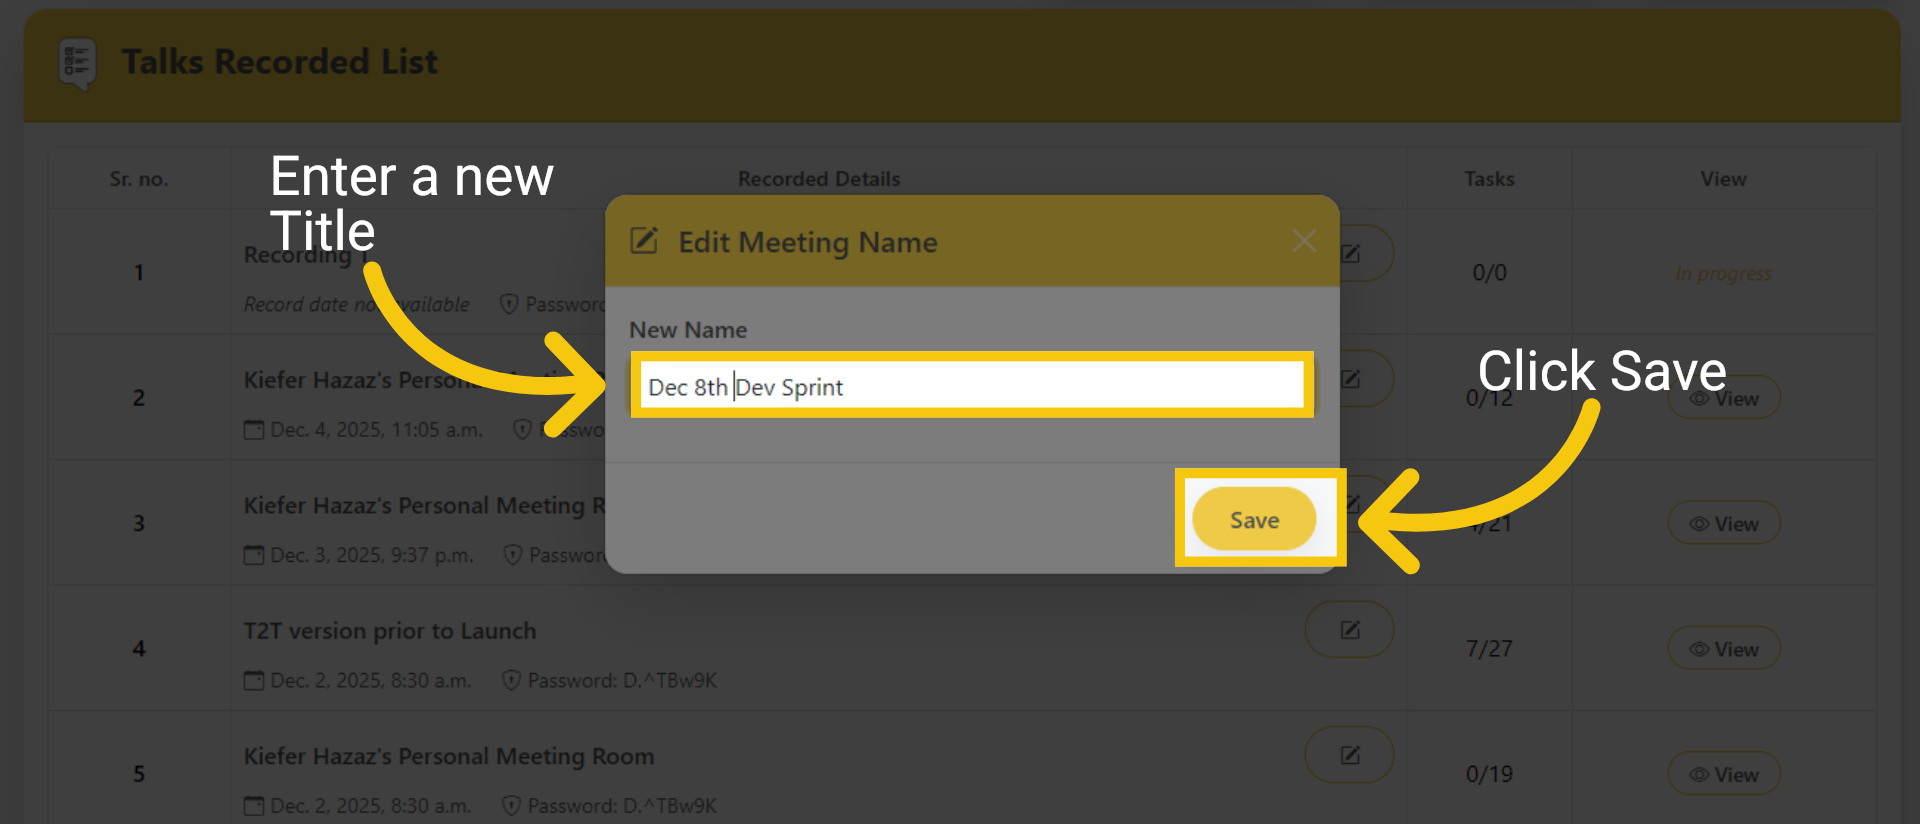
Enter a new title in the designated field. Click the save button.
Enter New Title

3 Edit Title of Task

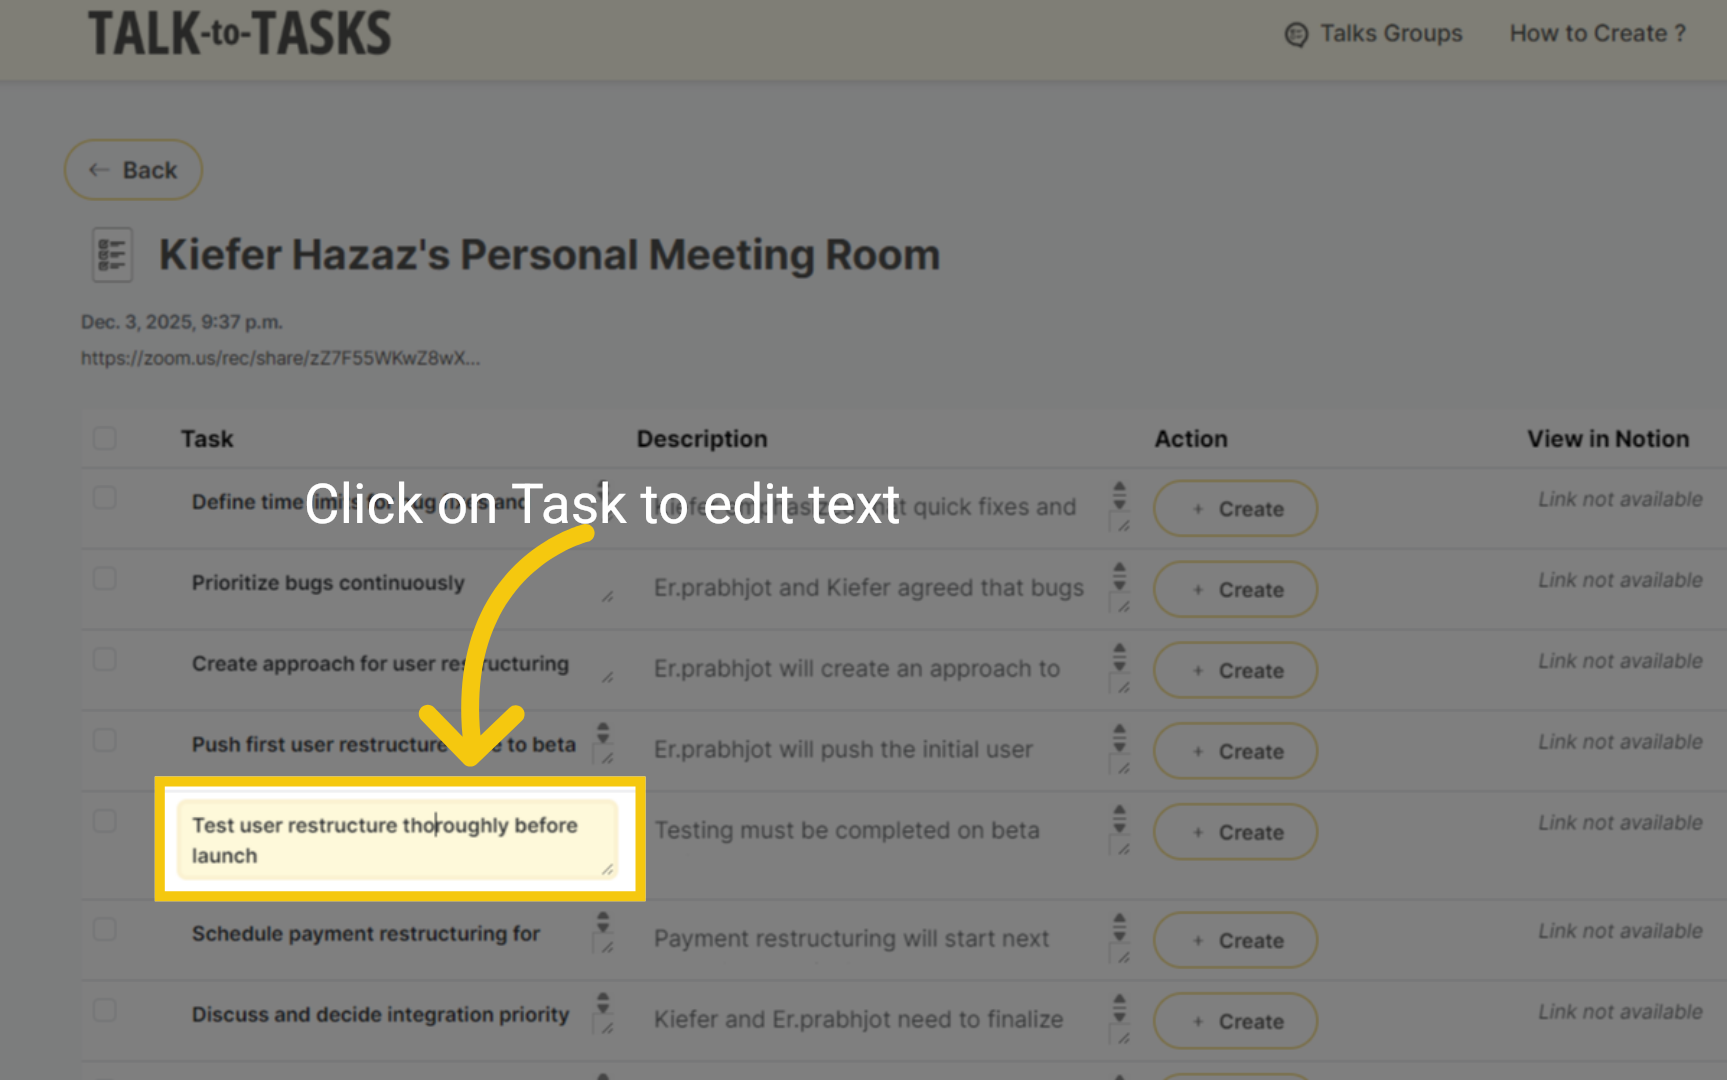
Click the Task Title field. This allows you to customize the text according to your changes. The changes are saved automatically.
Edit Title of Task

4 Edit Description of the Task

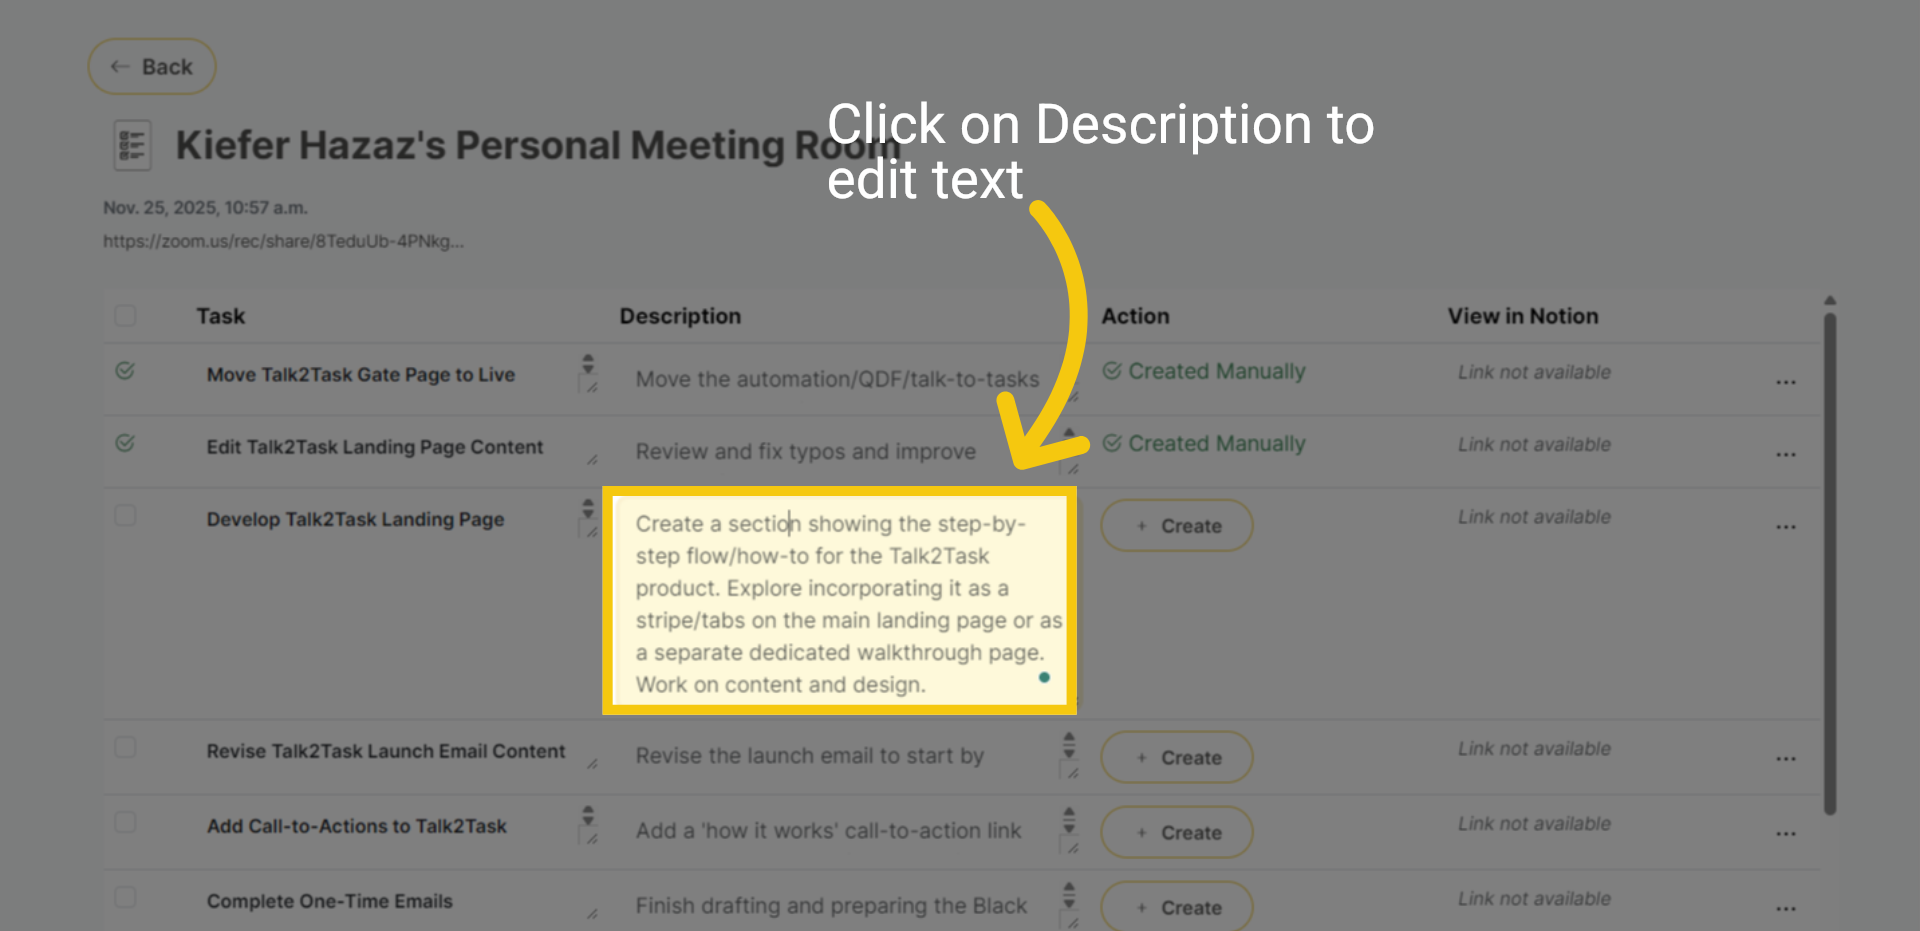
Click the Description. This allows you to customize the text according to your changes. The changes are saved automatically in the field.
Edit Description of the Task

5 Hide or Show Tasks

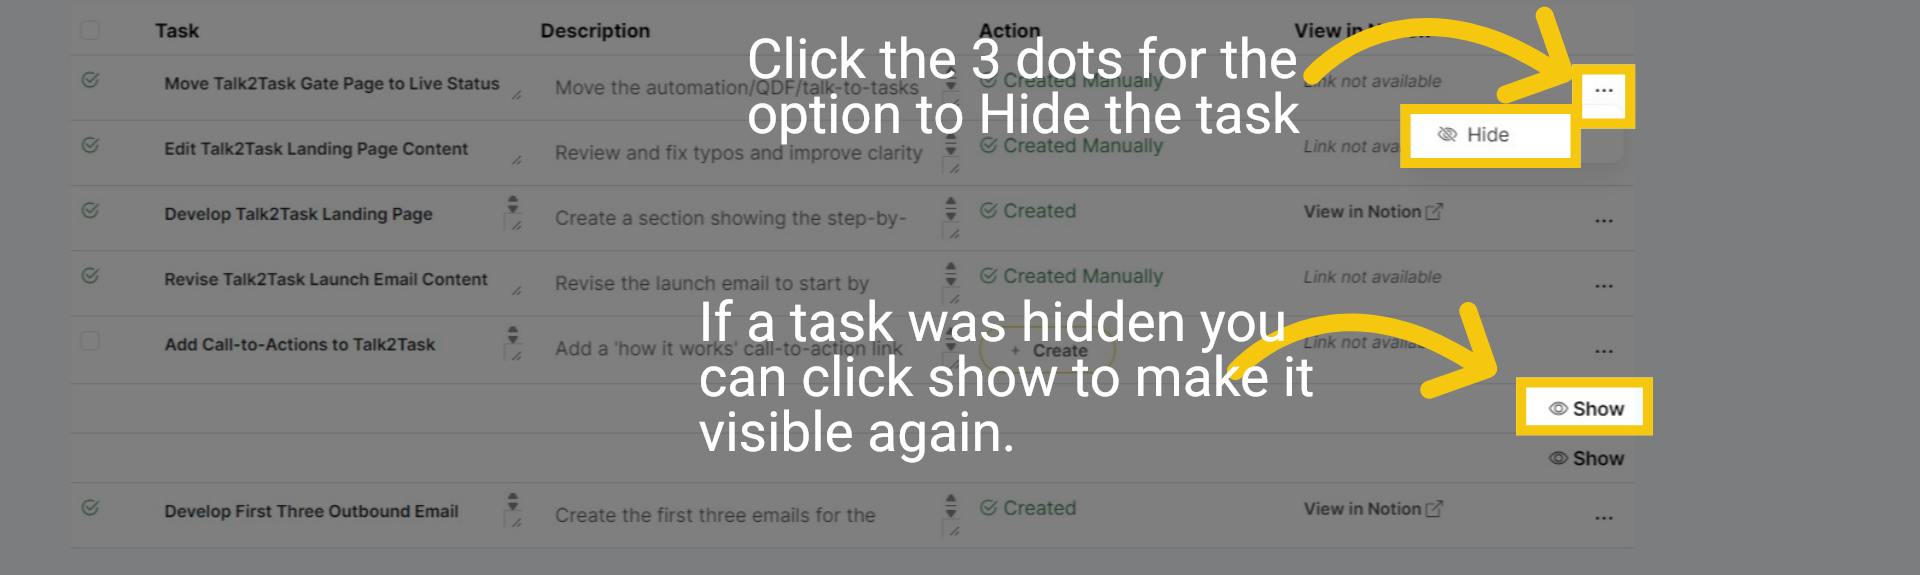
If you come across duplicate tasks or those you do not wish to create, click the three-dot menu next to the task and select Hide. This action will remove the task from your active view. To restore a hidden task, click Show. The task will then reappear in the list, allowing you to create it or send it to Notion as necessary.
Hide or Show Tasks

6 Thank you

In this guide, you learned how to edit tasks. thanks for watching.
Thank you

Before you get started, please open your Slack settings using the link: Click Here
This will ensure everything connects smoothly. Once you’re in, follow the steps to complete your setup.

How-to Create and Assign Task to Projects

In this guide, you will learn how to create and assign tasks for Notion.

1 Select tasks

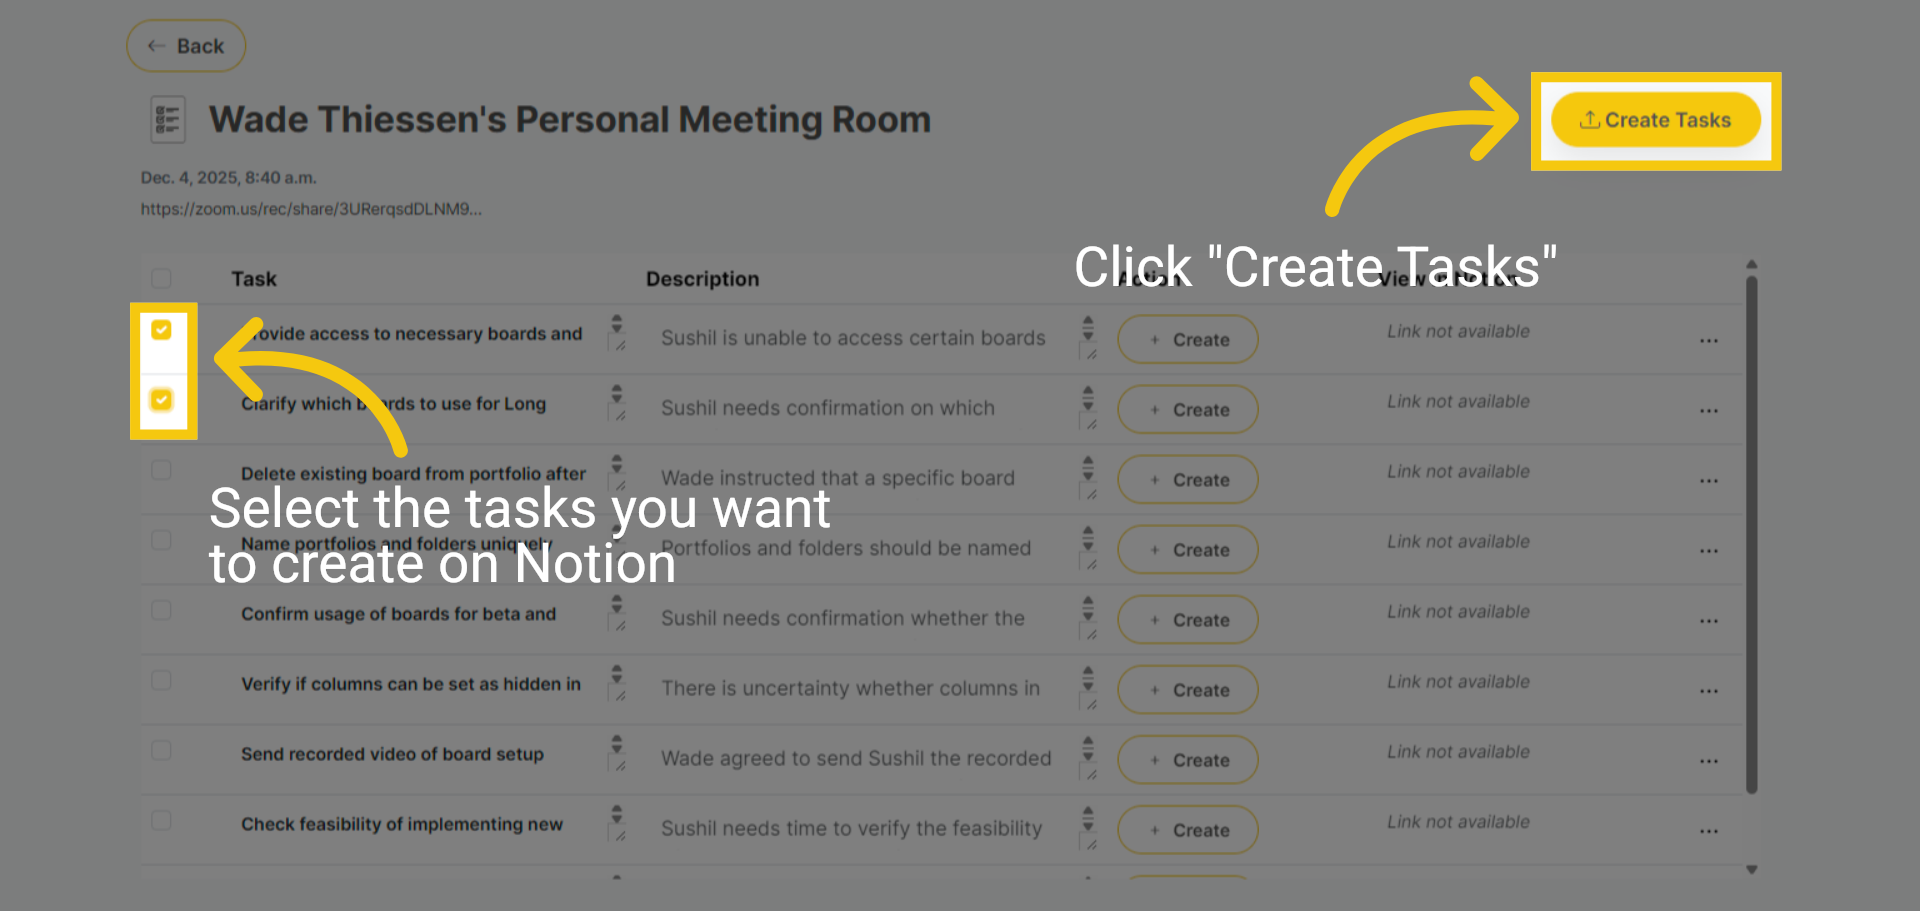
Before you get started, you will need to have integrated Notion and have a Talk Group with Talks and tasks to continue. Choose the tasks you'd like to create in Notion, then click "Create Tasks."
Select tasks

2 Open and Select Workspace

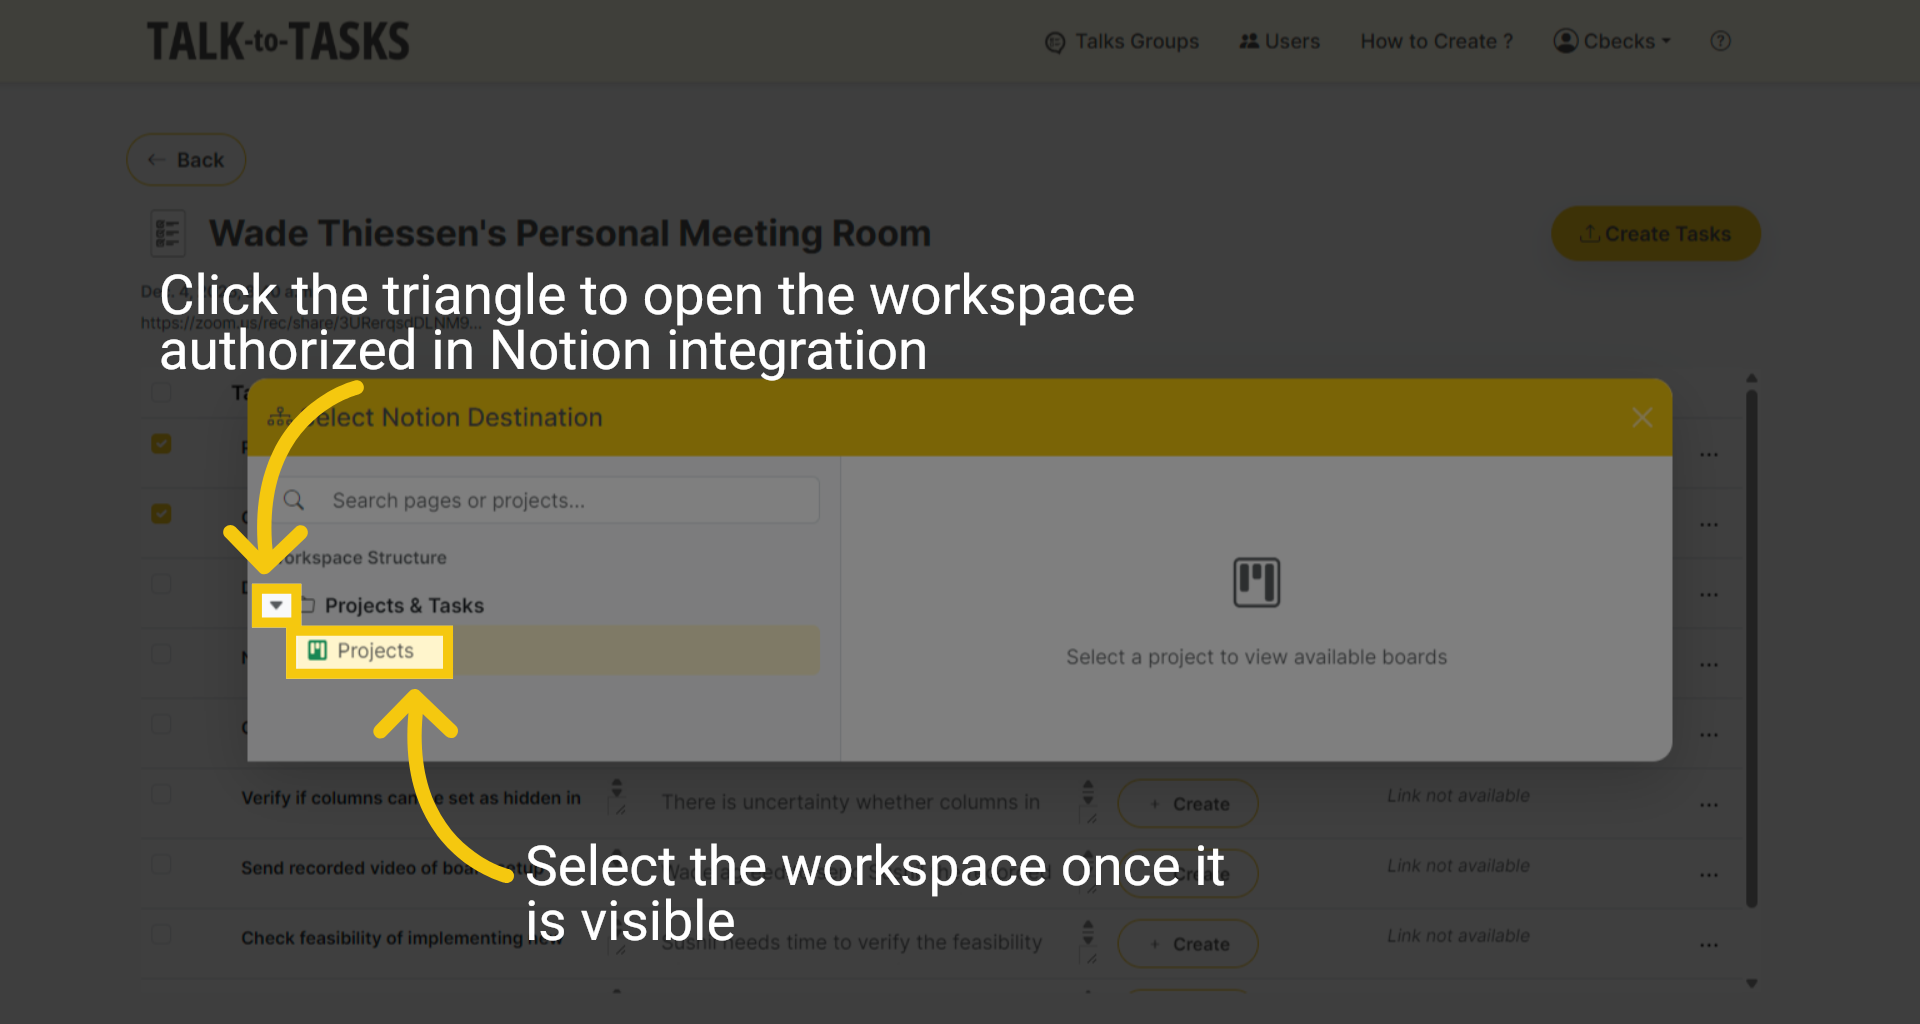
In this use case, we will use the Notion Integration. Click the triangle to open the workspace. Once visible, select the workspace.
Open and Select Workspace

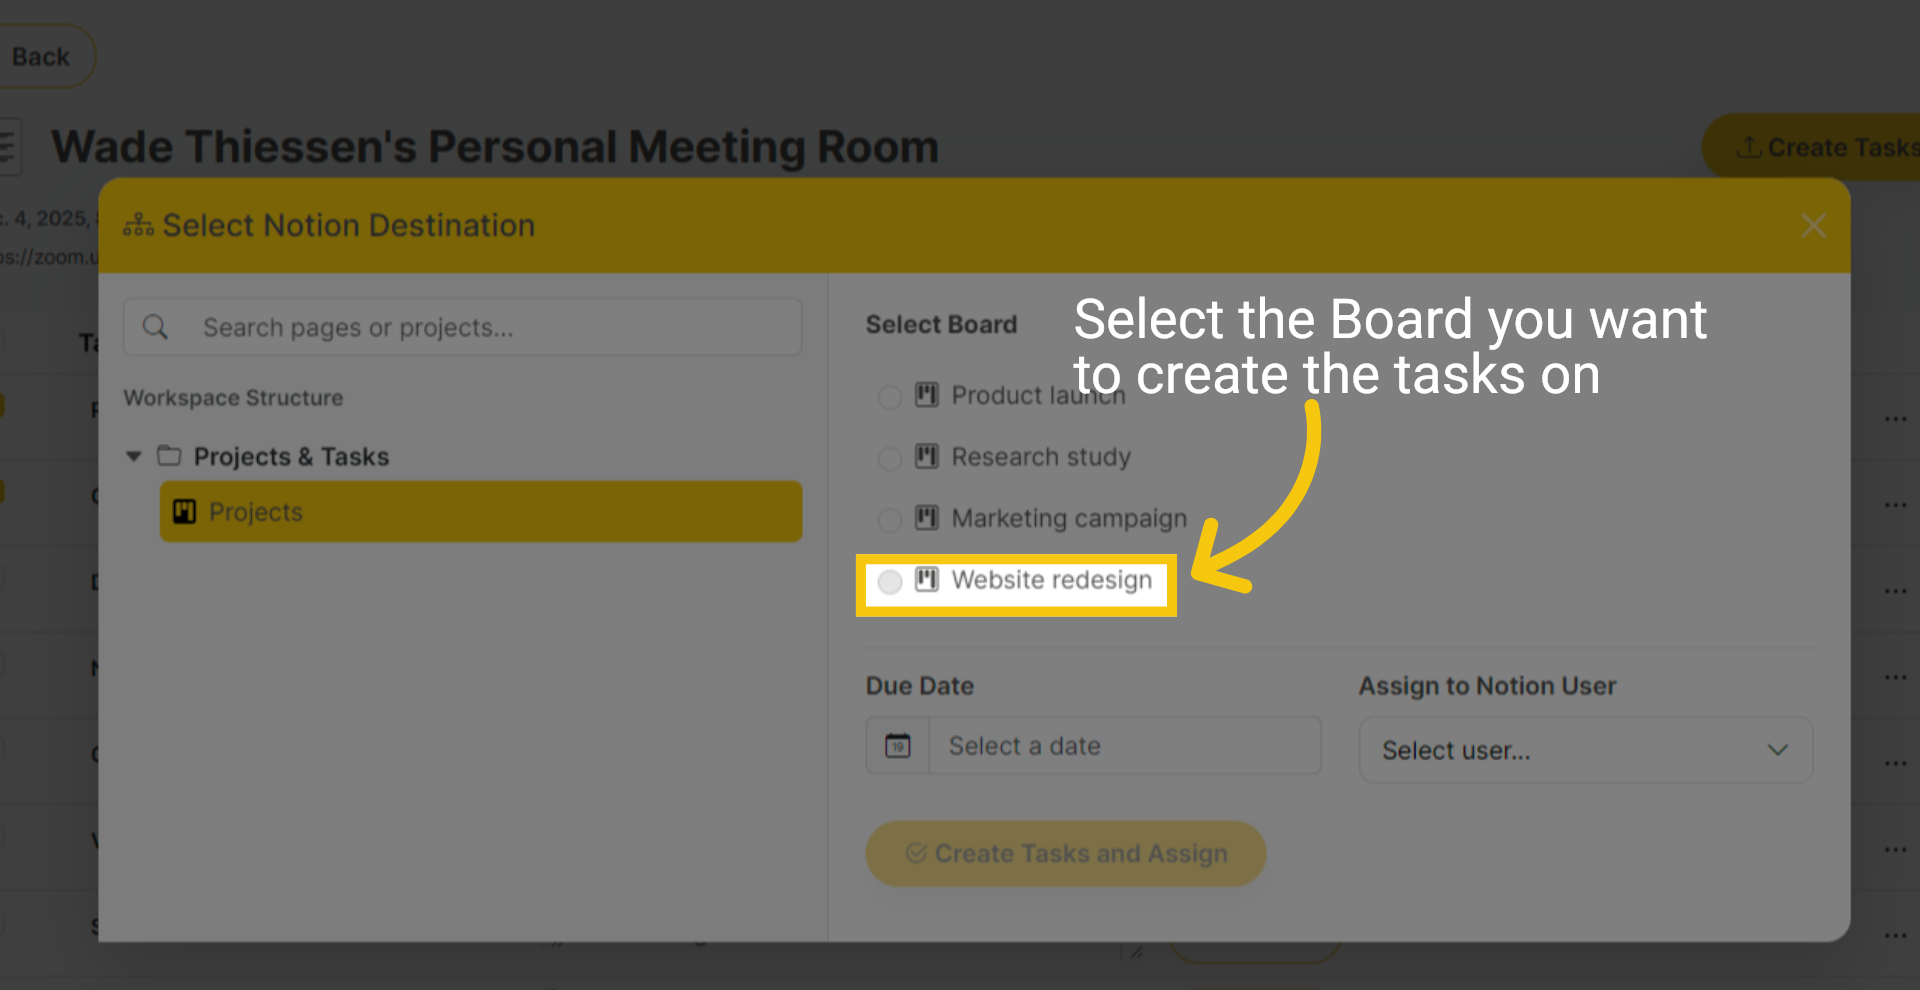
3 Select Board

Click on the Project Board you've already created in Notion, where you want to add your tasks.
Select Board

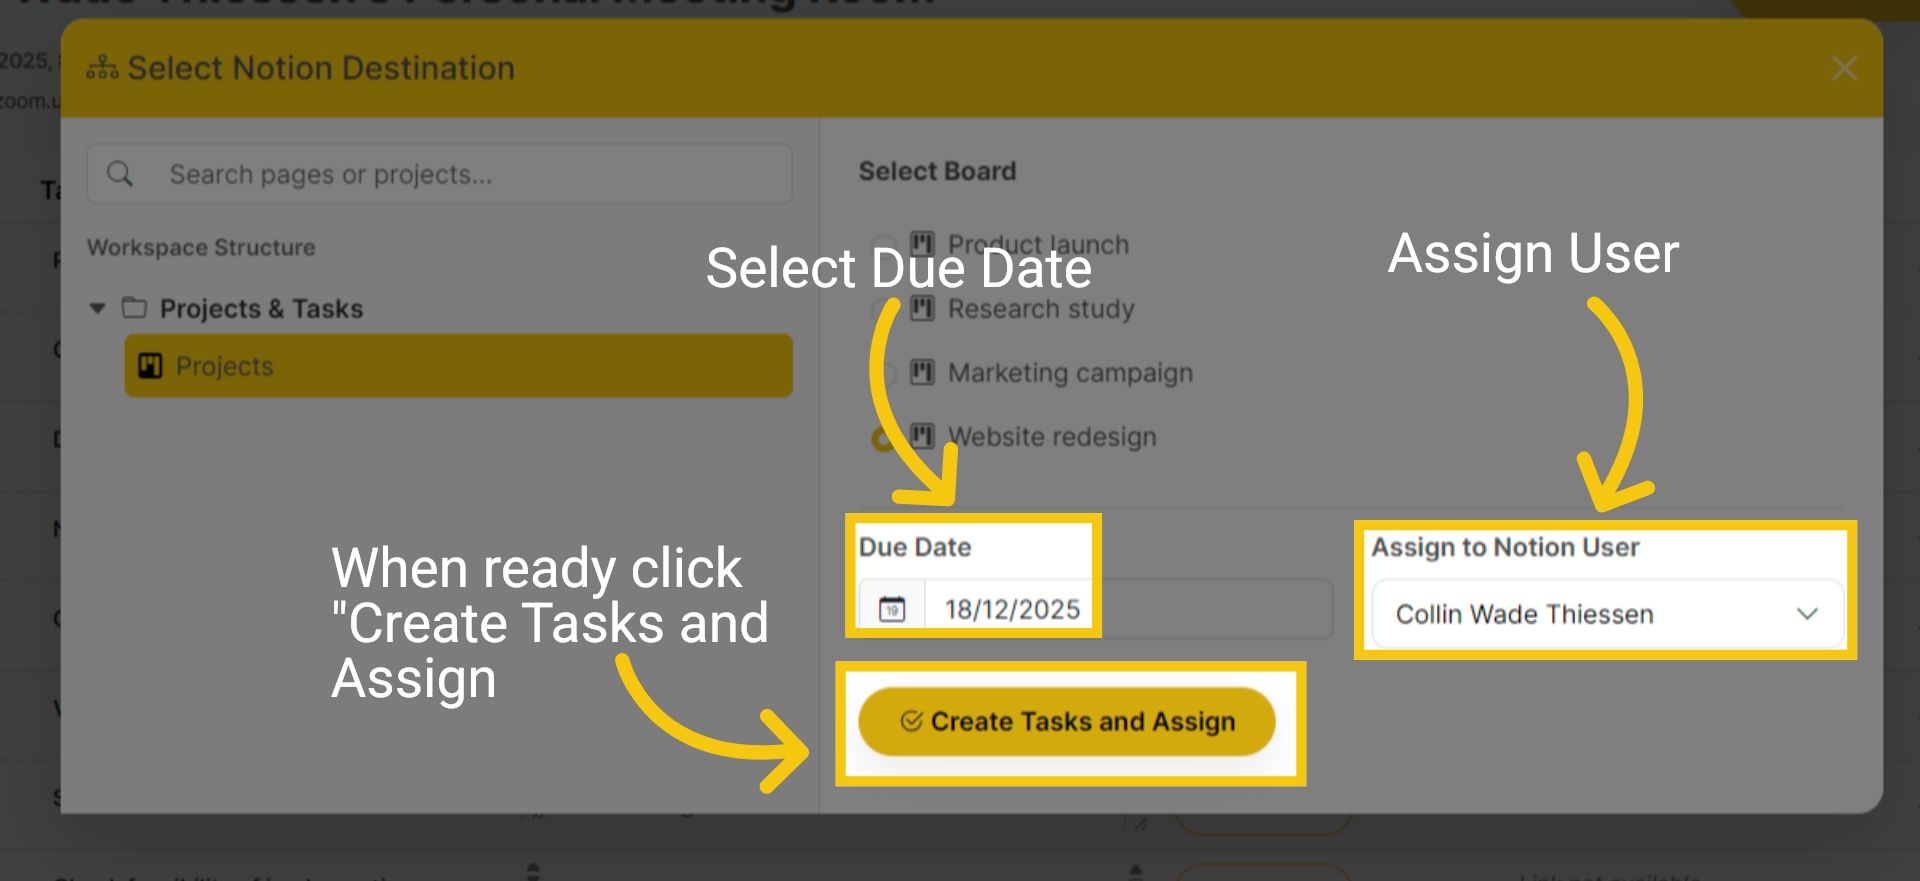
4 Finalize Task Creation

Choose the Due Date and Assign a User. Click on Create Tasks and Assign to finalize task creation and assignment.
Finalize Task Creation

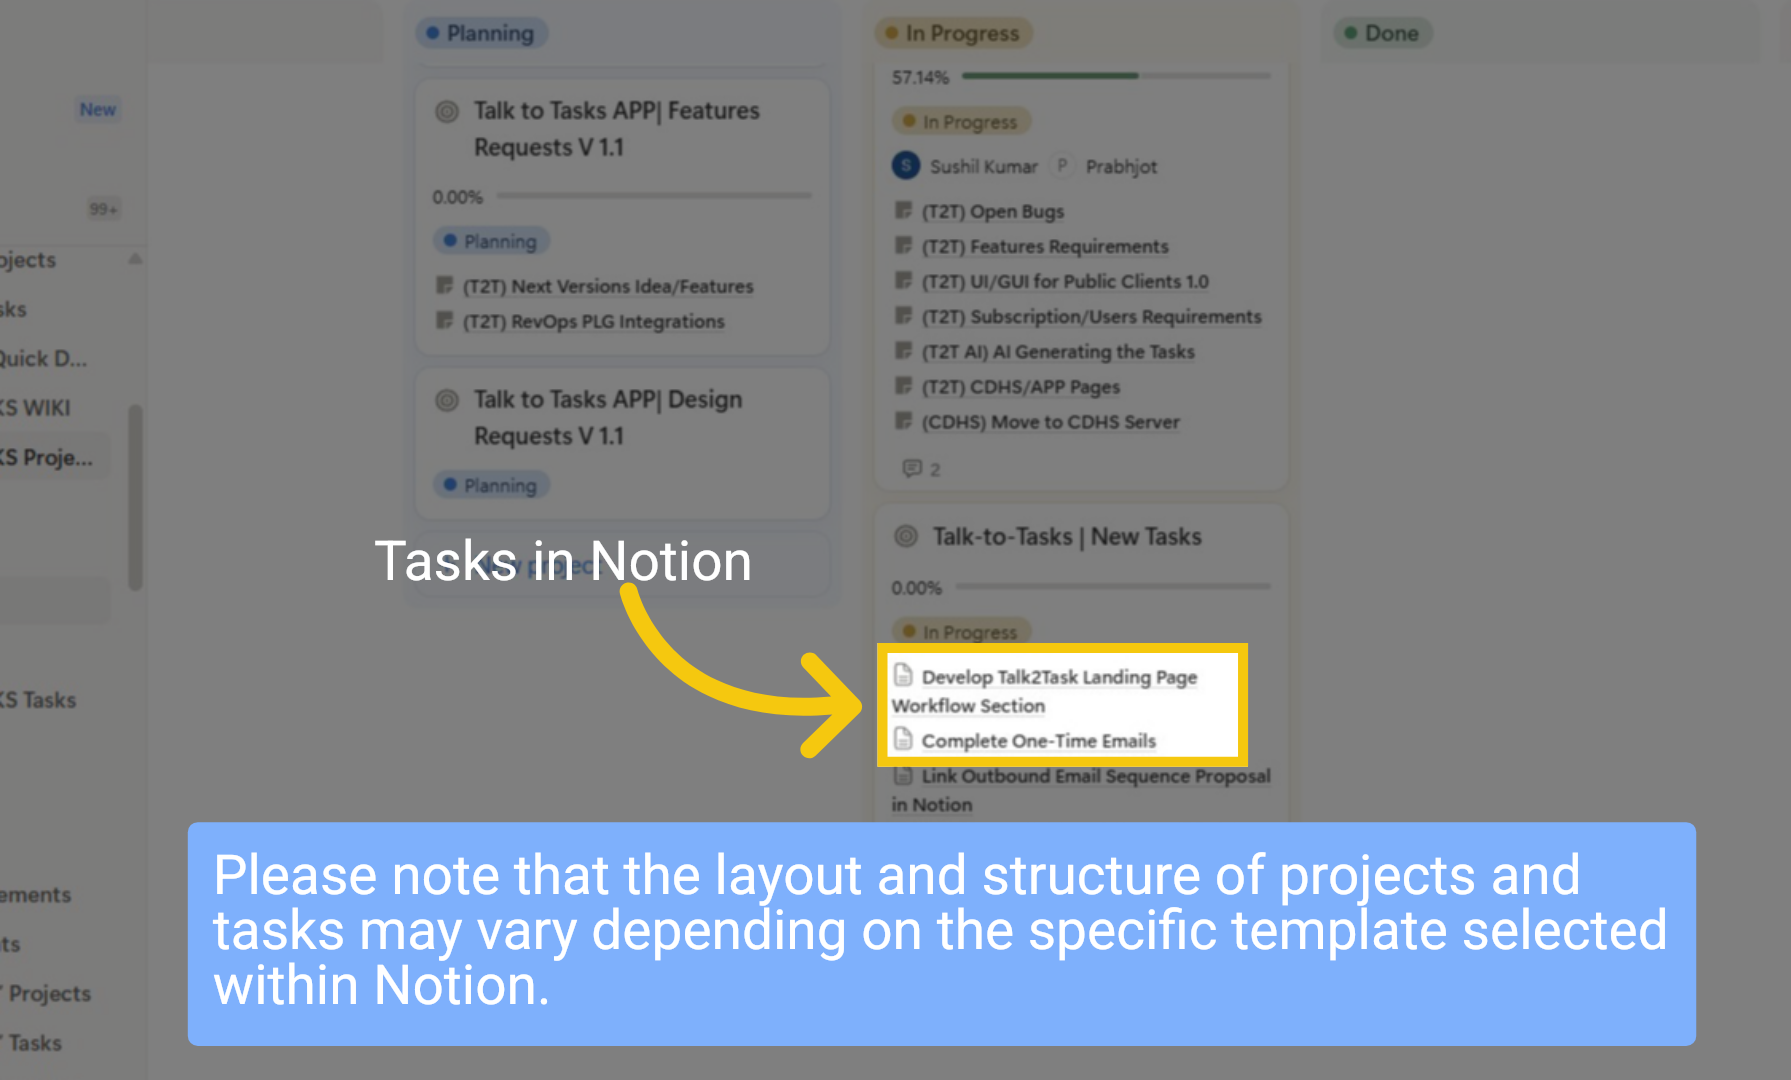
5 View in Notion

Now your task appears in Notion. Please note that the layout and structure of projects and tasks may vary depending on the specific template selected within Notion.
View in Notion
In this guide, you learned how to create and assign tasks for Notion from TALK-to-TASKS. Thanks for watching

Before you get started, please open your Slack settings using the link: Click Here
This will ensure everything connects smoothly. Once you’re in, follow the steps to complete your setup.

Create Talk Groups And Tasks From Slack Channel

In this guide, you will learn how to create tasks directly from a Slack channel. Before proceeding, ensure that your Slack workspace is already integrated with TalkToTasks, as this connection is required for the task creation feature to function correctly. Once the integration is set up, you can seamlessly generate and manage tasks within your Slack environment.

1 Initiate New Talk Group

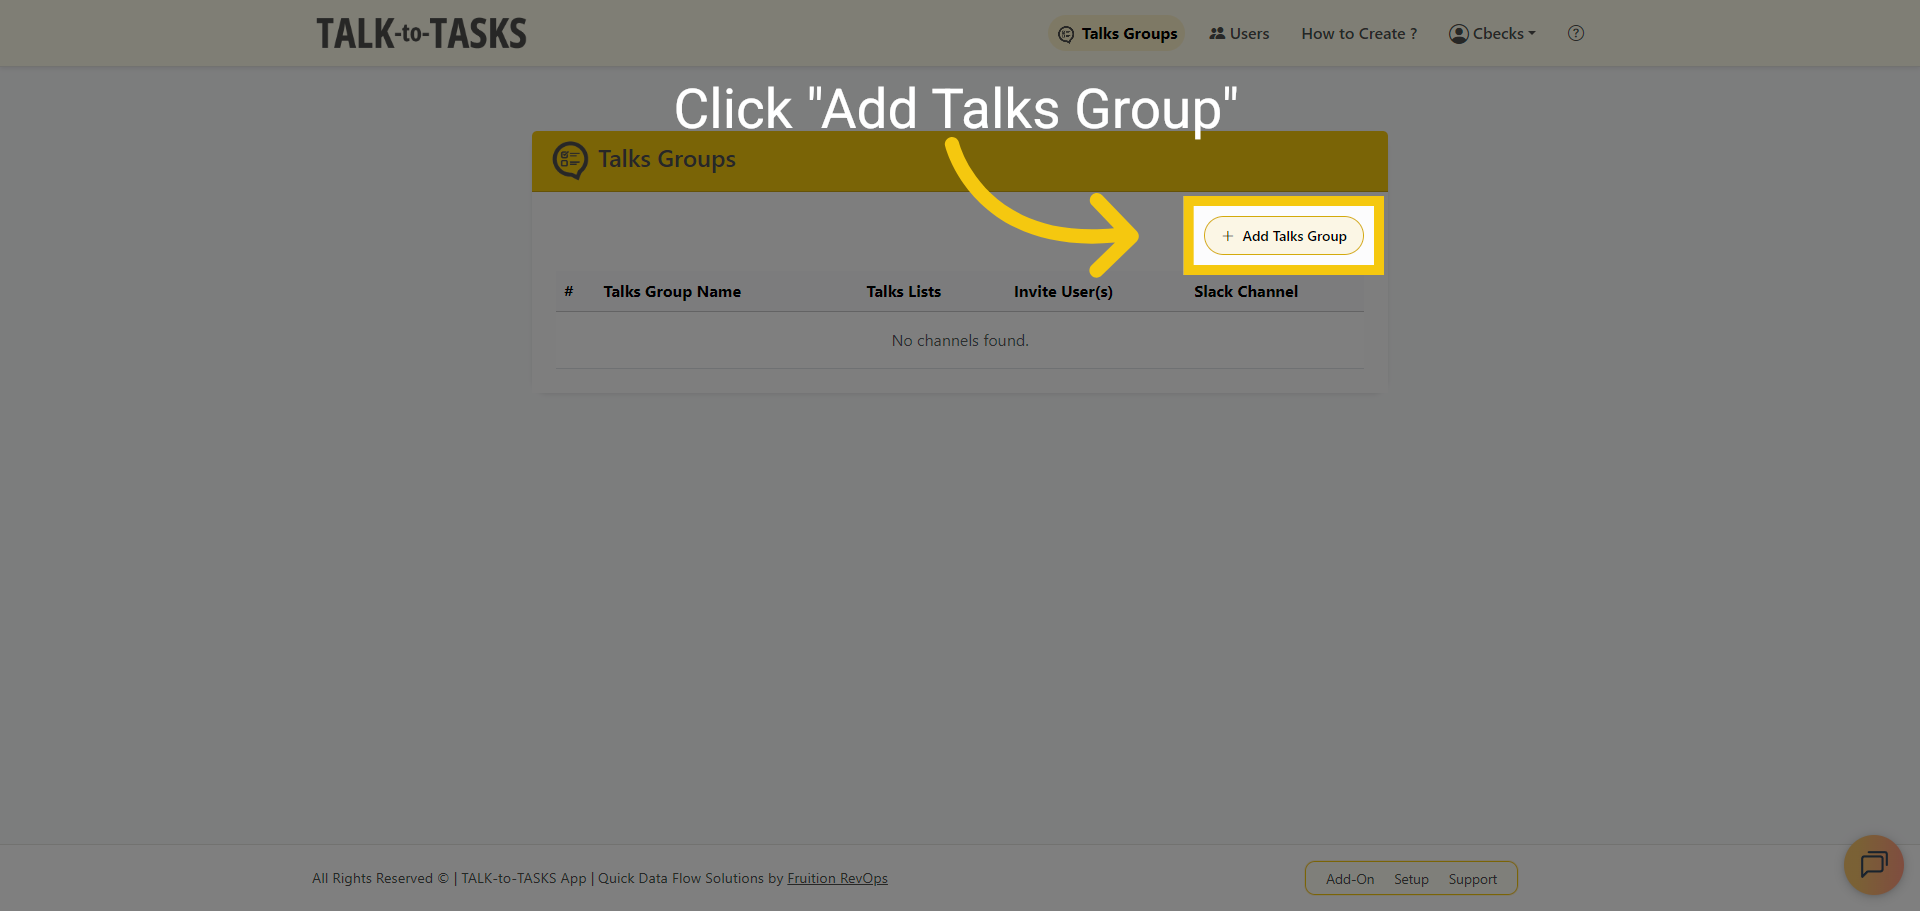
Click the Add Talks Group button to start creating a new talk group.
Initiate New Talk Group

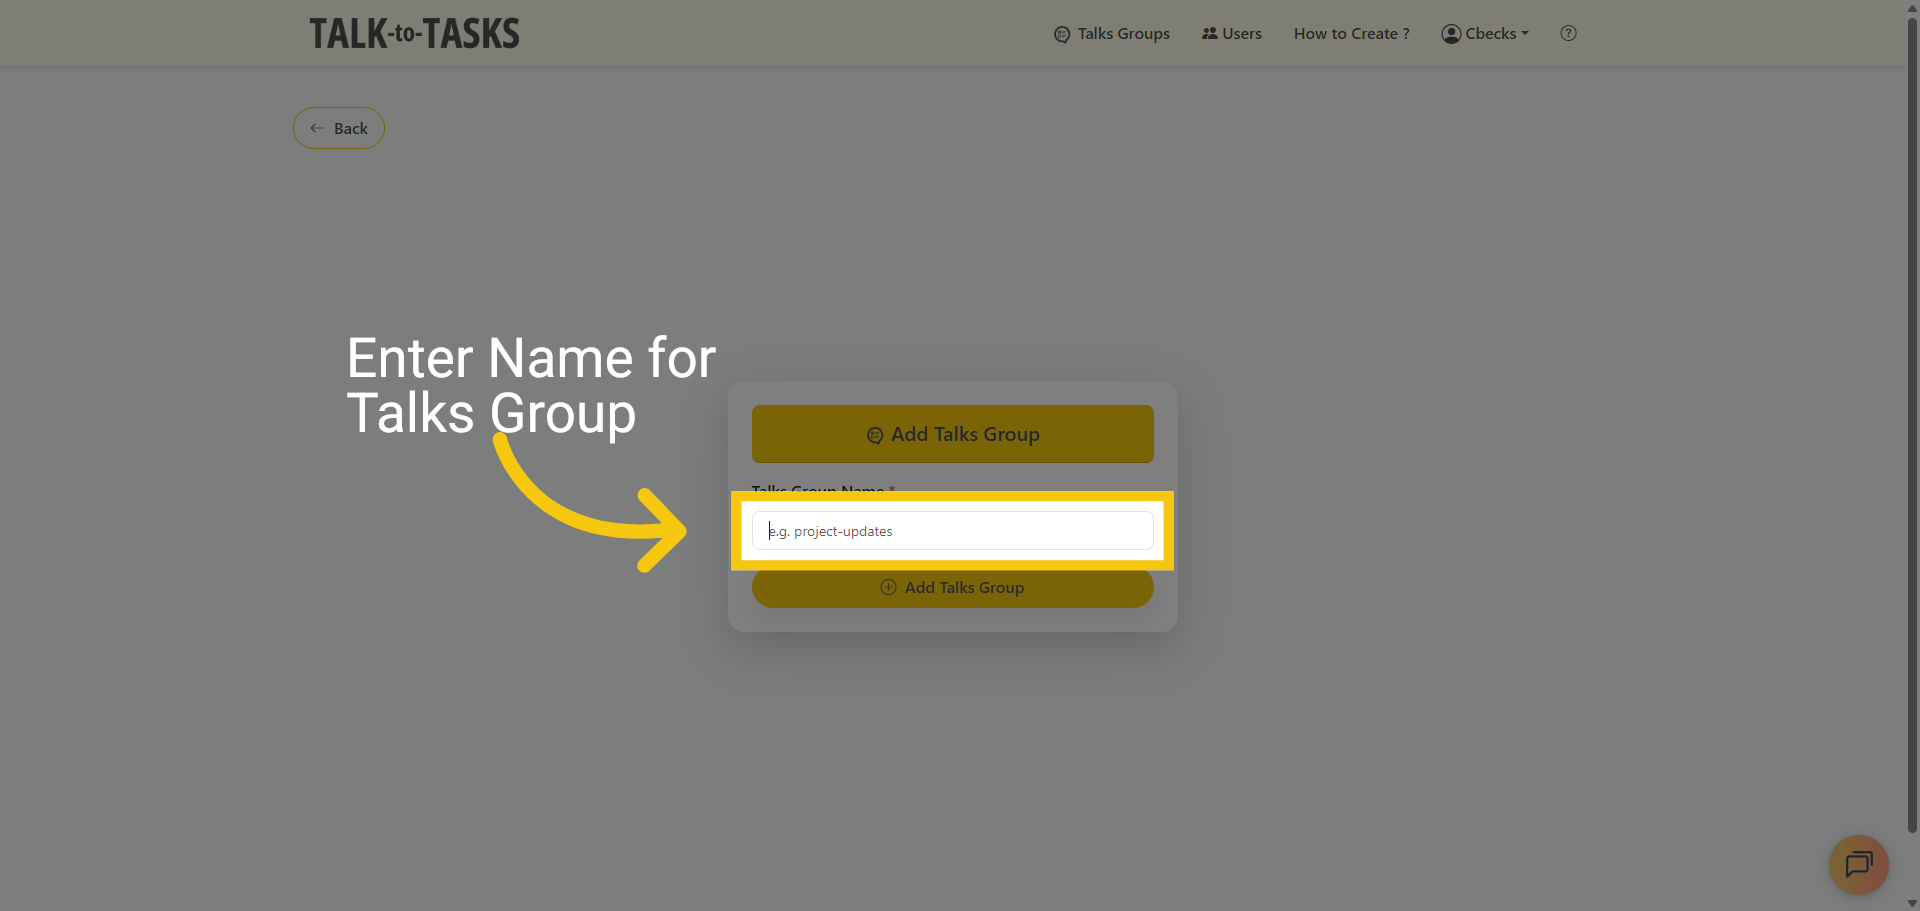
2 Enter Name for Talks Group

Click the Talks Group Name field to enter the name of the new talk group.
Enter Name for Talks Group

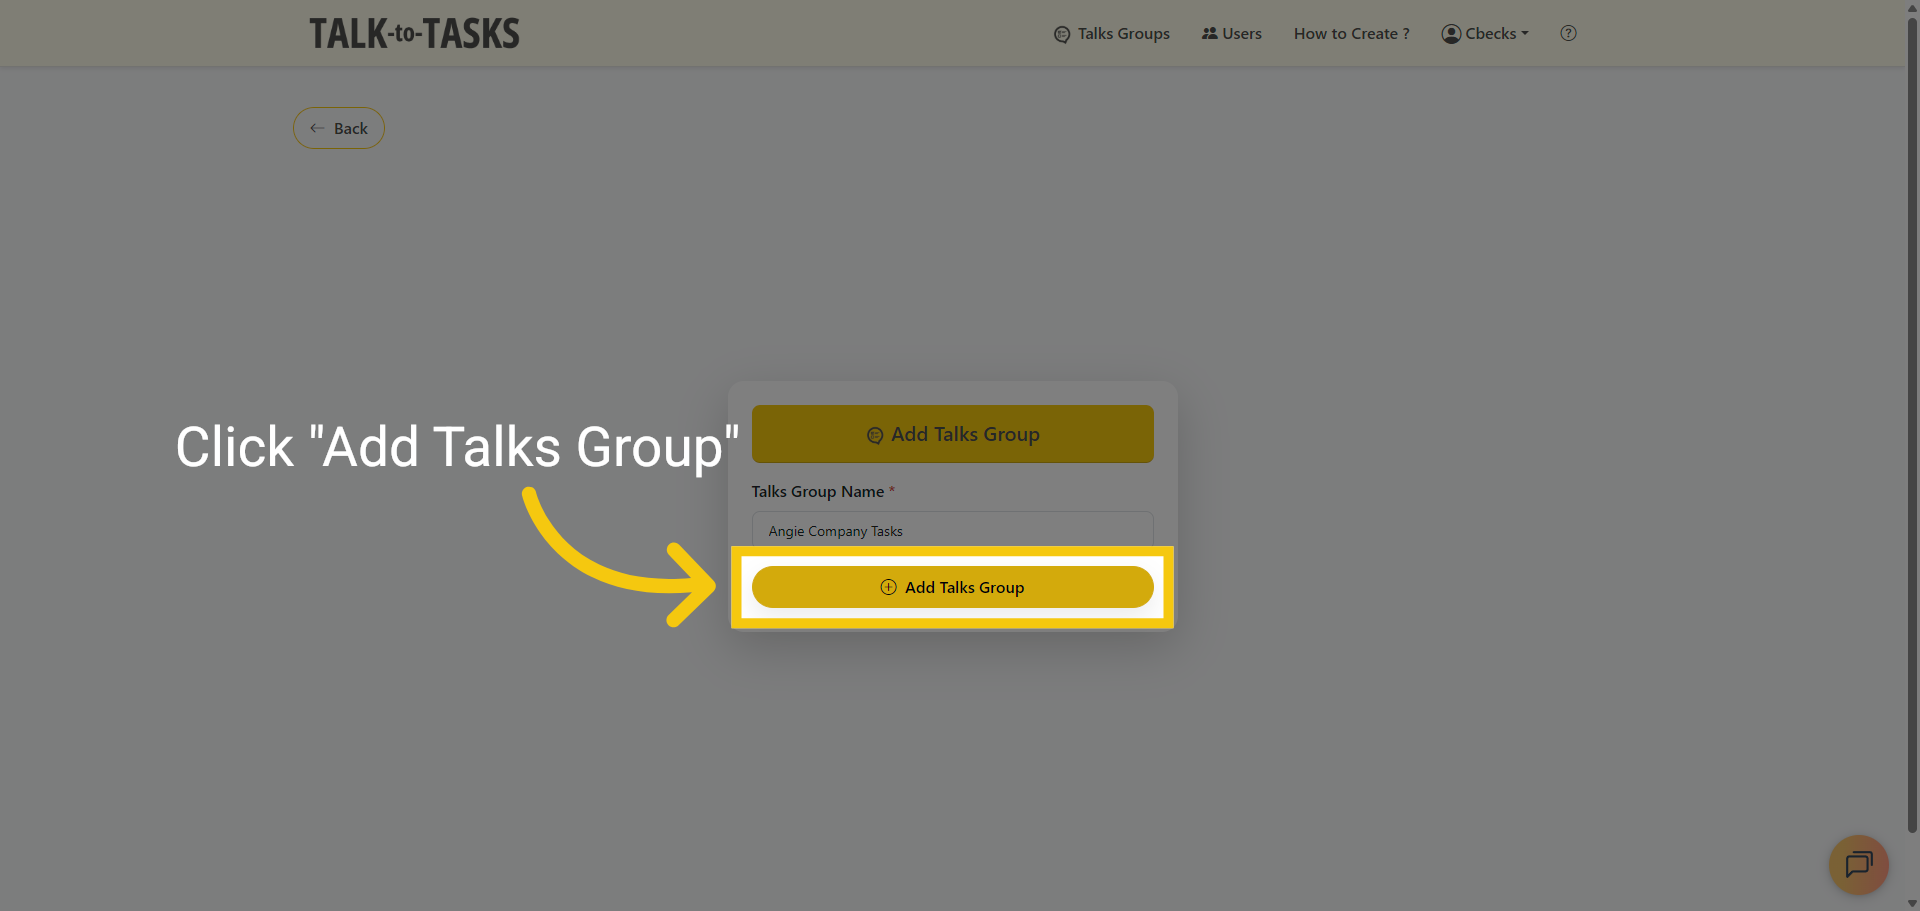
3 Confirm Talk Group Addition

Click the Add Talks Group button to save the new talk group.
Confirm Talk Group Addition

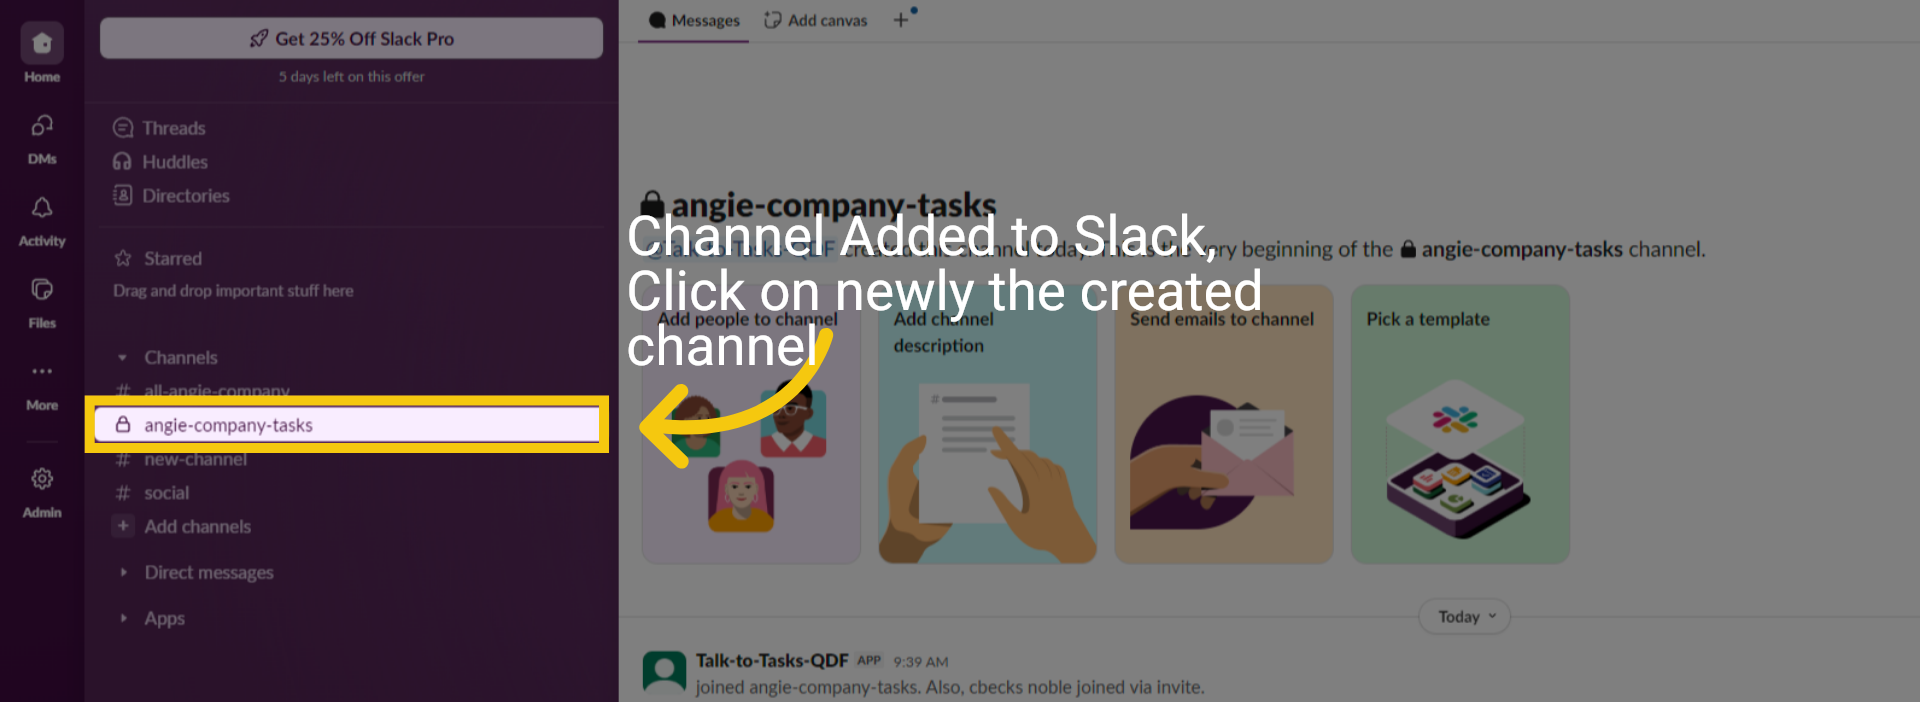
4 Switch to Slack

Switch to Slack, and your new channel will be created automatically. Channel Added to Slack, Click on the newly created channel
Switch to Slack

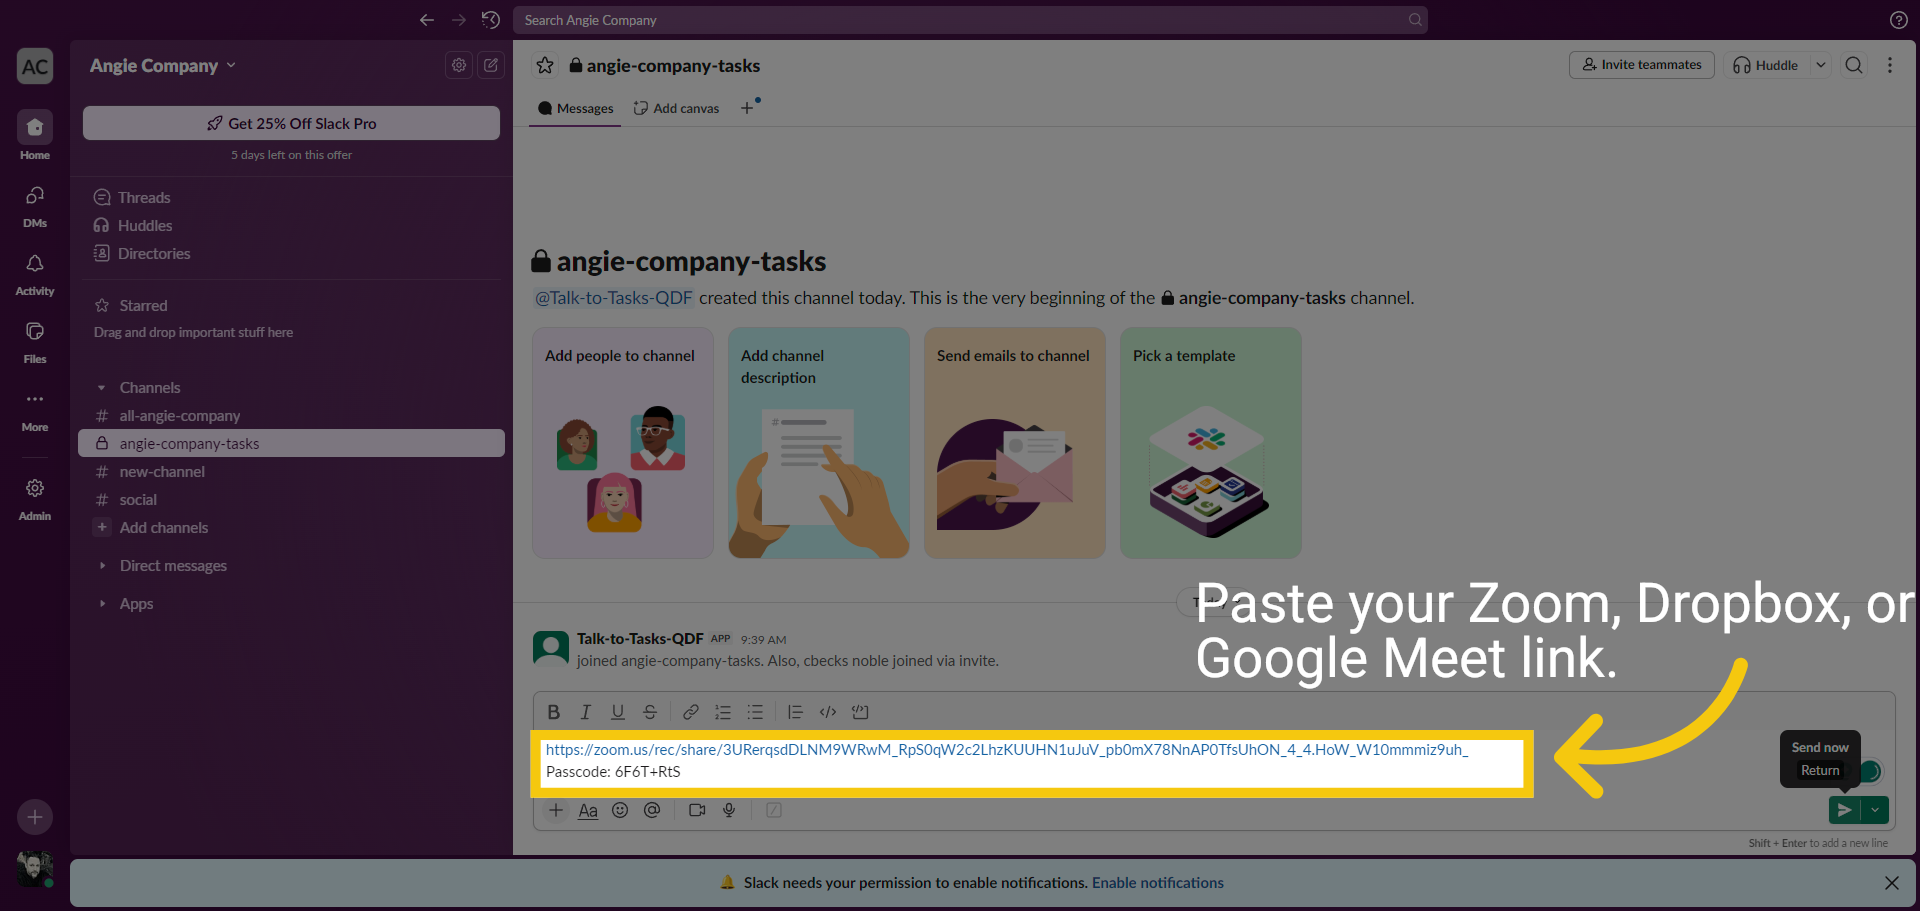
5 Paste Link into Slack

Paste your Zoom, Dropbox, or Google Meet link into the designated field, then click Send Now to create and process your task.
Paste Link into Slack

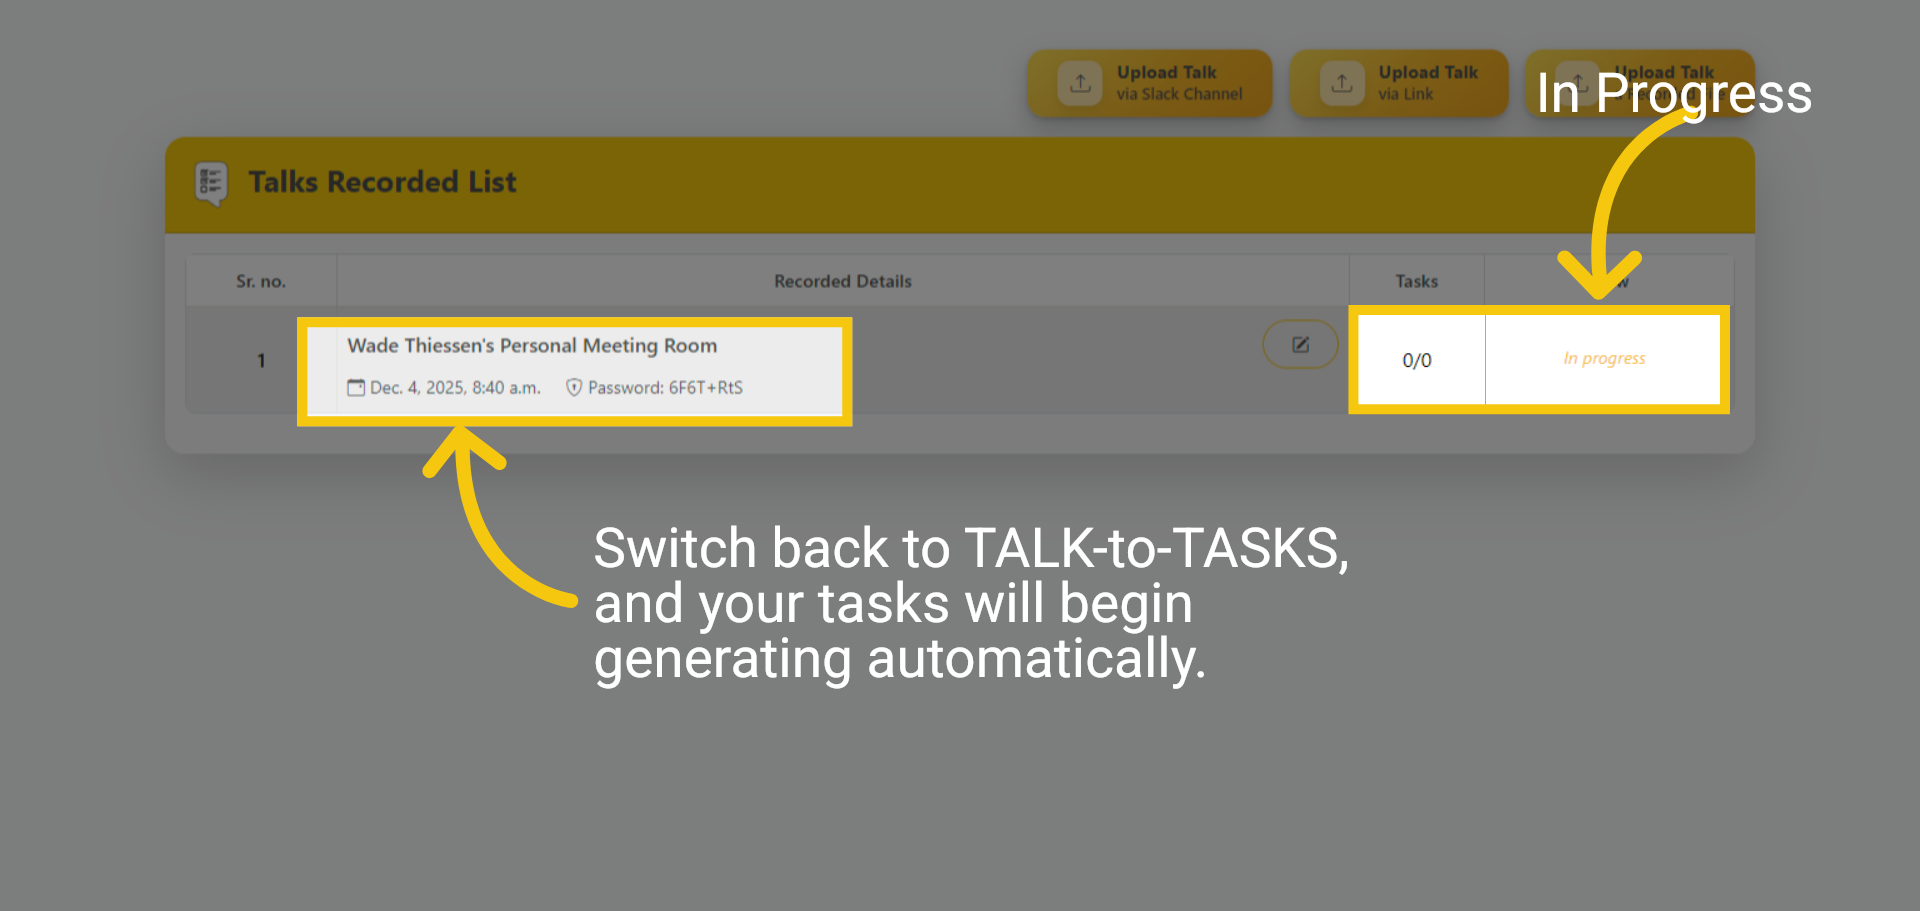
6 Switch Back to TALK-to-TASKS

Switch back to TALK-to-TASKS, and the Talk file will be listed, and the tasks will begin generating automatically.
Switch Back to TALK-to-TASKS

7 Refresh page Task in Progress

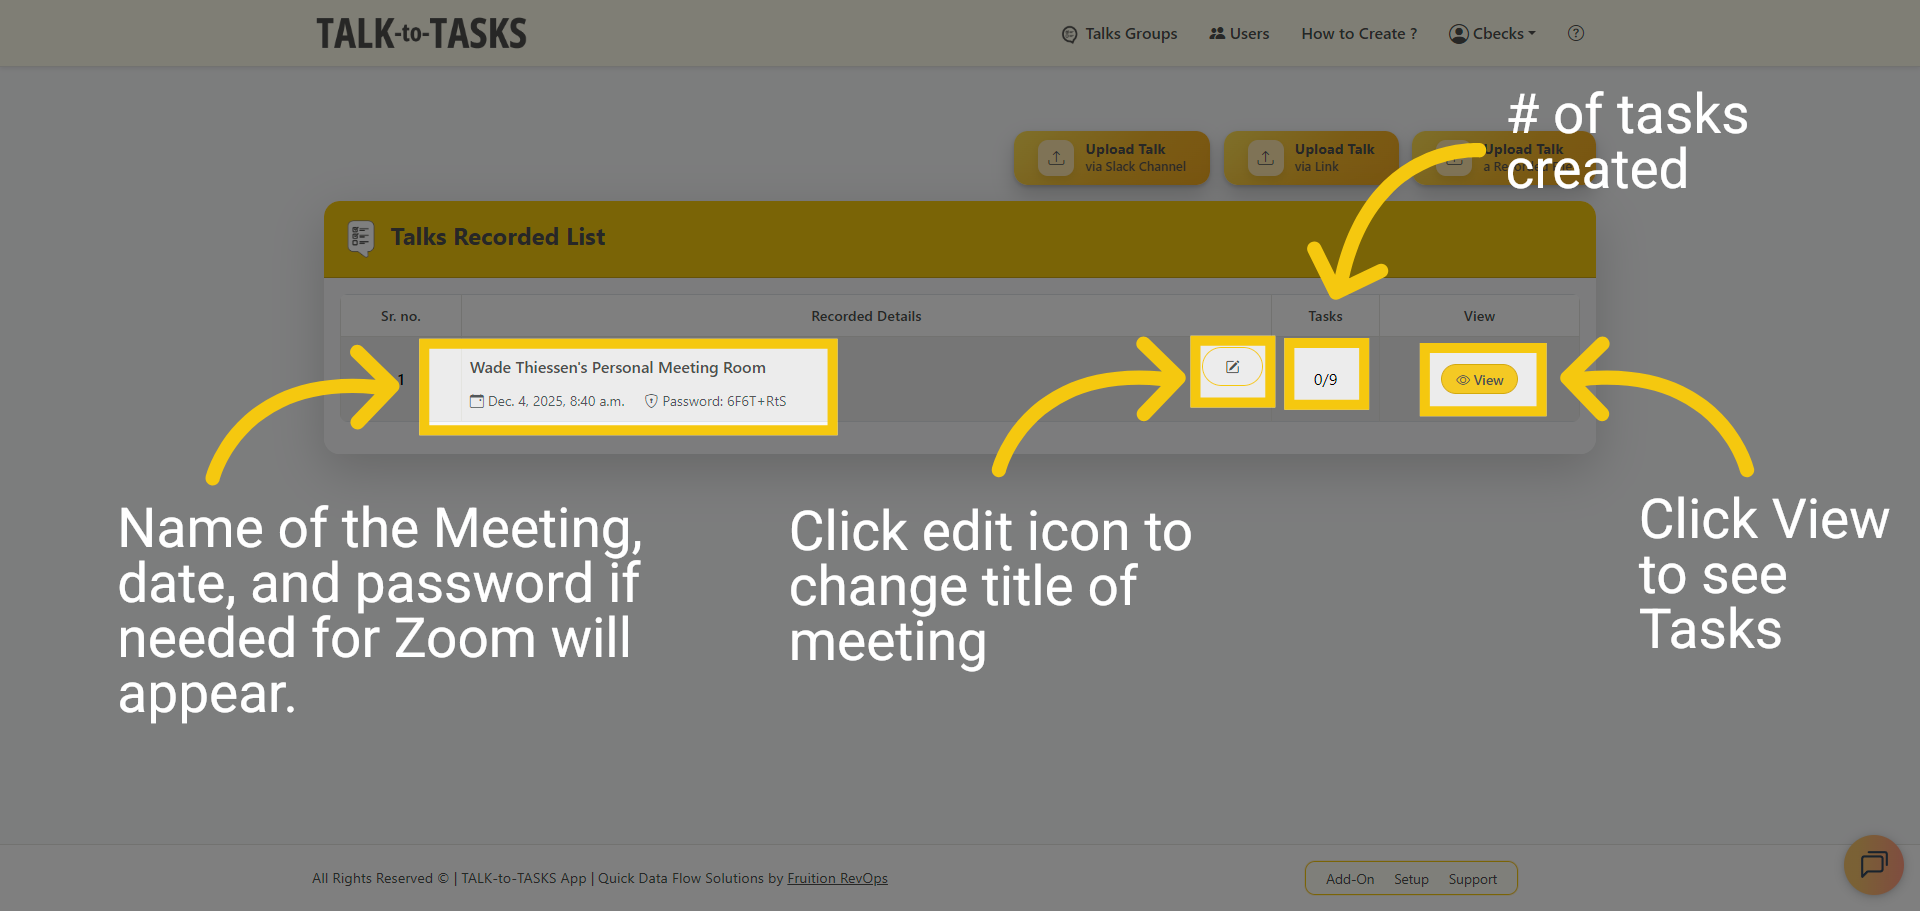
Please refresh the page. This process may take between 30 seconds and one minute, depending on the duration of your recording. The meeting name, date, and password (for Zoom links), number of tasks created, and icon to edit title are automatically added. For Google Meet or Dropbox links, confirm they are publicly accessible before pasting them into Slack so that the system can process them without restrictions. Click View to see the generated Tasks.
Refresh page Task in Progress

8 Generated Tasks

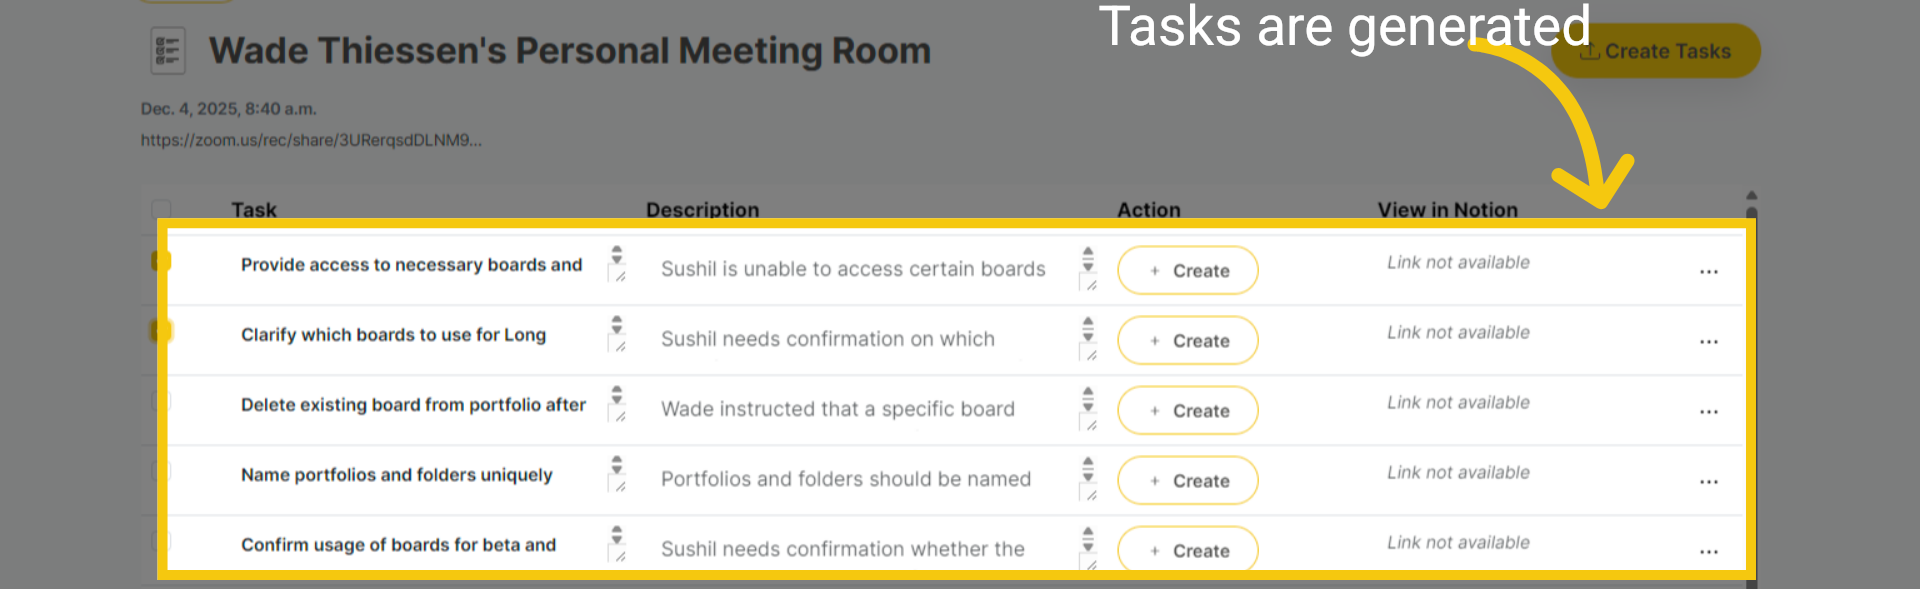
These are the generated tasks. Click on the title or description to edit them easily. You can also hide unnecessary tasks to maintain an organized and focused workspace.
Generated Tasks

9 Slack Thread

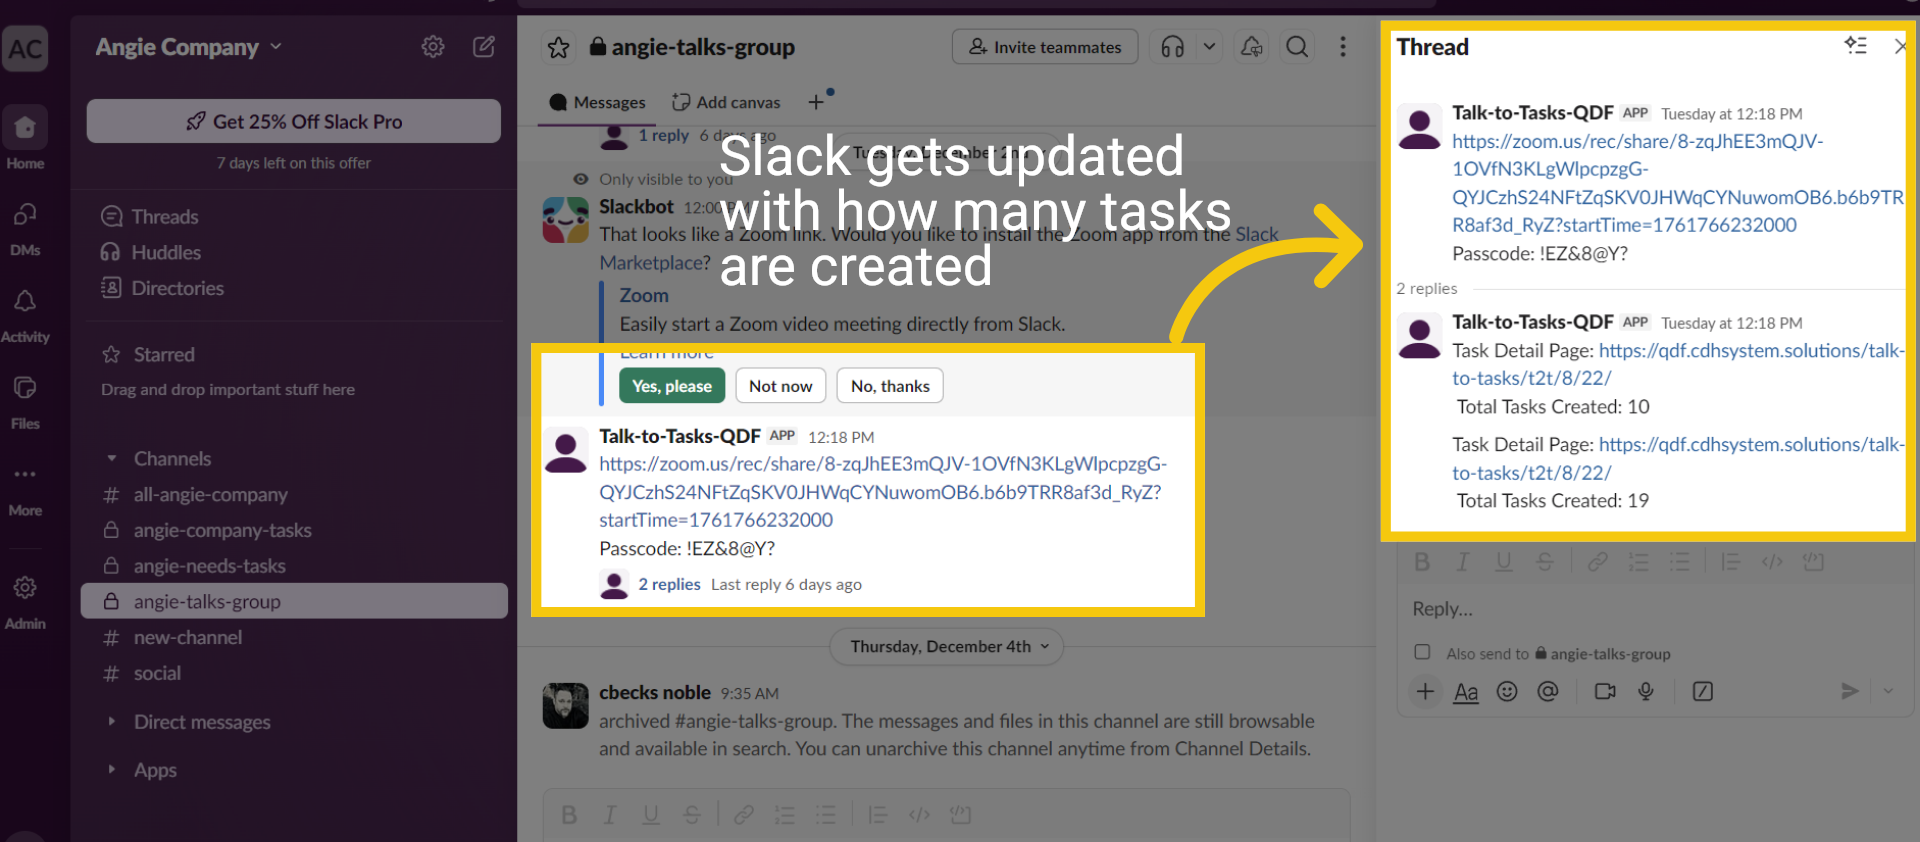
Slack gets updated with how many tasks are created in the thread. The thread can be used to communicate between team members.
Slack Thread

10 Ending

This procedure effectively creates a talk group and generates associated tasks from a Slack channel. Thanks for watching.
Ending
 Dashboard

Schedule a Time with our Expert!

— Fill out the Form and let's meet —

Fill out the form below to book your meeting to get your HubSpot Audit Report.
Schedule a meeting
Your HubSpot Onboarding Plan.

** Schedule to have you High level plan for free.

Funnel Types List

Register and Get the Funnel List type

Provide you with a complete overview of the type of funnel and how to manage it. 

JOIN OUR LIVE EVENT!

Wednesday, October 18th
10AM (PST)

Webinar Topic: Fix the Leak with Streamline Your Revenue Path with RevOps Funnels. 
How to seamlessly guide prospects through your company’s journey,

  1. Utilize the Funnels in Revenue Operations
  2. How to Prevent Bleeding Prospects and Customers in Your Company’s Journey
  3. How to Automate the Process for Enhanced Efficiency

RevOps Knowledge Sharing!

Fill out the form below, and blogs, videos and content will come directly to your inbox.